King
Full Fledged Farker
- Joined
- Jun 22, 2009
- Location
- O'Fallon, MO
I've been to enough parties this summer to see tons of mistakes when it comes to grilling. I want to stop them, but that is just rude. Often, I thank them for the grub and if they invite some suggestions, the first tip I give is using indirect heat or in this case....the 2-zone method.
I know most of the brethren think this is grilling 101, but I talk more about this subject than anything else not related to smoking.
I hope some find it useful or perhaps pass it along to other weekend warriors of the grill who hates flare ups and burnt meats.
The 2-zone method
The 2-zone concept is simple…create a hot and a cool side on the grill. The hot zone is the heat source using charcoal or propane for fuel. The cold zone is where you put your food. The radiant heat from the hot zone will cook the meat…this is more commonly known as indirect grilling.
Indirect grilling is a fool proof way against burning the food on the grill. The 2-zone method can be achieved on a either a charcoal or gas grill.
Here are photos that will be helpful in setting up the 2-zone method. Let’s start with a charcoal grill:
1. Open the bottom vents entirely.

2. Fill a charcoal chimney half way with charcoal (or about 45 briquettes).
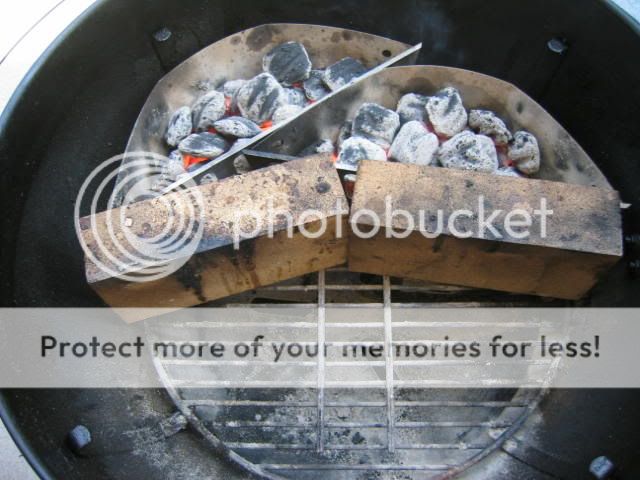
3. Pour the unlit charcoal out the chimney and bank them to one side of the grill.
4. Optional items: wood chips, wood chunks and a foil pan. Add the wood on top of the unlit charcoal and place a foil pan opposite from the charcoal (this will catch most of the fat drippings).

5. Fill the chimney with approximately 12-15 briquettes and light them.

6. When the briquettes look mostly white, dump them on top the unlit briquettes. This is the hot zone.

7. Place the grill grate back on and put the food on the cool side of the grill.
8. Put the lid on, place the top vents over the cool side. Do this because you want the heat and smoke to pass over the meat and out the vents.

9. Adjust the vents to open half way.

10. Check food every 10-15 minute, do not flip. Remove food when it has reached the desired internal temperature.

With that amount of charcoal and the configuration of the vents the temperature of the grill will be approximately 350-375 degrees.
If you want a lower temp, adjust by closing off the bottom and top vents. Adjust in small increments; closing the vents all the way will extinguish the fire because of lack of oxygen. Vice versa, to get a high temp, open the vents all the way.
Notes:

2. Control the heat by increasing or decreasing the amount of gas.
3. The opposite end is the cool zone, place food there.

4. Keep the cook chamber closed once the meat is on.
5. Don’t flip the meat. Check the meat every 10-15 minutes.
6. Remove meat when it has reached the desired internal temperature.
This configuration should get somewhere between 300-350 degrees. This range is still considered smoking temps, so ribs can be done on a gas grill!
Notes:
I know most of the brethren think this is grilling 101, but I talk more about this subject than anything else not related to smoking.
I hope some find it useful or perhaps pass it along to other weekend warriors of the grill who hates flare ups and burnt meats.
The 2-zone method
The 2-zone concept is simple…create a hot and a cool side on the grill. The hot zone is the heat source using charcoal or propane for fuel. The cold zone is where you put your food. The radiant heat from the hot zone will cook the meat…this is more commonly known as indirect grilling.
Indirect grilling is a fool proof way against burning the food on the grill. The 2-zone method can be achieved on a either a charcoal or gas grill.
Here are photos that will be helpful in setting up the 2-zone method. Let’s start with a charcoal grill:
1. Open the bottom vents entirely.
2. Fill a charcoal chimney half way with charcoal (or about 45 briquettes).
3. Pour the unlit charcoal out the chimney and bank them to one side of the grill.
4. Optional items: wood chips, wood chunks and a foil pan. Add the wood on top of the unlit charcoal and place a foil pan opposite from the charcoal (this will catch most of the fat drippings).
5. Fill the chimney with approximately 12-15 briquettes and light them.
6. When the briquettes look mostly white, dump them on top the unlit briquettes. This is the hot zone.
7. Place the grill grate back on and put the food on the cool side of the grill.
8. Put the lid on, place the top vents over the cool side. Do this because you want the heat and smoke to pass over the meat and out the vents.
9. Adjust the vents to open half way.
10. Check food every 10-15 minute, do not flip. Remove food when it has reached the desired internal temperature.
With that amount of charcoal and the configuration of the vents the temperature of the grill will be approximately 350-375 degrees.
If you want a lower temp, adjust by closing off the bottom and top vents. Adjust in small increments; closing the vents all the way will extinguish the fire because of lack of oxygen. Vice versa, to get a high temp, open the vents all the way.
Notes:
- A consistent temp can be maintained for about 2 hours in this configuration. Check the amount of fuel every 30-45 minutes, add more briquettes (10 or 12) if the temps start to drop.
- Grill marks cannot be achieved using this method. However, to get those great grill marks you need 1) cast iron grates 2) oil, butter or a sugar based rub/liquid 3) a very hot grill, 600+ degrees. If have the ability to do these things, after coating your meat, sear it with the lid off. Then, put the meat on the cool side and put the lid back on until the meat reaches desired doneness.
- Searing your steak or other meats does not lock in the juices, it only creates a flavor crust which is most delicious.
- If you like the flavor of burnt meat, move the food over to the hot side for the final few minutes or so.
- Crisp up that chicken skin or bacon by moving it over to the hot side for the final few minutes.
- Fill the foil pan with water, juice or beer to create some moisture in the cooking chamber. Humidity keeps meat from drying out.
- Using the 2-zone method isn’t hard on a steel grill grate. The lower temps prevent the meat from sticking to the grate which over time causes corrosion and rust. Use a grill brush before and after cooking to remove any debris or residue..
- Turn on 1 end burner (this is the hot zone) on low.
2. Control the heat by increasing or decreasing the amount of gas.
3. The opposite end is the cool zone, place food there.
4. Keep the cook chamber closed once the meat is on.
5. Don’t flip the meat. Check the meat every 10-15 minutes.
6. Remove meat when it has reached the desired internal temperature.
This configuration should get somewhere between 300-350 degrees. This range is still considered smoking temps, so ribs can be done on a gas grill!
Notes:
- To create smoke, use wood chips (not soaked in water) and stuff it in a foil pouch. Poke many holes in the foil envelope and place it directly over the flame. Have multiple pouches on standby in case you need more smoke.
- Again, to char or crisp up the meat/chicken skin, grill directly over the hot side the last few minutes before it’s done.
- If you want grill marks, first crank the fire on all the burners to maximum heat. Sear the meat, and then start at step 1.
USDA Recommended Safe Minimum Internal Temperatures
- Cook all raw beef, pork, lamb and veal steaks, chops, and roasts to a minimum internal temperature of 145 °F as measured with a food thermometer before removing meat from the heat source. For safety and quality, allow meat to rest for at least three minutes before carving or consuming. For reasons of personal preference, consumers may choose to cook meat to higher temperatures.
- Cook all raw ground beef, pork, lamb, and veal to an internal temperature of 160 °F as measured with a food thermometer.
- Cook all poultry to a safe minimum internal temperature of 165 °F as measured with a food thermometer.