THE BBQ BRETHREN FORUMS

Welcome to The BBQ Brethren Community. Register a free account today to become a member and see all our content. Once signed in, you'll be able to participate on this site by adding your own topics and posts, as well as connect with other members through your own private inbox!

ferincr

Is lookin for wood to cook with.
Joined
Feb 9, 2019
Location
Curridabat, Costa Rica
Name or Nickame
Fernando
Hi guys/gals:
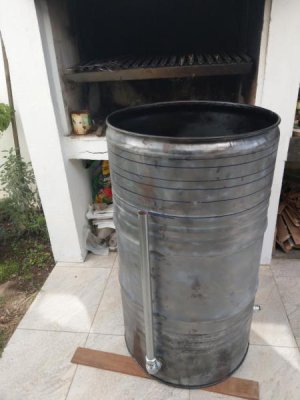
I'm very new here, I'm in the process of building another UBS.
I'm from Argentina so I'm not new to the concept of fire + meat but we do it way different down there.

I've been living in Costa Rica for many years now and here everything is different (meat and fuel).
Last time I was in Argentina just for S&G I compared a bag of charcoal (I think you call it lump) not the brickets, and for the same size bag the weight is twice as much there, anyway real BBQ (asado) men (sorry I don't mean to be sexist but is the way it is down there) use wood there, so do I here.(at least up until now...).
So...
I've been reading quite a bit and saw quite a few videos and decided to take the jump into the unknown, or a different way to cook (it would probably get me excommunicated from my people but as long as it keeps my hands greasy and my belly full I'm not too worried :razz:

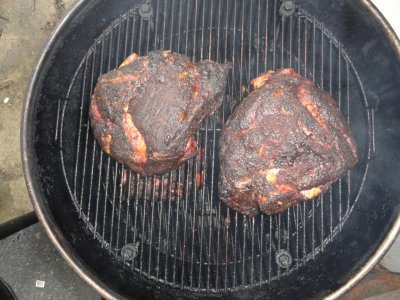
Meat quality is not the best so I decided the low and slow is the best approach. I've been doing my own sausages and cured salami/capocollo/ prosciutini for a while and some smoke salmon (cheated there, used liquid smoke) so therefore the UDS. I think is the next natural step...

Since this is a new territory for me, and I know temps should be something in the 220~250 degrees (on your weird scale :mrgreen::mrgreen::mrgreen:)

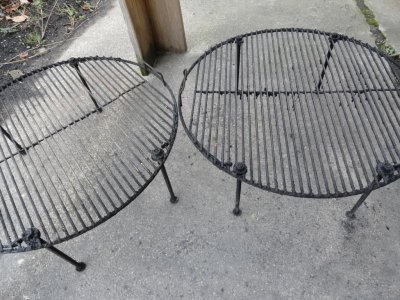
I thought of using those shelf brackets to be able to place the grills but they are quite expensive here so I'm going with the three screw approach to keep costs down and I'd like to have two grills.
Also building a heat deflector made of 1/8 steel sheet with few holes around to avoid the center over heat.

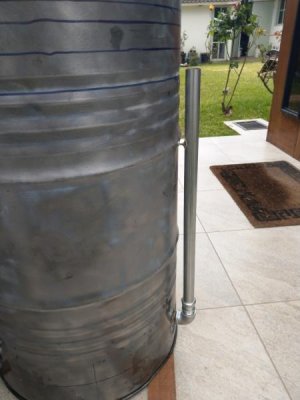
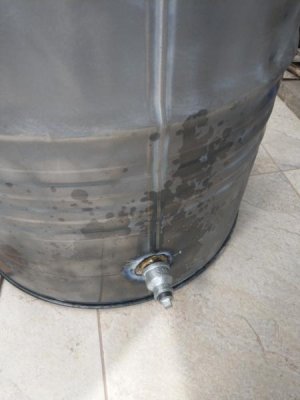
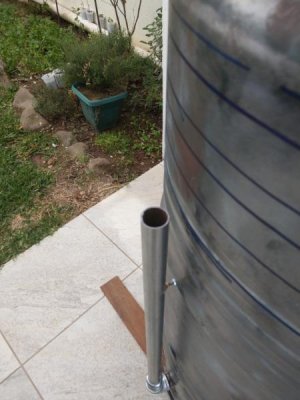
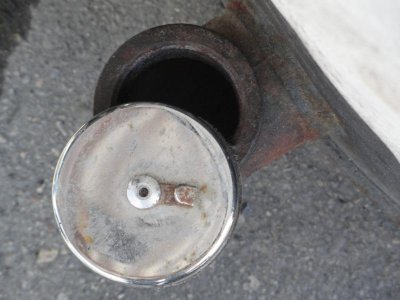
I have 3 x 1" intakes, one is capped (but I could not get a 1" cap so I have the option to have it open or reduced to 1/2" or closed The other 2 I'm not planning on using ball valve but some flanges with sliding covers to regulate intake.
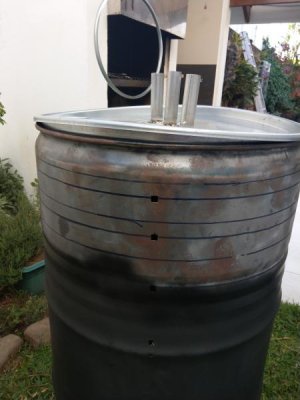
On the lid I'll put 3 x 1" exhausts (which I read is about what you need) hopefully they would be adjustable too and I also have one 2" cap (the one that came in the drum lid).

I'm not going to start asking question that are answered everywhere but I'd like to know what do you guys think is the shortest distance between the fire basket (heat source) and the bottom grill? if you have a heat deflector?

I attach some pics of what I have so far...

Thanks for any input...
Fernando
 

Attachments

  • IMAG0338.jpg
    IMAG0338.jpg
    31 KB · Views: 444
  • IMAG0339.jpg
    IMAG0339.jpg
    25.9 KB · Views: 440
  • IMAG0340.jpg
    IMAG0340.jpg
    38.1 KB · Views: 442
  • IMAG0341.jpg
    IMAG0341.jpg
    26.7 KB · Views: 437
  • IMAG0342.jpg
    IMAG0342.jpg
    33.7 KB · Views: 437
I'm not going to start asking question that are answered everywhere but I'd like to know what do you guys think is the shortest distance between the fire basket (heat source) and the bottom grill? if you have a heat deflector?Thanks for any input...
Fernando
You could probably go less, but 50mm/2" would be the distance from the top of the coal basket to the deflector plate grate.
I'd go 100mm/4" more up to the bottom cooking grate. In case you want to use a drip pan on the deflector grate at times. If that makes sense.
I use magnets to cover/adjust my intake openings.
 

Attachments

  • uds vent 6.jpg
    uds vent 6.jpg
    50.1 KB · Views: 381
I built a second stubby UDS which is a UDS that I removed a section from the middle and riveted it back together. OAL top to bottom is 26". My fire basket sits 7.5-8" high and I have a steel heat deflector sitting over that a few inches and it measures 10" (I think) high. I have a bottom grate that sits probably (gosh I don't know at the moment) 4-4.5" above the deflector. Then a second rack sits on 4 legs about 4.5 high over that rack and is 7" down from the lid. I can't recall (once again grrrr) which member from this site gave me this idea about the legs several years ago but it is not my original idea. Thanks to whichever member that was.

FWIW I haven't done 2 loaded racks yet to test it all out but I suspect a rotation on longer cooks will be needed so to simplify things, (and not have to worry about transferring meat from one rack to the other), each rack has 4 legs so all I have to do is pull first rack and sit on grill table with meat on it, then pull second rack and sit it down on table then reinstall first rack on bottom location. I will try to see if I can dig up some pics and post them for you to see what I am talking about.
 
Last edited:
I dug some pics out of my deleted bin. You can see in the one how the top rack stands on the bottom rack. Disregard everything else about that pic as it was sitting in another drum that had a weber lid so it was near the top of the drum. But you can still get the idea. Currently I have put heavier bolts in and as stated in first post both racks have legs for easy rotation. Note on the last pic..I decided to throw that in for S&G. I can put charcoal on my top rack which is around 7.5" below the top and set that attachment on the drum for grilling. It is just an old lid that I cut the center out of and put a Weber grate in the middle of. Fits right on the drum in case I ever just want to grill burgers or dogs. :)
 
Last edited:
Thanks guys!

@Ebijack, that was wht I was thinking (something between 2"~4" from the fire basket to the deflector so it can breathe.
Do I understand you correctly that I can put the bottom meat rack just another 4" above that? If so that is great, I thought that it would need about 20" or more.
I can't get any spare Webber parts here so I have a flat lid and therefore I wanted to have options for grill heights.
As for the magnets, I'll have to weld some sort of flanges on the end of the tubes since I used metal electrical conduit pipes and they have a thin wall but yes anything but expensive ball valves.

@cmwr
Liked the idea of adding legs to the cooking grates!!! I would probably do that too (for the same reason you did).
I'll probably work on my ash tray and fire basket today...
Fernando


I wasn’t trying to hijack your thread with all my pictures so I apologize for that!. I posted early this morning before I was fully woke up with coffee LOL! Nice looking smoker by the way.
 
I never thought you were hijacking anything and sorry if I might have implied so...
Anyway... a little break from welding my ash tray that fits perfectly the U of the smoker.
Hopefully I can finish the fire basket and the heat deflector today (a bit ambitious...)
Fernando
 
I never thought you were hijacking anything and sorry if I might have implied so...
Anyway... a little break from welding my ash tray that fits perfectly the U of the smoker.
Hopefully I can finish the fire basket and the heat deflector today (a bit ambitious...)
Fernando

Oh no it’s cool man. You never implied anything. It was just me thinking about my earlier post and thinking I probably shouldn’t of posted all those pictures LOL. Nothing you did.
 
Do I understand you correctly that I can put the bottom meat rack just another 4" above that? If so that is great, I thought that it would need about 20" or more.
Yes most aluminum drip pans are 3" tall. So having 4" for total height, allows enough air flow that the bottom of the meat cooks also. If that make sense.
6" X 3/8" bolts for legs. Allows plenty of room for large porkbutts. Easy grate rotation. NO tipping of grates. Straight in/out. Set on ground to rotate.
 

Attachments

  • cook grates.jpg
    cook grates.jpg
    100.9 KB · Views: 301
  • 4 butts UDS (1).jpg
    4 butts UDS (1).jpg
    95.6 KB · Views: 302
Yes most aluminum drip pans are 3" tall. So having 4" for total height, allows enough air flow that the bottom of the meat cooks also. If that make sense.
6" X 3/8" bolts for legs. Allows plenty of room for large porkbutts. Easy grate rotation. NO tipping of grates. Straight in/out. Set on ground to rotate.

I did upgrade my legs from 5/16 bolts to 3/8 as ebijack said. It made a difference but they are also only as sturdy as the racks they are bolted to. If you use cheap aftermarket grates they will also work but they will be more flimsy than a Weber grate which is sturdier. And as ebijack said straight in and out if both racks have legs. You will have to put legs 90 degrees opposite on each rack otherwise your legs will be sitting on the heads of the bolts on lower rack which doesn’t work so well. Good luck!
 
I'll have to build my own grates and I'm thinking of using 3/16" stainless steel for the outer rim and 1/8" for the inside grills.
Anyway, I already drilled the holes on the drum for the screws that would hold the grates :sad: so I think I just use those for holding them inside but I might add three short legs on each just to be able to stand them over surfaces as cmwr mentioned.
But I'm done for today, I did the Ugly ashtray and the Ugly fire basket and the Uglier heat deflector.:mrgreen:

If you already drilled holes you might as well use them but my drums always have extra holes cause I change my mind so much. If need be just stick a short dummy bolt in to seal the hole if you decide not to use it. I like to use stainless acorn nuts on the outside of my drum to look pretty and to a bystander they have no idea if the extra nuts do anything or not.
 
When are we going to see some food pron? Asking for a friend.

If you are asking me , not very soon.
I just brazed three exhausts on the lid and made a mess:mad:
The lid material is very thin and it got all warped,I'll see if I can fix that.

Still to do:
Food grills
Lid hinges
Wheels stuff
Painting
Coal starting chimney
Seasoning
Learn how to cook in it:mrgreen:

You should have asked before you did that lol! That stuff is very thin. No need to braze anything though. What kind of lid?
 
The lid came with the drum it looks like a metal taco now:mrgreen:
I still have the ring so I'm not sure if I should try to fix it or just forget it and use the clamp ring
 

Attachments

  • IMAG0349.jpg
    IMAG0349.jpg
    31.9 KB · Views: 95
The lid came with the drum it looks like a metal taco now:mrgreen:
I still have the ring so I'm not sure if I should try to fix it or just forget it and use the clamp ring

Put the lid on he edge of a bench and apply pressure on each side. Go slow and you might be able to straighten it. Most flat lids are warped a littlest anyways and I have used this technique to make them even straighter. He rolled lip is what gives the lid it’s structural integrity. If you can straighten it you should be ok.
 
Back
Top