THE BBQ BRETHREN FORUMS

Welcome to The BBQ Brethren Community. Register a free account today to become a member and see all our content. Once signed in, you'll be able to participate on this site by adding your own topics and posts, as well as connect with other members through your own private inbox!

I would wager to say that our group was responsible for getting Chris to add a caster with brakes to his accessories. I think we improved the product for future customers. Good for us!

What I said before was truth full that we have been looking forever for a good replacement, but also you all were responsible for proding us into looking much harder. After a day of tracking backwards from retailers, distributes and finally getting in touch with a mfg we found our new 8'' wheels which include a swivel lock and wheel lock. They are slightly higher in cost but its a really nice wheel. Moving forward all wheels will be bolted on so changing them out is easy.

I leave the vents open, when it gets hotter and more humid if you close the vents it will grow mold and mildew on the food grates (any one with a green egg knows what I am talking about, at least here in the south).

We are also starting to work on a smaller version, and any input would be much appreciated. My thoughts so far are as follows, keep the height the same but but shrink the width and depth down to around 24''x24'' give or take a little. Rack dimensions will roughly be 17'' wide by 21 1/2'' deep, just enough for one full size foil pan with a little breathing room all around it. Any input would be much appreciated.
 
Rack dimensions will roughly be 17'' wide by 21 1/2'' deep, just enough for one full size foil pan with a little breathing room all around it. Any input would be much appreciated.

Folks are paying extra for Backwoods G2 models that will fit full-size foil pans with 16.5" x 21.5" racks. I think that would be the perfect size for a smaller version. Same height would be easy marketing, it would be half the capacity, but I suspect you could drop the height to 3 racks and still have a market. 4 racks would put you at roughly the size of a Backwoods G2 Party, 3 would be the width and depth of a G2 Chubby but roughly the height of a Fatboy, which isn't a bad setup at all.

If you went with a 3 rack height (internal height of 19" or so), you might consider actually including 4 racks and extra rack sliders, so you can go 3 racks with 6" clearance, or have some racks closer together for cooking stuff like ribs. The extra sliders would give more options for organizing the cooking space.
 
Having a smaller version would be nice too. Three racks for pans would be good with sliders built for smaller rib and chicken racks. I may be able hide it in the corner of the garage.
 
We are also starting to work on a smaller version, and any input would be much appreciated. My thoughts so far are as follows, keep the height the same but but shrink the width and depth down to around 24''x24'' give or take a little. Rack dimensions will roughly be 17'' wide by 21 1/2'' deep, just enough for one full size foil pan with a little breathing room all around it. Any input would be much appreciated.
Chris, I think that is a great idea. Cooking with foil pans has become quite popular in recent years, so I think it is important to build a smoker that a full sized foil pan will fit in. Your smokers should compete very well with Backwoods Smokers, which I have used for 8 years. They have only recently started building smokers for full sized foil pans.
I have several thoughts:
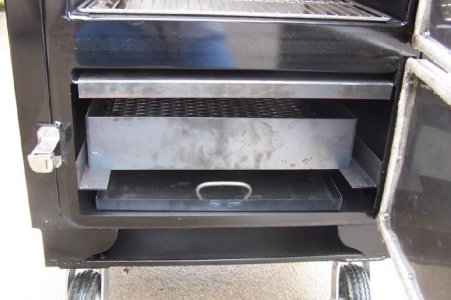
1.) Keep your ash pan arrangement the way it is. I love it. The firebox and ash pan slide out together so you don't spill ashes on the driveway. My Backwoods ash pan rests on the bottom of the firebox and is subject to rust and ash spillage.
Weld 2.jpg
2.) I would keep 4 racks instead of 3. I rarely use the rack just above the water pan. The more capacity the better.
3.) Keep the 2" ball valve air intake. It works great and is easy to adapt to the Guru.
4.) Be sure to add casters as an option (with brakes). A lot of us use them.
5.) Consider adding a diffuser plate as an option. Backwoods and the Meadowcreek BX50 both use these.
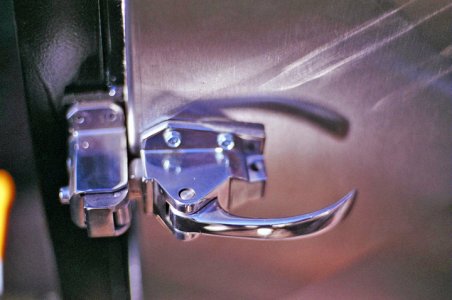
6.) Consider upgrading the slam latches. The Backwoods slam latch seems to be of a little better quality.
Latch CloseUp.jpg
7.) Consider offering T-plates as an option such as used in the Gator Pit Rebel and Dual Stacker.
Good luck on your new design. Let us know when you have a design.
 
Chris, I think that is a great idea. Cooking with foil pans has become quite popular in recent years, so I think it is important to build a smoker that a full sized foil pan will fit in. Your smokers should compete very well with Backwoods Smokers, which I have used for 8 years. They have only recently started building smokers for full sized foil pans.
I have several thoughts:
1.) Keep your ash pan arrangement the way it is. I love it. The firebox and ash pan slide out together so you don't spill ashes on the driveway. My Backwoods ash pan rests on the bottom of the firebox and is subject to rust and ash spillage.
View attachment 95938
2.) I would keep 4 racks instead of 3. I rarely use the rack just above the water pan. The more capacity the better.
3.) Keep the 2" ball valve air intake. It works great and is easy to adapt to the Guru.
4.) Be sure to add casters as an option (with brakes). A lot of us use them.
5.) Consider adding a diffuser plate as an option. Backwoods and the Meadowcreek BX50 both use these.
6.) Consider upgrading the slam latches. The Backwoods slam latch seems to be of a little better quality.
View attachment 95939
7.) Consider offering T-plates as an option such as used in the Gator Pit Rebel and Dual Stacker.
Good luck on your new design. Let us know when you have a design.

One reason we want to keep it the same height is so every thing functions the same, same size fire box assembly, ball valves and water pan set up the same way, just smaller capacity on each rack but still the same size in between racks. We will look at T plates as an option, I have resisted because I cant make the pit function better with or with out them. The only benefit as I see it to T plates is adding smoke or different flavor smoke at different times during the cook. I know some people really like them and insist they work better so we may start offering them as a option. I don't see a diffuser plate working any different than the water pan does now, it is a diffuser either with or with out water. I do see that a secondary smaller water pan set in side the existing pan could be nice to use water at higher temps or heat up faster and it wont affect anything down inside the fire box area.
 
I do like the latches of the backwoods. I do also enjoy how heavy duty each of the grate guide is and how the ash pan sits in the charcoal basket assembly. Keeps most of it off thru floor of the chamber. I think the continued use of quarter inch steel in the water pan makes a sturdy product and can also act as a diffuser. Maybe an option of rhino lining texture under the smoker to make it 100 percent maintenance free.
 
Oh. And sheet rock or water heater finish to fool my wife so I can stick it in the corner. Maybe a stealth or cloak finish.
 
Chris...

I really have no complaints on the current design...I really am very happy with the smoker!!! Opinions on tweaks/modifications:

1. The casters with locks is an awesome option, great move there.

2. I am also a fan of the diffuser under the water pan. The reason I like this idea is to slow the water boiling off so fast, as the the source of heat is very close to the water pan, almost touching it. On my WSM, I could run on 3 gallons of water for 12 hours before needing to refill the water pan (the pan distance by the smaller fire etc..playing some role in this). By placing a foil pan inside the water pan (as suggested) with water defeats the awesome water refill option. A heat diffuser between the fire and the water pan would certainly slow the boiling rate down and not need to refill as often. Or, maybe somehow add a hollow steel wall under the water pan to slow the rate of boiling off.

3. I like the T-Plates option to make the fuse/snake method easier to setup than doing manually by separating coals in the firebox. I am always doing overnight cooks with large briskets and will typically load over 30lbs of charcoal just once and let it run. The T-Plates would need to be removable in my opinion and heavy enough to sit in the firebox so you could pour charcoal around them.
 
Would be nice to get a maze setup with quarter inch steel for longevity along with a heat plate installed made of quarter to half inch steel plate. I was thinking if a retrofit could be made for the diverters. 2 long heavy duty L brackets with a plate, heavy plate is expensive.
 
We are also starting to work on a smaller version, and any input would be much appreciated. My thoughts so far are as follows, keep the height the same but but shrink the width and depth down to around 24''x24'' give or take a little. Rack dimensions will roughly be 17'' wide by 21 1/2'' deep, just enough for one full size foil pan with a little breathing room all around it. Any input would be much appreciated.
Those are the dimensions of the smoker I bought when I found out that you didn't make a smaller version. Full size pans fit perfectly. It has rack sliders for 6 racks spaced 4.5" apart. Briskets fit 1 per rack if normal size. I can get 2 8lb briskets on a rack. 3 baby backs fit with just enough space to not touch. I have not tried spares. Whole chickens fit in pans. I like the extra sliders to give me options on spacing.

jrben1 pretty much nailed my wish list. T plates work very well for me because I don't like to use water as I feel it wastes charcoal. Without the maze temps are hard to control but that may be an issue with my smoker since it is a reverse flow. Even though I don't use water I still use a diffuser to keep the direct heat from affecting the bottom rack too much. I did a test run with water and the diffuser helped keep the water usage down at higher temps. The ball valve is a must. The ash pan sliding out with the firebox is really nice. The only issue I have is that you are building these after I bought mine. :p
 
What also would be great is to have a temp probe hole. I don't know how it can be designed to keep the efficiency of the smoker. Maybe a hole that can have up to 4 probes/wires and a replaceable high temp silicone squeezable foam insert that can seal, and keep up with the high temps with being replaceable.
 
What also would be great is to have a temp probe hole. I don't know how it can be designed to keep the efficiency of the smoker. Maybe a hole that can have up to 4 probes/wires and a replaceable high temp silicone squeezable foam insert that can seal, and keep up with the high temps with being replaceable.

The Assassin smokers have these but I'm not sure how they work. I saw one being used at a comp and asked the guy if it affected the smoker and he said no. It was after cooking so I couldn't tell if heat escaped from there or not.
 
I will be very excited to see a demo of the smaller smoker. It may work for my other cooks.
 
What also would be great is to have a temp probe hole. I don't know how it can be designed to keep the efficiency of the smoker. Maybe a hole that can have up to 4 probes/wires and a replaceable high temp silicone squeezable foam insert that can seal, and keep up with the high temps with being replaceable.

You'd need a hole in the insulation for that.

I'd think you'd be better off just putting the wires through the door opening. The gasket material won't crush the wires.
 
You'd need a hole in the insulation for that.

I'd think you'd be better off just putting the wires through the door opening. The gasket material won't crush the wires.

I kind of agree. At first, I thought I liked the idea of having a probe port on the smoker. But, that would just introduce points of wear over time, cleaning issues, smoke leaks, and the probe wires would get in the way of sliding the racks in and out etc...

I dont mind running the probe wires between the door, works fine for me.
 
If they drilled a hole through the wall and welded a small pipe through the wall to seal the wall. Them include a high temp silicone insert that van be pushed in the hole after thru wires have been run through. It'll expand in thru pipe creating a good seal. But them there is a replaceable item that'll need to be added for maintenance.
 
Back
Top