THE BBQ BRETHREN FORUMS

Welcome to The BBQ Brethren Community. Register a free account today to become a member and see all our content. Once signed in, you'll be able to participate on this site by adding your own topics and posts, as well as connect with other members through your own private inbox!

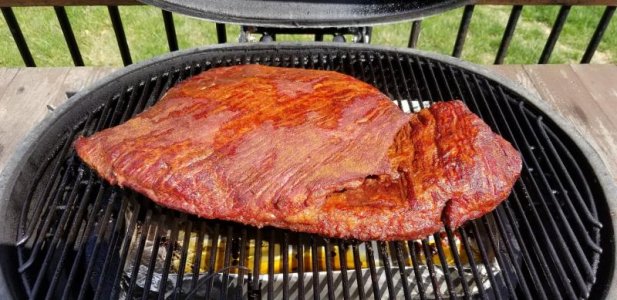
Brisket looks great after the trim! I like the wood chip plan, may try it in my charcoal summit next cook. How did you go about lighting the kamado?

A single Weber wax cube in the middle, though sometimes I'll use one of those electric hot air deals. If I use it to grill, I almost always go for the knockoff looftlighter.

Do you notice any difference in cook time with a trim like this?

I've never really done a side by side comparison with similar pieces of meat, but I'd have to think it knocks off a little bit not having to heat up that extra couple pounds.

about 3 hours into it in this pic.
 

Attachments

Brisket turned out pretty decent, not as good as the ones that came off my Shirley last weekend but I got caught up doing the "bedtime routine" with the kiddo and let this one go a little long...not "falling apart" long but maybe 45 minutes past the point I would've liked to pull it. I think it'll still do just fine for a bunch of beer drinkin' bachelor party guys though :thumb:
 

Attachments

I prefer to leave attached, there's still plenty of bark, but I feel like I've gotten better results doing so. I rarely separate so I'm not pulling from a large sample size either.
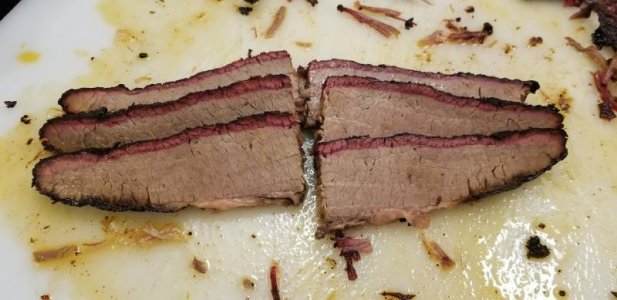
+1, I prefer to trim briskets the same way.

Nice tutorial and pron.
 
Nice write up Suds! I never gave any thought to how the trim effects uniform thickness. I was just discussing with the wife that I need to BBQ this weekend so maybe brisket will be on the menu now!
 
Thanks for the run down on the brisket trim.
I wanted to comment on the kamado set up with wood chips. I agree this is the best way to do it, I usually run chips or vey small chunks even in the kettle. I just find you get a better/hotter burn since the small pieces go up really well and this ensures a nice thin blue the whole time. I've noticed especially on a kamado, not only do you have the potential for time in between chunks catching as you mention, but I think just the much smaller amount of air flow required to keep a kamado in the 250 range doesn't really support clean combustion of the larger chunks. Same thing running a snake/minion in the kettle. There just isn't enough air to cleanly burn the big chunks. Just my opinion of course but its interesting to see someone else settle on a similar approach.
 
Only took a couple cooks where I was cleaning out the charcoal bowl afterwards and finding chunks left largely unburnt where I thought....maybe there's a better way? I've been pretty happy with this result. It never billows smoke, but it is a constant but light smoke for the duration of the cook.
 
I would call that a "Brazilian" trim.

... but he only trimmed one of them... not a brazillian of 'em! :shocked: :shock: :crazy:

Agreed - thanks for the pictorial. Hope you fellas destroy that and have a great weekend.
 
Thanks for this post! I was just thinking of a brisket cook and how to up my game. The time you took to document this is much appreciated!
 
Thanks for this post! I was just thinking of a brisket cook and how to up my game. The time you took to document this is much appreciated!

I always take a bunch of pictures anyway, then all I had to do was mash my finger on the screen and draw some circles, barely took any time :becky:

Good luck on your cook
 
Nice pictorial...., agree 100% with using red label brisket & the trim job..., used to do the same routine with chips in my BGE (now using pellets instead)..., and the finished product looks great. Also loved the John Madden-like freehand sketches on the pictures. I've been known to do that as well.... Heheheee.

FupMG0v.jpg
 
Thanks for posting this tutorial ....bookmarked for my next attempt :thumb:
 
Back
Top