Combination backyard heater/cook top/pizza oven/BBQ/Smoker

Now that is REALLY cool. Even though I love to build things, I'm not very creative. I think it's super impressive when people can come up with cool ideas like this AND put them into action.
 
........................................
And if you are talking to a complete newbie when it comes to smoking and grilling, what would you recommend to start out with cooking? Can you recommend anything simple and hard to screw up?


Chicken. It's inexpensive to experiment with while you learn how your equipment performs.
 
Chicken. It's inexpensive to experiment with while you learn how your equipment performs.

Excellent recommendation, thank you. I’m pretty sure I can make that without messing it up. Suggested times and temps?

Edit to add:

My younger brother does a LOT of grilling. He’s going to join me this weekend and we’re going to grill chicken halves. He think 2 hours at 300 degrees should do it.
 
Last edited:
Now that is REALLY cool. Even though I love to build things, I'm not very creative. I think it's super impressive when people can come up with cool ideas like this AND put them into action.

I didn’t have any background in anything that would help in this build. (I was a podiatrist in private practice for 25 years.) So I just watched a bunch of YouTube videos, bought tools from Craigslist and Harbor Freight, and learned by trial and error. (If I can do it, anyone can...)
 
Last edited:
Excellent recommendation, thank you. I’m pretty sure I can make that without messing it up. Suggested times and temps?

Edit to add:

My younger brother does a LOT of grilling. He’s going to join me this weekend and we’re going to grill chicken halves. He think 2 hours at 300 degrees should do it.

A pork butt would be an excellent way to really run your rig through it's paces. Depending on the temperature that you cook them at, and the size of the roast, the cook time can run from 4-24 hrs. I cook a 7lb pork butt in my Pit Barrel Cooker at around 300 degrees, and it usually takes about 6hrs. Some guys cook them at 225, and the same sized butt may take them 12hrs. Pork butt has two virtues for your experiment:

1. It's as cheap as chicken, and it's impossible to mess up! Pork butt is cut of meat that pulled pork comes from (also known as boston butt, boston roast, pork shoulder, pork shoulder blade roast depending on your butcher). It's high fat content makes it very forgiving; even when I do everything wrong, they still come out great. Just cook it to 165, wrap it in tinfoil, and put it back in until it gets to about 203 degrees. You're just about guaranteed some great pulled pork. It also freezes nicely so you can make a big one and have a 1 month supply.

2. Practicing temperature management. Mananging the temp inside your smoker is what it's all about. It's what separates the pit masters from the rest of us. It's a bit like checkers in that it's easy to learn, but takes a lifetime to master. Keeping a smoker at 300 for 2 hrs to cook a chicken is one thing, keeping it there for 8 hrs is a different thing altogether. You'll get an opportunity to see how your proposed fuel burns in your rig. Does it burn like a banshee for an hour and settle out, or does give a nice consistent heat through the duration of the burn? You'll also see what happens to the temps when you reload after 5 hrs. Does it hold steady, or does it spike like crazy?

There are two pieces of equipment I highly recommend you get if you don't have them already. An instant read thermometer, and a remote temp monitor.

Instant Read Thermometer: The instant read will give you high accurate temps quickly, which is important not just for food safety, but also for food quality. Small temperature differences make a really big difference in terms of texture and juiciness, especially for low fat things like chicken breasts. There are a million to choose from. I use the thermopop, which for me is good balance between price and speed/accuracy.

http://www.thermoworks.com/ThermoPop

Remote Temp Monitor: This is a wireless thermometer that will give you two important temps: the air temp of your cooker, and the temperature of your meat. You put one probe in the cooker near your meat, and one right inside the meat itself. This way you can sit in your living room and always be able to see how your temps are running. There are a million to choose from, but the one's you'll see being used most frequently around here is the Maverick 732 or 733. They're inexpensive, but very high quality and last for many years. They don't have the bells and whistles of some of pricier ones, but they get the job done. I use the Maverick 732 and I've been very pleased with it. One note of great importance: the probes should be hand washed with great care given to ensure that the cable itself doesn't get too wet. They're reasonably waterproof, but if you drop them in a pot of water to soak, you'll be shopping for a replacement probe.:icon_smile_tongue:

https://www.amazon.com/Maverick-732...08420822&sr=8-4&keywords=maverick+thermometer

If you want to get real fancy to test how your rig performs, you can get a Fireboard thermometer. It ain't cheap, but it does some pretty useful stuff that the inexpensive thermometers can't. First, you can run 6 probes instead of just 2. That may be of interest to you because it will allow you to simultaneously monitor the temps of your pizza oven, as well the temp of your smoker in several places to monitor for hot spots within the chamber, as well as tracking the temps of your meat. Second, it has the ability to log data. It tracks all of the temperatures once every minute or so, and it logs the data so that you can download it into excel or google sheets, or you can just look at the graph. This will give you valuable data to track how your smoker truly performs. It's not essential equipment by any stretch just for backyard cooking, but it might be of interest to a man like yourself who built such a sophisticated rig and wants to really understand how it performs, and how it can be improved.

https://www.fireboard.com/shop/fireboard-fbx11-thermometer/

Good luck and keep us posted!
 
Last edited:
A pork butt would be an excellent way to really run your rig through it's paces. Depending on the temperature that you cook them at, and the size of the roast, the cook time can run from 4-24 hrs. I cook a 7lb pork butt in my Pit Barrel Cooker at around 300 degrees, and it usually takes about 6hrs. Some guys cook them at 225, and the same sized butt may take them 12hrs. Pork butt has two virtues for your experiment:

1. It's as cheap as chicken, and it's impossible to mess up! Pork butt is cut of meat that pulled pork comes from (also known as boston butt, boston roast, pork shoulder, pork shoulder blade roast depending on your butcher). It's high fat content makes it very forgiving; even when I do everything wrong, they still come out great. Just cook it to 165, wrap it in tinfoil, and put it back in until it gets to about 203 degrees. You're just about guaranteed some great pulled pork. It also freezes nicely so you can make a big one and have a 1 month supply.

2. Practicing temperature management. Mananging the temp inside your smoker is what it's all about. It's what separates the pit masters from the rest of us. It's a bit like checkers in that it's easy to learn, but takes a lifetime to master. Keeping a smoker at 300 for 2 hrs to cook a chicken is one thing, keeping it there for 8 hrs is a different thing altogether. You'll get an opportunity to see how your proposed fuel burns in your rig. Does it burn like a banshee for an hour and settle out, or does give a nice consistent heat through the duration of the burn? You'll also see what happens to the temps when you reload after 5 hrs. Does it hold steady, or does it spike like crazy?

There are two pieces of equipment I highly recommend you get if you don't have them already. An instant read thermometer, and a remote temp monitor.

Instant Read Thermometer: The instant read will give you high accurate temps quickly, which is important not just for food safety, but also for food quality. Small temperature differences make a really big difference in terms of texture and juiciness, especially for low fat things like chicken breasts. There are a million to choose from. I use the thermopop, which for me is good balance between price and speed/accuracy.

http://www.thermoworks.com/ThermoPop

Remote Temp Monitor: This is a wireless thermometer that will give you two important temps: the air temp of your cooker, and the temperature of your meat. You put one probe in the cooker near your meat, and one right inside the meat itself. This way you can sit in your living room and always be able to see how your temps are running. There are a million to choose from, but the one's you'll see being used most frequently around here is the Maverick 732 or 733. They're inexpensive, but very high quality and last for many years. They don't have the bells and whistles of some of pricier ones, but they get the job done. I use the Maverick 732 and I've been very pleased with it. One note of great importance: the probes should be hand washed with great care given to ensure that the cable itself doesn't get too wet. They're reasonably waterproof, but if you drop them in a pot of water to soak, you'll be shopping for a replacement probe.:icon_smile_tongue:

https://www.amazon.com/Maverick-732...08420822&sr=8-4&keywords=maverick+thermometer

If you want to get real fancy to test how your rig performs, you can get a Fireboard thermometer. It ain't cheap, but it does some pretty useful stuff that the inexpensive thermometers can't. First, you can run 6 probes instead of just 2. That may be of interest to you because it will allow you to simultaneously monitor the temps of your pizza oven, as well the temp of your smoker in several places to monitor for hot spots within the chamber, as well as tracking the temps of your meat. Second, it has the ability to log data. It tracks all of the temperatures once every minute or so, and it logs the data so that you can download it into excel or google sheets, or you can just look at the graph. This will give you valuable data to track how your smoker truly performs. It's not essential equipment by any stretch just for backyard cooking, but it might be of interest to a man like yourself who built such a sophisticated rig and wants to really understand how it performs, and how it can be improved.

https://www.fireboard.com/shop/fireboard-fbx11-thermometer/

Good luck and keep us posted!
Wow, what an excellent post, VERY helpful, thank you!
 
What really intrigues me about the use of a rocket heater core in an offset smoker is that at first thought, the two have diametrically opposite goals. Rocket heaters are meant to burn as hot as possible, for as short as possible, with as little smoke as possible. Offset smokers are designed to burn for as long as possible, maintain a low temperature, and to provide ample smoke. Combining the two is, well, fascinating! :-D

My understanding of your firebox/core setup is that maybe 70% of the combustion occurs in the core, and the remainder of smoke is burned in the drum above it in a whirling vortex of fiery insanity where the smoke itself is burned, like in a modern woodstove's secondary combustion chamber. The 99.9% smoke free exhaust would then exit the first drum and into the bottom of the second drum, where it would do the "smoking" and then out the chimney. At least that is what I think would occur if you gave this beast free reign and gave her all the oxygen she could breathe.

The most important pieces of equipment in this rig will definitely be your airflow regulators! I'll be super curious to see if a modern rocket thermal mass heater can be brought to heel enough to maintain the temps you're looking for, and to produce enough smoke to create the desired flavor profile in the finished prodcut. I'm betting it can.:-D

Then there is the thermal mass. It looks like the secondary barrel is what would ordinarily be the "bench" of a rocket mass heater. A thermal mass "bench" in a home heating rocketl mass heater is used to extract every last btu of heat out of the superheated exhaust produced, and then radiate the heat long after the fire goes out. Clearly in this application, improved efficiency from extracting BTU's from the exhaust is not a concern, but the thermal mass may well help even out temps a bit. Then again it may not. I remember seeing a lot about fire-bricks in UDS 10 years ago for that purpose, but there was great debate as to whether it was actually useful in regulating temperatures. There's only one way to know for sure; try running it both with and without the bricks. The capacity of the drum will certainly be larger without bricks, which is a pretty big deal from a utility standpoint.

Just some random thoughts. I really love you're rig and I hope you keep us posted!
The neat thing about this stove - which is intended primarily as a deck, patio, back yard, ice fishing hut or emergency heater - with the combination of really impressive thermal insulation from the ceramic insulation board and the larger firebox of a batch box configuration, it can burn one batch of hardwood firewood for 5 hours without adding wood, and 6 hours on a batch of compressed sawdust fire fuel at higher heat output, and by adding one hardwood firewood piece per hour, it will burn indefinitely.

With the 300 pounds of firebrick in the UDS, it’s actually and primarily designed to serve as a masonry bell. The UDS was an afterthought. If I remove the grill, I can add an additional 165 pounds of firebrick. (I have HUGE 18”x9”x4.5” firebricks out of an old brick factory kiln that are 55 pounds a piece.)

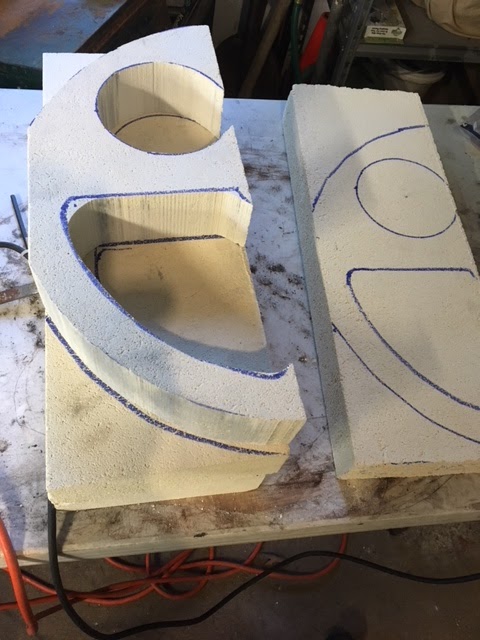
The “riser” of this batch box consists of a section of horizontal riser inside the core in the left hand side base of the barrel, then vertical riser inside the core and extended with an additional 8” of 6” ID section of vacuum formed ceramic riser on top of the core. (The curved part of the second photo in the original post.)

So I actually have about 36” of riser between the horizontal and vertical sections in the core itself and the 8” extension, before it exhausts inside the barrel. The first section of horizontal riser is actually an expansion chamber just past the Venturi port separating it from the firebox, where the majority of complete combustion occurs; temps should be reaching 2100-2200 degrees F in this section, aided by the superb high temp thermal insulation.

That’s more than enough riser so that full and complete combustion of the wood, particulates and volatiles occurs in the firebox, expansion chamber/riser, and little if any smoke enters the barrel. I’m actually considering putting a small basket of aromatic pieces of wood inside the flue to the UDS to create some smoke because this thing burns so clean!
 
Last edited:
2200 degrees F might be ok for chicken but too hot for delicate things like salmon. :icon_smile_tongue:

The old school rule was 225 for low and slow and 325 for hot and fast; nowadays a lot of guys are swearing by 250-275 as giving equally good results with more manageable cook times. Obviously the air cools quite lot from 2200 in the riser to when it actually exhausts into the UDS, any idea what the UDS barrel temp tends to run when you reign it in?
 
Last edited:
2200 degrees F might be ok for chicken but too hot for delicate things like salmon. :icon_smile_tongue:

The old school rule was 225 for low and slow and 325 for hot and fast; nowadays a lot of guys are swearing by 250-275 as giving equally good results with more manageable cook times. Any idea what the UDS barrel temp tends to run when you reign it in?

I’ve only run it wide open so far. On hardwood firewood at the height of the burn, it was at 400 degrees on the probe thermometer on the lid, then settled in for several hours at 350 degrees. I have no doubt between the two dampers in the flues and the vent on the Weber lid and adding one piece of wood per hour or two, I’ll be able to maintain it indefinitely at lower temps.

I’ll know more when I grill those chicken halves this weekend.
 
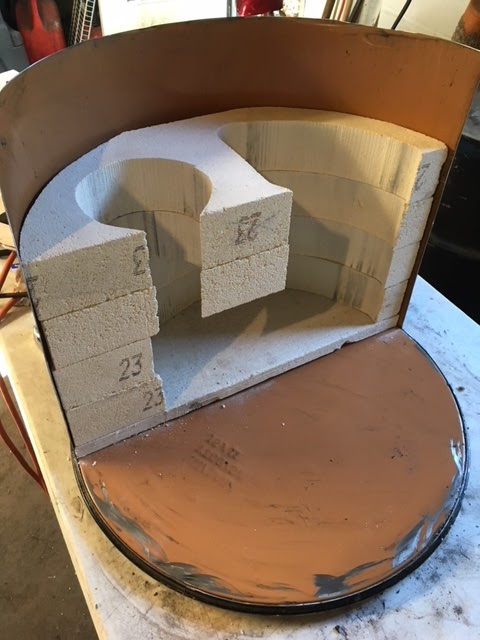
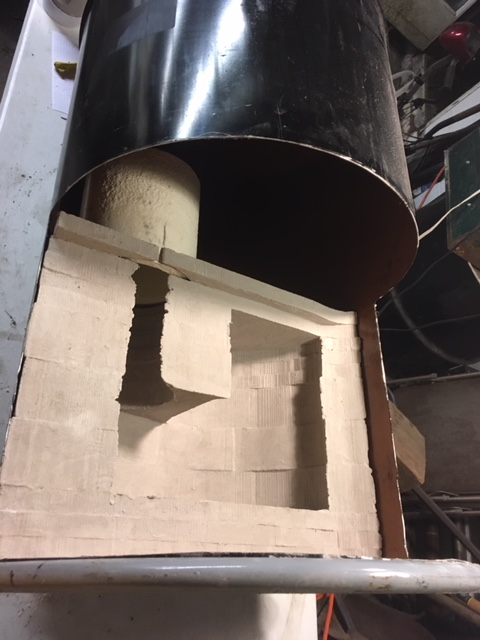
This is the vertical expansion chamber/risers of the current stove, made from laters of ceramic fiber insulation board:
rocket%2B22.jpg


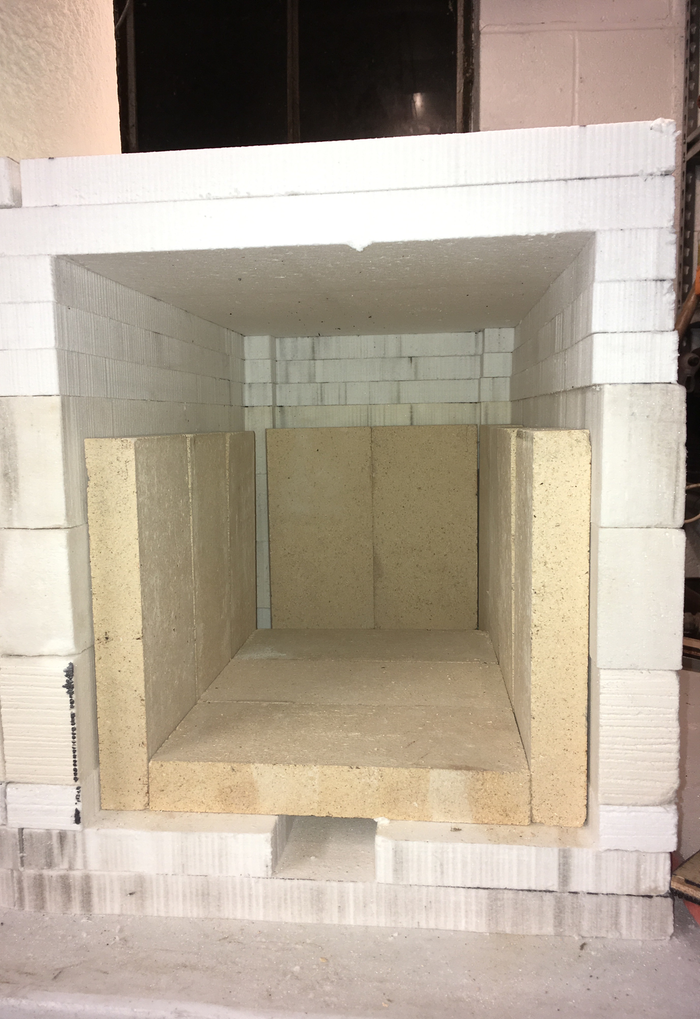
And this is the same for a rocket stove I'm building in my basement family room, but I'm using insulating fire brick slabs ('soft fire brick"):

rocket%2B20.jpg

rocket%2B25.jpg

rocket%2B24.jpg
 
What intrigues me the most about this setup is the superheated riser running at 2200 degrees or "swirling vortex of insanity" as I call it :-D. What excites me about it is that it may be possible to really dial in the quality of the smoke by getting the right proportions of firebox to riser height, and using the advantage of 2 stage combustion to manipulate the proportion of combustion that occurs in primary vs secondary combustion chambers. Not all smoke is equal; black sooty smoldering smoke will ruin bbq in a hurry by creating unfortunate acrid flavor profiles.

There's a smoker called the Karubecue that uses a blower to suck the air down through the coals in a process they call "reverse flame". In a normal offset smoker the logs burn below and the smoke just rises through the rig because hot air rises. The Karubecue has the firebox up above, and the blower motor sucks the air down through the coals. The purpose is to burn off all the nasty smoke and produce a nice clean smoke. This is very similar in mind to what you're accomplishing with the super heated riser, the difference is that you don't have a $150 blower motor rattling like a freight train and breaking down every 2 years. Another advantage a super insulated riser has over the Karubeque is that the Karubeque needs to be stoked with precisely sized 3" x 6" logs every 30 minutes. Yours can run for 5 hours in a normal sized firebox.

BBQ luminaries such as Meathead from AmazingRibs.com have said the Karubeque produces some of the best smoke flavor of any bbq he's ever had from years of traveling and judging competitions. That's high praise indeed, and the reason is because the Karubeque is burning off many of the volatile particles that create undesirable flavors when it sucks the air down through the coals.

I've never seen a super-insulated riser in an offset firebox before, but it may be a really good idea. Figuring out the precise ratio of riser height to firebox might allow a pit to burn off all the nasty smoke, but retain the good smoke. Your current set-up might be too efficient, but that may be a variable you can play with.

Another incredibly important variable that two stage combustion opens up is where the oxygen is introduced. It's possible to have 2 air intakes: 1 below the fire, and 1 immediately prior to entering the super heated riser. In this way, you could choke the fire, but super-heat the riser by increasing the proportion of combustion happening there. Or vice versa. Two stage combustion affords a significant advantage in smoke quality over anything else I can think of, and with no moving parts.

In short, I think you're breaking new ground here. In 5 years we may be seeing vacuum formed ceramic risers in $20,000 competition rigs. Super interesting stuff!!!

Granted, this is just total speculation here, and I'm most guys around here have forgotten more about bbq than I'll ever know, but I'd rather have your rig to play with than a Shirley (I could be banned, banished, and executed for even thinking that btw!:shock:).

I think there is a good chance my poor little PBC is about to be gutted, and retrofitted with a wood firebox and a superheated insulated riser in the near future...

Here's a bit about the Karubecue I was talking about:

http://amazingribs.com/bbq_equipment_reviews_ratings/smoker/karubecue-c-60-pit
The neat thing about this design is that folks could buy a kit, buy barrels off eBay, and have a superb unit for less than $600-$700. And tell all their buddies they built it themselves!
 
This is the vertical expansion chamber/risers of the current stove, made from laters of ceramic fiber insulation board:
rocket%2B22.jpg

Holy crap that's beautiful! :clap::clap::clap:

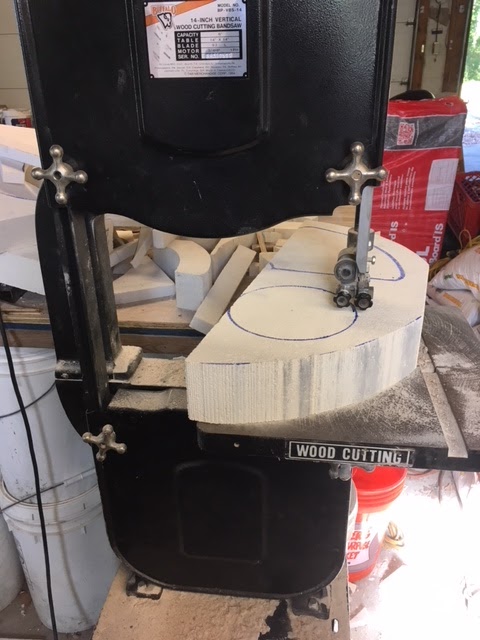
I get goosebumps just looking at it. I can't believe you're made that thing with a Harbor Freight bandsaw and few handtools in your basement. Truly epic. It looks like it came out of a 10 year NASA project to create a perfect combustion environment.

Ironically, that thing is almost certainly too efficient! Can you even see the exhaust when it come out of the stack or is it just like a shimmer of heat?:icon_smile_tongue:

I take my had off to you sir!
It smokes at start up but after 5 or 10 minutes its crystal clear. I'd wager good money its cleaner burning than ALL the mass produced wood stoves currently on the market.

(The bandsaw is a Taiwan knock off of an American icon bandsaw and came from Craigslist for $100.)
 
Last edited:
Wow again! Is that little channel there (red arrow) made for controlling the airflow so that it's getting oxygen just before it goes into the secondary combustion chamber???

KuNk5l9.png
 
Nice! I've had one of those on my drawing board for quite a while now, but I just haven't come up with the time to make it. Completely different than yours but a similar idea. I'll be watching this post for sure.
 
Wow again! Is that little channel there (red arrow) made for controlling the airflow so that it's getting oxygen just before it goes into the secondary combustion chamber???

KuNk5l9.png
Yep. My own design and I think its unique in the rocket heater world. Its covered with firebrick and only uses steel tube for the secondary air introduction at the base of the Venturi port:
rocket%2B12.png

rocket%2B26.jpg
 
Last edited:
Back
Top