Smokin Tex Mod With BBq Guru CyberQ WiFi

Grant968

Knows what a fatty is.
Joined
Dec 18, 2011
Messages
59
Reaction score
4
Points
0
Location
Gainesvi...
The 2011 Thanksgiving turkey was charred by my six year old Smokin Tex. Bummer, and created a joke that keeps on laughing.

The Smokin Tex folks said they would sell me a replacement thermostat for $28. Reasonable, but I figured if restoration was required, I preferred renovation to contemporary standards. Internet searches brought me to the BBQ Guru site. Compelling, but not my ideal. I wanted WiFi control. I communicated to the BBQ Guru folks who informed me they would be delivering a WiFi CyberQ in 2012. So I bought a pizza stone for my gas DCS grill to fill the gap, and waited. The BBQ Guru folks emailed me when they were ready to ship, and then I ordered without a pause. Glad I did.

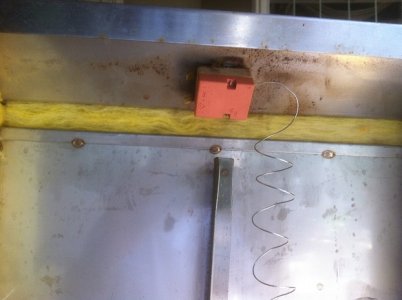
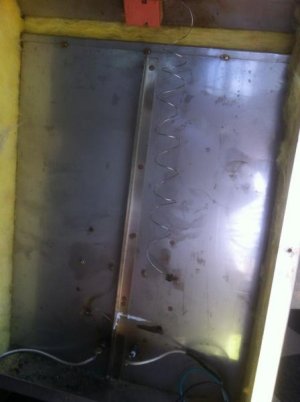
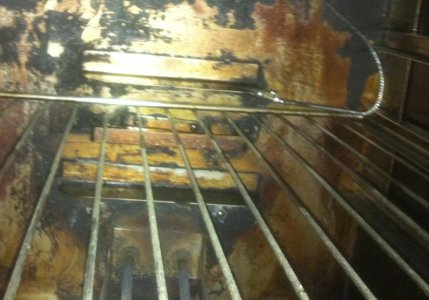
Since the Smokin Tex is an electric, I ordered the CyberQ WiFi with the Power Raptor. Here I will post information and picts on the modifications I made to my Smokin Tex, my set up, and experience.
 
Very easy to modify the Smokin Tex to the BBQ Guru CyberQ WiFi with Power Raptor.

Step 1: UNPLUG the Smoking Tex from your power source. Electrical shock and possible death can occur. If in doubt, do not perform the following. This is merely a suggested approach, and I am not responsible for anything.

Step 2:

Remove the back panel. Screws surround the complete back perimeter; all must be removed. No reason not to use a battery screwdriver. My Smoking Tex is stainless. They are also sold in black powder coat. Remove the insulation from the back interior chamber. From the pit, remove the bolts that hold the cover for the heating element connectors in the now exposed back chamber.

Insulation in back of Smokin Tex

IMG_0359.jpg


Back of Smokin Tex with insulation removed, and wires removed connecting thermostat and heating element connectors.
 

Attachments

  • IMG_0335.JPG
    IMG_0335.JPG
    81.3 KB · Views: 265
Step 3:

Removed the wire connecting the thermostat at top of Smokin Tex, and from the heating element at bottom of Smokin Tex.

Keep the wire from the power cord connexted to the heating element. Now connect the wire that had been disconnected from the thermostat directly to the heating element. My wires and connectors were all in good shape so the old wires and connectors could be reused. Check your wires and connectors to insure in good shape before proceeding.
 

Attachments

  • IMG_0336.jpg
    IMG_0336.jpg
    23.4 KB · Views: 264
Step 4:

Before I buttoned up the Smoking Tex, I plugged the power cord into the power point on my wall. Careful not to touch any exposed connectors as you may be shocked, and even death can occur. I confirmed that the unit was working. I then disconnected the power cord from the wall power point. I then buttoned up in reverse order to the above.

Step 5. Plug the Smokin Tex Power cord into the BBQ Guru Power Raptor.

Step 6.
Proceed with steps for BBQ Guru CyberQ Wifi and Power Raptor setup.
 
The Test:
Salmon, dinner for four. I am not fond of salmon in brine. Instead, marinated in vodka, spices, some oil; placed in a "fresh food" shrink vacuum type bag for about two hours. Smoked with cherry wood and a small piece of lump coal. In Smokin Tex for about 40 minutes and removed the salmon at 140 degrees.

The Result:
DigiQ WiFi on Adhoc worked perfectly, reporting time and temperature of the pit and food. All at dinner raved over the main course. Sorry, so excited I forgot to take pictures of the main course. Next time.

I ran the pit probe wire through the exhaust hole in the top of the Smokin Tex. I clamped the probe at right angles to the back on a grate above where the salmon would reside. Shown in picture below. Also in the below picture is a good view of the heating elements that connect in the back directly to the original electrical cord, bypassing the original thermostat.
 

Attachments

  • IMG_0337.jpg
    IMG_0337.jpg
    58.6 KB · Views: 237
Ready for the after dinner espresso with home roast!

Equipment: Gas grill (DCS), BBQ Guru CyberQ WiFi using only the pit probe, rotisserie, and coffee bean container as shown in the photo. I purchased the bean container off ebay, and have no idea of its "name." I recall from coffee forums it was made by a guy working in his garage. I also have no idea if they are still sold.

I like the setup shown because I no longer need to be concerned with my green bean roaster catching on fire (which they all will eventually do). Also, I wanted a digital temp control for my Smokin Tex. The CyberQ WiFi does the job for both Smokin Tex and coffee roasting justifying for me the additional expenditure for the WiFi capability; as I said to my wife, this saves us money! :))
 

Attachments

  • IMG_0462.JPG
    IMG_0462.JPG
    110.8 KB · Views: 222
The Roast Ramp

Adjusting by hand the dual DCS gas knobs, my goal was to emulate the roast profile(s) referenced at CoffeeGeek

Quoting from coffeegeek
http://www.coffeegeek.com/forums/coffee/homeroast/8492

I've been reading about your Hottop Profile experiments and have been esperimenting with them in my Rosto as well. Too early to tell for sure, but the last 4-5 roasts have been some of my best ever.

I've tried two variations on your profile:

    • A fast ramp up to 250, followed by a super slow ramp to 1st Crack (i.e. reaching 1st at 10-12 minutes), and a 2-4 minute ramp to 2nd.
    • A slow, even ramp to 1st crack, by brining the heating element voltage down to about 90-95 (1st crack at 10-12 minutes) with a 2-4 minute ramp to 2nd. My initial impression is that there was a more even, more well rounded roast flavor when I did a slow and even ramp up to 1st.
 

Attachments

  • coffeegeek.jpg
    coffeegeek.jpg
    77.4 KB · Views: 215
The Beans

I generally purchase Ethiopian and a variety of espresso blend beans from Sweet Marias. The below photo shows my current "stash." I will roast two cups at a time which generally lasts about a week.
 

Attachments

  • IMG_0459.JPG
    IMG_0459.JPG
    183.2 KB · Views: 207
Ranking The Importance To Great Home Coffee
In order of importance is

1. the beans
2. the roast (in my case, on the BBQ)
3. the grinder
4. the brewing device

I purchased my grinder from a restaurant supply store long ago. Sweet Marias and others now sell similar and competitive models as well. Mine is a Mazzer Mini. My Mazzer Mini is over ten years old. As the grinding blades get worn, they can be replaced on the Mazzer Mini.

If you have satisfied 1, 2, 3 above, then great coffee can be made with many different kinds of brewing devices, ranging from Mr. Coffee drip filter, French press, to espresso. I prefer espresso, but good espresso comes at a price.

I have the original (older) model La Spaziale Vivaldi S1 purchased from Chris Coffee. It is directly plumbed in to the house water lines, via several filtration devices also purchased from Chris Coffee. The newer model can be purchased as either plumbed or canister water supply.
 

Attachments

  • IMG_0470.JPG
    IMG_0470.JPG
    146.5 KB · Views: 201
The Output

Green beans roasted on the BBQ, a great cup of espresso, following a superb salmon smoked with cherry wood. The coffee roast and cherry wood smoke both monitored with the new BBQ Guru CyberQ WiFi.

Love the technology. Technology is fun. And the output contributes to the good life and good companionship. :)


Attachments

  • IMG_0466.JPG
    IMG_0466.JPG
    135.3 KB · Views: 200
Close Look At The Beans


Beans roasted with the profile cited above.

Proof that a BBQ can roast green beens, and no need for expensive home roasters. A gas or electric BBQ can do the required job very well.


My next experiment will be to purchase an electric heating element to place on the grill within the gas BBQ for when I roast green coffee beans. That way my BBQ Guru CyberQ WiFi can monitor and I can control the roast from another room. :)
 

Attachments

  • IMG_0465.JPG
    IMG_0465.JPG
    137.6 KB · Views: 200
This is interesting. I've got some three year old green beans in my basement, in cardboard boxes. Think they are toast now?

So that drum thing attaches to your rotisserie?
 
Very nice setup!

I've been roasting for over 4 years with an RK Drum rotisserie roaster on a Weber 1000 and never had a fire in it. (yet)
Usually, I'll roast 6-10 lbs in 1 lb batches at a time as I easily plow through a pound or more myself a week for Espresso drinks, more if my daughter is home from school!

I'm not the coffeegeek, but I really should get more of a handle on my roast chamber temps, just using 3 dial thermos across the lid, my temps are usually 50* higher L to R and depending on the outside temp and beans my typical roasts are 12-17 minutes.

I'm going to have to stick my DigiQ inside next time.

Thanks for the thread!
 
Green beans can easily be stored for two years if in right environment. So you are likely good if not damp.

I just checked eBay and rotisserie bean containers are still listed. Important that the holes allow the chaff to drop out, but not the beans. Also, need fixed "rotars" to stir the beans while the canister rotates. Perhaps someone here would like to generate competitive supply for the BBQ folks.
 
RonL hipped me to the RK Drum.

http://www.rkdrums.com/

I researched as many coffee forums as I could find on BBQ Drum roasters and found no complaints on the RK and mine has been trouble free since day one.

I use the custom swamprb bucket bean cooler.

NorthwestBBQ shot this video a couple years ago showing my setup.

[ame="http://www.youtube.com/watch?v=lcPtebrBJGI"]coffee roaster.wmv - YouTube[/ame]

You are right, it is so easy to homeroast and you don't need a lot of equipment to do it.
 
"metal craftsman" lists coffee drum roasters on ebay, and offers them in various sizes. RK sells their product at http://www.rkdrums.com/ Their listed addresses are in different states on the east coast. Still, may be the same product, price discriminating between eBay buyers versus direct buyers. Or different, and if different I do not know how they are different.

I believe mine is an older model RK. At the time I purchased mine they were offered in stainless and some other metal. I paid more for stainless. I buy for the long run. I believe the stainless component is the drum mesh and fixed rotar blades. The end caps on mine have discolored, but still work fine; the end caps on mine as shown in the photos may or may not be stainless.

The retail BBQ coffee drums back then came in only one size: 5 lbs I believe. Big enough for my personal use. Larger capacity drums require a rotisserie motor that is stronger and faster than normal. Normal is fine for up to 5 lbs. I prefer to roast more frequently, so that my beans are never more than a week old from roast. So I don't need or want a 20 pound capacity drum. Important to measure the distance between your grate and rotisserie arm; this measurement should be conveyed to the vendor.

Mine is the old style which required the entire end to be removed. The "new" style from RK and A Metal Craftsman has a hatch which appears more convenient and allows for a flat piece of metal on the end versus a more difficult to make round end cap.

It appears "Metal Craftsman' has had a surge in sales since my thread. Good for him. Perhaps he or RK will give me a new model to write up here and compare with my old model!? :)

I should say, I have no relationship to any of the vendors I referenced. I purchased each of the products. I tend to keep my stuff for many years, and if need be renovate them as they age for continued use. Part of the fun of long term ownership.
 
Considering the Brinkmann 812-3323-0 Smokeshop Electric Converter for occasional use on my DCS gas grill. It is listed on "big river sales" for $42. Comments on this product and alternative vendors appreciated. No problems with Big River but like to support local when economic.

One thing leads to another, and everything is connected.

I justified the expense of my BBQ Guru CyberQ WiFi basted upon its ability to replace my Smokin Tex thermostat and thermocouple, and to serve as a needed temperature controller for my BBQ green bean coffee roasts. But my DCS grill is gas. To receive the full benefit of the CyberQ WiFi + Power Raptor, I need to roast on an electric. Least expensive, and more space efficient, is to purchase an electric heating element for use in the DCS natural as grill, thereby transforming my DCS gasser to a convertible hybrid. A CHy could have other uses as well.

The Brinkman is listed as 1,500 Watts. This wattage is over the 700 Watts heating element in the Smokin Tex 1400. I don't need fast temp ramp up in the smoker; though fast with control is good for roasting. 1,500 Watts should give me the HP I need.

The Brinkman Smoker is said to heat to 225. The volume of the Brinkman smoker is way greater than my DCS grill. Any problem with getting the Brinkman heating element to say 400 degrees in 15 minutes, in close proximity? See good roast ramp above.

The Brinkman heating element is three inches high according to "big river sales." There is not 3" between my coffee drum roaster and my grill grate. So, when roasting I would need to either tempoarily remove the DCS grill grates, or keep on gassing with my DCS gasser. Thoughts?
 
Last edited:
Back
Top