T
traildust
Guest
Last Friday after work I got busy putting the final mods together on my char griller. Before I called it a night I wanted to do the following: 1) Add the 3 inch flex duct inside from the exhaust down to the grill surface 2) Extend the smoke stack with a valve in line 3) Make a charcoal basket
I ran to Lowes with a list and high hopes. I knew I wouldn’t have time to fabricate a charcoal basket from scratch so I just picked up that shiny one for vegetables that other people tend to use. Easy enough, just trim the handles off when I get home and I can live with this one until I get a chance to fabricate something better. Next I found the 3 inch flex hose and tossed that in the basket. Looking for the perfect supplies for the smoke stack extension took the longest. I couldn’t find a valve that would work inline and figured I would just make one. I found 3 inch ducting, a vent cap for the top, and a supply of clamps.
I’m sorry I didn’t take any pictures during the build up of the valve and smoke stack, now I wish I did. Making the valve I cut a round piece of sheet metal the diameter of the inside of the duct and continued trimming until it fit just right. Then I took half inch hollow tubing and cut a slot down the middle of its length about four inches long. Next I cut another length of tube six inches long and notched it in the middle until the other one fit in like a “T”, now I welded the two forming the valve handle and shaft. About half way up the duct I drilled a half inch hole through both sides of the duct. To keep the round valve from sliding out of the handle/shaft assembly I welded a piece of metal on either side of the location the valve shaft would slide between. I lowered the valve down into the duct and slid the tube that had the lengthwise cut into the half inch holes I had drilled in the duct side. Since the valve/shaft tubing had the length wise slit, one half of it was on top of the valve and the other half on the bottom of the valve, like a sandwich. To help seal the half inch holes that the valve shaft goes through I used the fabric that I had from sweating copper pipes a while back. It’s that stuff you put in-between something you don’t want to burn and the pipes you are torching. This was placed on the outside of the duct with a washer to create a seal on the valve shaft assembly. With a hole drilled on the opposite side of the handle on the shaft I placed a bolt and nut, torqued and was satisfied with my hack work. Dang I really wish I had taken that picture now! If you aren’t confused then you really should be, go have a beer!
To fit the smoke stack extension I had to remove the existing valve that comes with the cooker. Easy enough, just remove one bolt, the tension spring and the valve comes, or falls, right off. To adapt the extension to the stubby pipe on top of the cooker I used a Campbells Chunky Soup can. The soup can was clamped to the cooker and the duct extension was pop riveted to the top of the can, bingo..looked GOOD!
Now the easy part, place the flex hose inside to re direct the exhaust, trim to fit and clamp in place. The charcoal basket was placed in the sfb on a grate that is sitting on top of the ash drawer guide. To keep the grate from falling down next to the cooker I just leveled the grate and used electric fence wire to secure it to a bolt. Slid the ash tray in and it cleared perfect! Mods done it was time to go inside and prep the meat for the morning. Oh, I hadn’t been watch the time and I almost died when I saw the clock, 11PM.
Grabbed the ribs, pulled the membrane off the backside, applied the rub, tossed in the fridge. The pork butt was a seven pounder! Removing the butcher paper like a Christmas present I was totally bummed when I noticed the meat was wrapped in twine. NO BONE! Ok, so at least it was seven pounds without the bone, I can live with that. I cut the strings and quickly applied the rub then tossed in the fridge. I was in bed by midnight and set my alarm for 4 AM. Now my wife thought I was totally nuts….”That’s too early, why are you doing that to yourself?”…
I close my eyes, the alarm sounds and I force my self out of bed, get the coffee pot going and pull the meat out to stabilize at room temp. Oh man, am I tired.
Go outside to fire up the cooker and it’s 35 degrees with a wind, it’s COLD! Slowly the beast comes alive and I’m happy to see the Minion method and all my new mods work..YEAY!
With the goods in the cooker the thing chugged along very well and my first stash of charcoal lasted six hours. My only problem was the wind. It was blowing and gusting into the intake at the sfb and into the exhaust stack. Both were problems as gusting into the intake was causing temp spikes and the gusts going down the exhaust was creating nasty back drafts blowing smoke out the intake! To help reduce these effects I placed foil half way around the exhaust port on the windy side and wedged a piece of metal down by the intake to block the wind. For the most part it worked out real well stopping the temp spikes and back drafts.
As the day drifted by the ribs finished at about 7:30pm. The cold air and winds really slowed things down. However, the butt was hanging tight at 145 degrees. The ribs were for dinner and the butt was only being cooked to be eaten another day so I could careless when it finished. After a great rib dinner along with a movie I started getting kinda tired. Maybe it was the beer? At around 10:30pm I admitted defeat and brought the butt into the oven set to 200 degrees. I set the temp probe alarm to 192 degrees and made a nest on the couch falling in and out of sleep with god knows what on TV. Somewhere about 4:15am the temp alarm sounded off, time to get back to work. As would be expected the meat just falls apart on its own and I had it shredded, in the fridge and I was off to bed by 5 am. Total cook time for the butt was 20 hours!
I think the butt took so long mostly because there was no bone. Maybe the ends of the bone migrate heat, but with out it the heat just has to take longer soaking in.
The other thing I found out was strange. While I was outside with the cooker I had two temp probes measuring different areas of the cooker. One was held in place with a metal bracket and the other probe stuck through a hole in a piece of wood. The one in the wood always measured about 30 degrees cooler. I placed the probe in the wood block next to the one in the metal bracket, same thing 30 degrees lower than the metal bracket. I removed the probe from the wood block and just set the probe next to the metal bracket and now it read the same. Conclusion, the wood block was somehow acting as an insulator. What I noticed was when I pulled the probe out of the wood block it was hard to back out. I had drilled the hole just bigger than the probe but when it heated maybe it put the squeeze on the probe restricting the normal heat expansion of the probe. Next time I will try it with a larger hole through the wood block and try it again.
Well folks, I know this is an exceptionally long post and I apologize for running on at the key board. I hope it was worth reading, next time I’ll make a better attempt to keep it short.

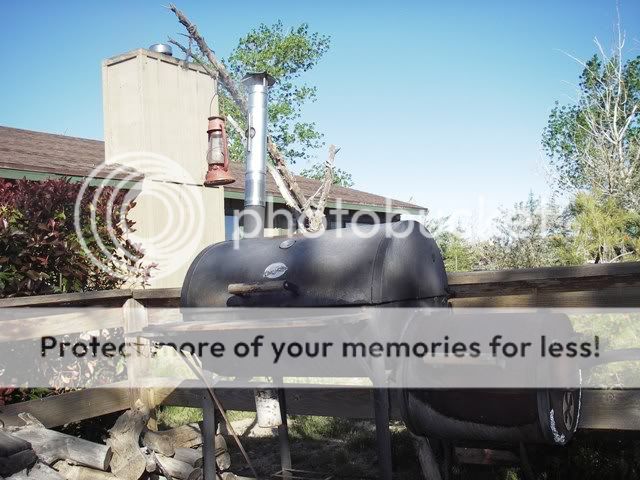
First view of the cooker at around 4:45am. That's condinsation on the lid and with the temps outside around 35 degrees it's going to take a long time to bust that cold soaked beast up to temp.

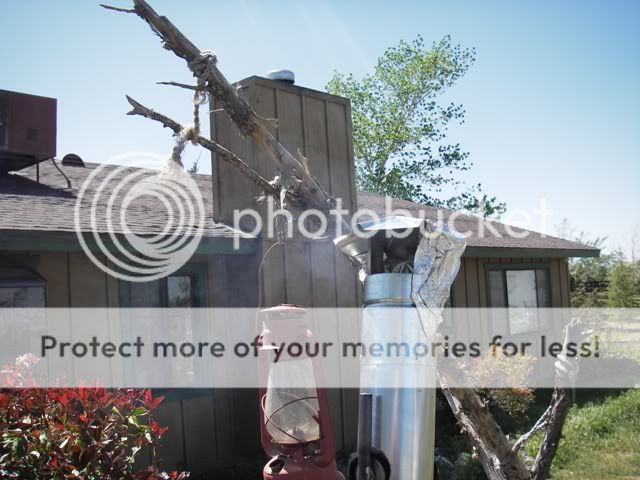
Getting readdy to toss in the coals
Chugging along, around noon I think.
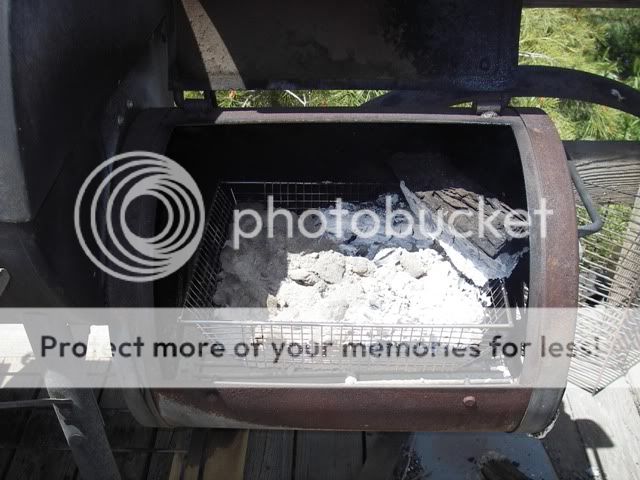
After about six hours the basket is ready for a reload.

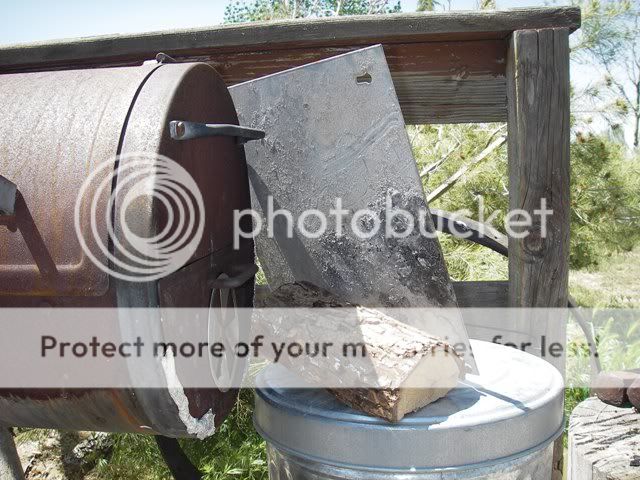
With the basket out you can see the electric fence wire in the upper left corner holding the grate.
Intake wind block mod.
Exhaust wind block mod.
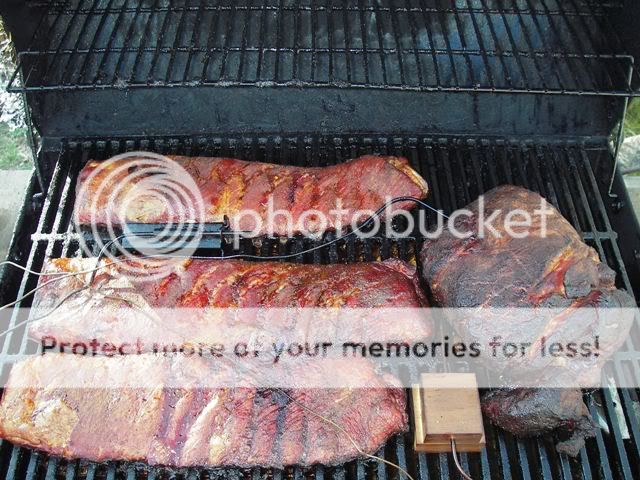
The goods. You can also see the temp probes in the metal bracket and wood block I mentioned.
I ran to Lowes with a list and high hopes. I knew I wouldn’t have time to fabricate a charcoal basket from scratch so I just picked up that shiny one for vegetables that other people tend to use. Easy enough, just trim the handles off when I get home and I can live with this one until I get a chance to fabricate something better. Next I found the 3 inch flex hose and tossed that in the basket. Looking for the perfect supplies for the smoke stack extension took the longest. I couldn’t find a valve that would work inline and figured I would just make one. I found 3 inch ducting, a vent cap for the top, and a supply of clamps.
I’m sorry I didn’t take any pictures during the build up of the valve and smoke stack, now I wish I did. Making the valve I cut a round piece of sheet metal the diameter of the inside of the duct and continued trimming until it fit just right. Then I took half inch hollow tubing and cut a slot down the middle of its length about four inches long. Next I cut another length of tube six inches long and notched it in the middle until the other one fit in like a “T”, now I welded the two forming the valve handle and shaft. About half way up the duct I drilled a half inch hole through both sides of the duct. To keep the round valve from sliding out of the handle/shaft assembly I welded a piece of metal on either side of the location the valve shaft would slide between. I lowered the valve down into the duct and slid the tube that had the lengthwise cut into the half inch holes I had drilled in the duct side. Since the valve/shaft tubing had the length wise slit, one half of it was on top of the valve and the other half on the bottom of the valve, like a sandwich. To help seal the half inch holes that the valve shaft goes through I used the fabric that I had from sweating copper pipes a while back. It’s that stuff you put in-between something you don’t want to burn and the pipes you are torching. This was placed on the outside of the duct with a washer to create a seal on the valve shaft assembly. With a hole drilled on the opposite side of the handle on the shaft I placed a bolt and nut, torqued and was satisfied with my hack work. Dang I really wish I had taken that picture now! If you aren’t confused then you really should be, go have a beer!
To fit the smoke stack extension I had to remove the existing valve that comes with the cooker. Easy enough, just remove one bolt, the tension spring and the valve comes, or falls, right off. To adapt the extension to the stubby pipe on top of the cooker I used a Campbells Chunky Soup can. The soup can was clamped to the cooker and the duct extension was pop riveted to the top of the can, bingo..looked GOOD!
Now the easy part, place the flex hose inside to re direct the exhaust, trim to fit and clamp in place. The charcoal basket was placed in the sfb on a grate that is sitting on top of the ash drawer guide. To keep the grate from falling down next to the cooker I just leveled the grate and used electric fence wire to secure it to a bolt. Slid the ash tray in and it cleared perfect! Mods done it was time to go inside and prep the meat for the morning. Oh, I hadn’t been watch the time and I almost died when I saw the clock, 11PM.
Grabbed the ribs, pulled the membrane off the backside, applied the rub, tossed in the fridge. The pork butt was a seven pounder! Removing the butcher paper like a Christmas present I was totally bummed when I noticed the meat was wrapped in twine. NO BONE! Ok, so at least it was seven pounds without the bone, I can live with that. I cut the strings and quickly applied the rub then tossed in the fridge. I was in bed by midnight and set my alarm for 4 AM. Now my wife thought I was totally nuts….”That’s too early, why are you doing that to yourself?”…
I close my eyes, the alarm sounds and I force my self out of bed, get the coffee pot going and pull the meat out to stabilize at room temp. Oh man, am I tired.
Go outside to fire up the cooker and it’s 35 degrees with a wind, it’s COLD! Slowly the beast comes alive and I’m happy to see the Minion method and all my new mods work..YEAY!
With the goods in the cooker the thing chugged along very well and my first stash of charcoal lasted six hours. My only problem was the wind. It was blowing and gusting into the intake at the sfb and into the exhaust stack. Both were problems as gusting into the intake was causing temp spikes and the gusts going down the exhaust was creating nasty back drafts blowing smoke out the intake! To help reduce these effects I placed foil half way around the exhaust port on the windy side and wedged a piece of metal down by the intake to block the wind. For the most part it worked out real well stopping the temp spikes and back drafts.
As the day drifted by the ribs finished at about 7:30pm. The cold air and winds really slowed things down. However, the butt was hanging tight at 145 degrees. The ribs were for dinner and the butt was only being cooked to be eaten another day so I could careless when it finished. After a great rib dinner along with a movie I started getting kinda tired. Maybe it was the beer? At around 10:30pm I admitted defeat and brought the butt into the oven set to 200 degrees. I set the temp probe alarm to 192 degrees and made a nest on the couch falling in and out of sleep with god knows what on TV. Somewhere about 4:15am the temp alarm sounded off, time to get back to work. As would be expected the meat just falls apart on its own and I had it shredded, in the fridge and I was off to bed by 5 am. Total cook time for the butt was 20 hours!
I think the butt took so long mostly because there was no bone. Maybe the ends of the bone migrate heat, but with out it the heat just has to take longer soaking in.
The other thing I found out was strange. While I was outside with the cooker I had two temp probes measuring different areas of the cooker. One was held in place with a metal bracket and the other probe stuck through a hole in a piece of wood. The one in the wood always measured about 30 degrees cooler. I placed the probe in the wood block next to the one in the metal bracket, same thing 30 degrees lower than the metal bracket. I removed the probe from the wood block and just set the probe next to the metal bracket and now it read the same. Conclusion, the wood block was somehow acting as an insulator. What I noticed was when I pulled the probe out of the wood block it was hard to back out. I had drilled the hole just bigger than the probe but when it heated maybe it put the squeeze on the probe restricting the normal heat expansion of the probe. Next time I will try it with a larger hole through the wood block and try it again.
Well folks, I know this is an exceptionally long post and I apologize for running on at the key board. I hope it was worth reading, next time I’ll make a better attempt to keep it short.
First view of the cooker at around 4:45am. That's condinsation on the lid and with the temps outside around 35 degrees it's going to take a long time to bust that cold soaked beast up to temp.
Getting readdy to toss in the coals
Chugging along, around noon I think.
After about six hours the basket is ready for a reload.
With the basket out you can see the electric fence wire in the upper left corner holding the grate.
Intake wind block mod.
Exhaust wind block mod.
The goods. You can also see the temp probes in the metal bracket and wood block I mentioned.
 Good work sir.