So i finally finished my mini. First off i got impatient i really needed a few more things to deck it out the way i wanted and didnt want to wait. So in the spirit of what building these is about anyways i decided to improvise a little, more on that in a minute first off the cook.
First cook the first cook went pretty well, i do not have pics of the cook only the build:icon_blush:. I did have a few minor problems i think i can rectify. 1. i could not keep the temp up very high ran about 200-215 most of cook, topped at at 240 momentarily and went back down. I had to pull ribs at about 6 hours and they were not quite done:tsk:, they were gooooood but a little tough. It was starting to rain and the cooker was simply starting to cool down.
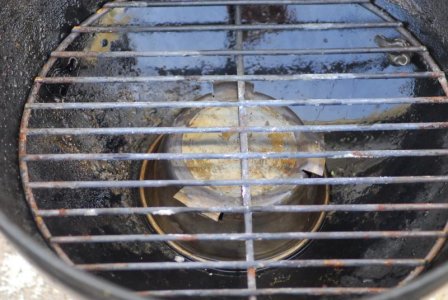
The build In the Second pic you will see my ash blocker, i looked at a couple other bowls but this one was a bit bigger around and taller fit almost snug against the grate. It did have a non slip coating on it. I had seen where others ground this off, i tried scraping but no grinder handy so i decided to burn it off, I put a few coals in the bottom of my chimmney, and got those going and sat the bowl on top, let it go pulled out with tongs rinsed off in garden hose and wiped away excess, took two rounds but worked well. I decided to do the flap method it worked really well.
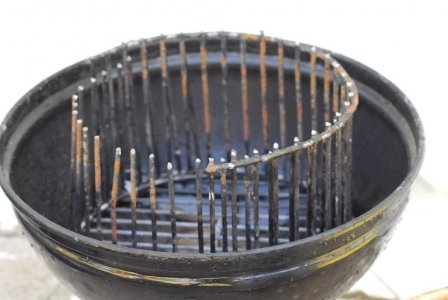
The 3rd pic is my charcoal basket, Did not have this on my first cook, wish i had think airflow was part of my issue. It is made of a donor grate from cheap gasser headed to land fill, Is make shift but should work perfect. You will also notice the height, decided could run it all the way up to the lip in the pan where my heat sink will be.
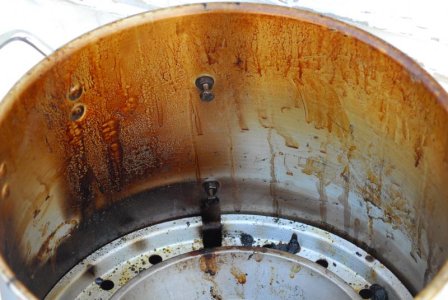
In the next photo you can see my setup for my shelves, as well as the adjustment i had to make to the steamer insert to make it sit in. I placed my shelves 3 in and 8 inches from top lip, this will give both about 5 inches of clearance. You also see a pie plate, did not like will replace with larger around heat sink that is slightly thicker. I am also going to chuck that insert and just use a rack since i dont think it was providing adequate air flow.
So in closing my ramblings i really like this, and think my main problem is airflow and coal management. Have the charcoal basket now will load more charcoal, and a few more lit coals than last time on top, get rid of steamer insert for a grate, find a better heat sink than the pie plate. I do want to do another one sometime, When i do it though will be a better build, take my time. The only other thing im thinking about with this is instead of painting is wrapping it in that exhaust tape.?:crazy: idk
First cook the first cook went pretty well, i do not have pics of the cook only the build:icon_blush:. I did have a few minor problems i think i can rectify. 1. i could not keep the temp up very high ran about 200-215 most of cook, topped at at 240 momentarily and went back down. I had to pull ribs at about 6 hours and they were not quite done:tsk:, they were gooooood but a little tough. It was starting to rain and the cooker was simply starting to cool down.
The build In the Second pic you will see my ash blocker, i looked at a couple other bowls but this one was a bit bigger around and taller fit almost snug against the grate. It did have a non slip coating on it. I had seen where others ground this off, i tried scraping but no grinder handy so i decided to burn it off, I put a few coals in the bottom of my chimmney, and got those going and sat the bowl on top, let it go pulled out with tongs rinsed off in garden hose and wiped away excess, took two rounds but worked well. I decided to do the flap method it worked really well.
The 3rd pic is my charcoal basket, Did not have this on my first cook, wish i had think airflow was part of my issue. It is made of a donor grate from cheap gasser headed to land fill, Is make shift but should work perfect. You will also notice the height, decided could run it all the way up to the lip in the pan where my heat sink will be.
In the next photo you can see my setup for my shelves, as well as the adjustment i had to make to the steamer insert to make it sit in. I placed my shelves 3 in and 8 inches from top lip, this will give both about 5 inches of clearance. You also see a pie plate, did not like will replace with larger around heat sink that is slightly thicker. I am also going to chuck that insert and just use a rack since i dont think it was providing adequate air flow.
So in closing my ramblings i really like this, and think my main problem is airflow and coal management. Have the charcoal basket now will load more charcoal, and a few more lit coals than last time on top, get rid of steamer insert for a grate, find a better heat sink than the pie plate. I do want to do another one sometime, When i do it though will be a better build, take my time. The only other thing im thinking about with this is instead of painting is wrapping it in that exhaust tape.?:crazy: idk