My vertical build (pics)

Pa_BBQ

is one Smokin' Farker
Joined
Nov 29, 2009
Messages
618
Reaction score
143
Points
0
Location
Wentzvil...
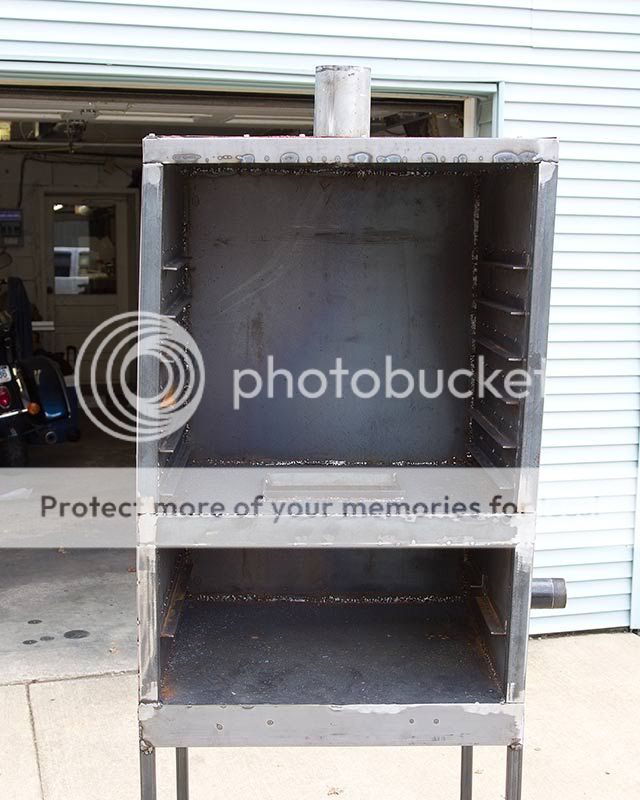
Finally got around to starting my insulated vertical build, please do not laugh at my welding, I had never welded before in my life until a couple weeks ago. I figured this would be a great way to learn.

I am only welding a little bit at a time, to keep the metal from warping.

Inside walls are 1/8", exterior walls will be 20 gauge.

Ideas, or suggestion appreciated.
 
Last edited:
Love your screen name! Welds look fine to me.
 
You still bringing the exhaust stack down below the roof line huh? What's the thought behind that? Not saying it's wrong, just curious. Most every other cabinet smoker I've seen just vents directly out of the roof.
 
You still bringing the exhaust stack down below the roof line huh? What's the thought behind that? Not saying it's wrong, just curious. Most every other cabinet smoker I've seen just vents directly out of the roof.

Actually I am not, going through the top, probably close to the back.
 
I also am unsure about the bottom, I am thinking just a solid plate of 3/16 or 1/8 since it will be on a stand and an ash pan will be under the charcoal basket.

With heat rising, would I need the bottom to be insulated, or would just a piece of plate steel?


I will paint it with high heat paint, that will help hide the ugly welding job.
 
Actually I am not, going through the top, probably close to the back.


Ah. Ok. It looked like from the drawing that the smoke stack was coming down behind the top grate.

I'd think that if you're going to the trouble of insulating, you might as well do the bottom too. But I've never built anything like this, so my opinion is worth less than most.
 
Ah. Ok. It looked like from the drawing that the smoke stack was coming down behind the top grate.

I'd think that if you're going to the trouble of insulating, you might as well do the bottom too. But I've never built anything like this, so my opinion is worth less than most.

I just never changed the drawing but realized the stack out the top was the way to go. I may put an elbow in it to get it outside the porch but think as long as its 4" pipe, should have plenty of flow for it to work.
 
how can someone make fun of somebody that is learning how to do something they have never done before like welding, looks great for welding a week!!
never make fun of some one working out or trying new things!
DONE!!!
i think i would have the exhaust run out the top in the center, as you said heat rising you might get an uneven heat distribution. colder in the front about half way up or so if the stack is tward the rear of the box.
the heat might just stay near the back.
my 2 cents
 
Great start! I can't wait to see the rest of the build.
I agree with ON THE FARM, exhaust stack should be dead center on top for the most even heat distribution.
I'm not a thermodynamics engineer, but I did stay at a Holiday Inn Express last night...
 
Thanks everyone, glad I posted before I finished. I will put the stack dead center of the top.

Would there be any harm in putting an elbow in it directing the smoke to the back say a foot above the cooker.
 
The longer the stack, the more draw the chimney will have. If you use eighth bends (45*) instead of quarter bends (90*) the restriction should be more than compensated for by the additional length of the stack.
 
Close to painting the inside with high temp paint, but wanted to post a pic to see if there is anything else I need to do before painting. I do not want to have to grind off paint to weld. :p

I will have a plate over the opening in the diffuser plate, but want it removable so when I do chicken I can use some direct heat. The opening is just smaller than 9 X11 so I can use a roaster pan, or cake pan to put water in if I want.

I made some stupid mistakes along the way, unlike wood, some can not be fixed.

vertical-0002.jpg


Suggestions appreciated.
 
Lookin good so far. Only suggestion I have is DONT paint the inside! Clean and season with oil and heat. I may be wrong here but thats what I do with the pits I build...
 
Only suggestion I have is DONT paint the inside! Clean and season with oil and heat.


I agree, sandblast it or clean it however you want, but don't paint it. After it is clean just season it like a cast iron skillet.
 
sorry, did not see these page 2 replies before posting a separate post asking about seasoning.
 
Looks great!! Rub it down with bacon and throw the heat to it!!!
 
how can someone make fun of somebody that is learning how to do something they have never done before like welding, looks great for welding a week!!
never make fun of some one working out or trying new things!
DONE!!!
i think i would have the exhaust run out the top in the center, as you said heat rising you might get an uneven heat distribution. colder in the front about half way up or so if the stack is tward the rear of the box.
the heat might just stay near the back.
my 2 cents

Oh my GOSH... this is terrible quality! I would do a much better job on my first try welding EVER and I would even be sure to gloat about it. I would never make mistakes or learn a thing because I would already KNOW EVERYTHING! :shock:

haha just kidding! This is really cool! I love it when people jump out of their comfort zones and try something new or different! There is NEVER a better chance for growth! Congrats on having the B@LLS to start a project like this head on AND post it online!!:thumb:

I hope to one day be in your shoes :grin:

If you dont mind me asking, how much did you invest in this project so far? Also did you come up with the design on your own, or did you devise it from another model you like, etc?

Again congrats and thanks for sharing!:cool:
 
Back
Top