Reverse Offset Smoker - Revitalize Help and Advice

Ikslawok

Found some matches.
Joined
Mar 19, 2019
Location
Port...
Name or Nickame
Iks
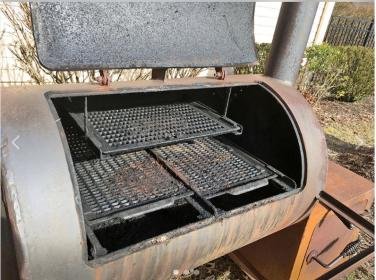
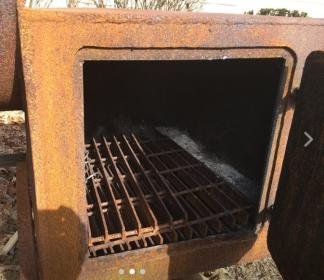
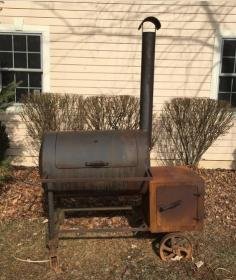
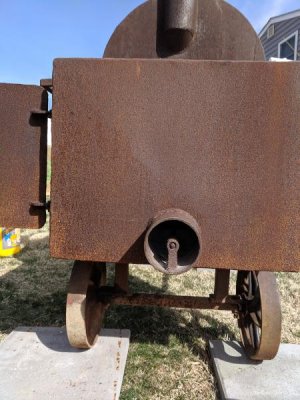
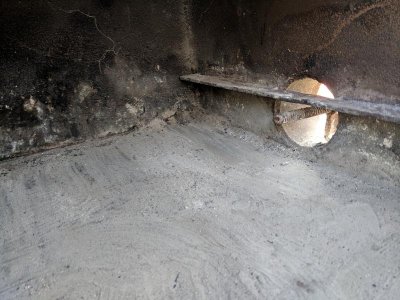
I have been on the sidelines a while doing my homework and dreaming of the day I could have a house and a yard to get a nice smoker. Tomorrow is the day this happens! I am going to pick up a Reverse flow Offset stick burner. It looks like it has some superficial exterior rust, but nothing structural. I was thinking of doing a full cleaning of it to remove all seasoning/rust to get myself off to a fresh start as well as to allow me to modify the unit to suite my needs. Things I feel need to be addressed, besides the cleaning. I do have the ability to weld/fabricate. Any suggestions to what I have already listed or things I have missed would be GREATLY appreciated as I cannot wait to start this project.


1. Firebox looks to not have an air vent visible. Install sliding vent if needed

2. Install some sort of adjustable throttle for the exhaust

3. Enhance the rack space to utilize the entire chamber (unsure what type of metal to use here as I have read a few things)

4. DripTray/Deflector Plate - Depending on what is there I was hoping to have this angled with a channel /general inward angle to allow for drippings to drain and also have a pipe/ballvalve installed to allow for draining of fat that is below chamber. (Any opinions on having the tray edges raised to allow for water retention here and have this be a water pan option as well)

5. Fire Elevation in Firebox - Firebox may need some love to have the grates raised in the box.


6. Have better wheels/redo mobility situation. - Unsure what to do about this entirely.

7. Paint with high temp paint - Unsure what type of paint to use

8. Temperature probe Port - Add an opening to pass through temperature probes

9. Add table /workspace on the front and side (Temp probe holder)
 

Attachments

  • FrontOpen.jpg
    FrontOpen.jpg
    26.8 KB · Views: 100
  • Firebox.jpg
    Firebox.jpg
    17.1 KB · Views: 99
  • Front.jpg
    Front.jpg
    16.5 KB · Views: 98
Your plan sounds about right. for a grate - number nine /3/4” flat expanded metal and 1/2” or 3/4”angle iron. It may be worth taking to a sandblaster and getting inside and outside sandblasted first .
 
Addressing #2 & #7...exhaust should be wide open at all times, so don't bother making an adjustable flap, and as far as the paint is concerned, take a look at this...https://www.por15.com/POR-15-High-Temp_p_104.html. I'm from LI and had those same dreams of owning a house with a nice yard which is why I moved to FL. Had some family down here for my dad's 80th and I was laughing with my step-brother about how my taxes are $760 a year and his are $14,700 lolol
 
Restore

In regards to #8 for the temperature probes, I used a Weber#85037 silicone gasket. You will need to drill a 1.25 inch hole usually with a step type bit in the side of the cooking chamber.


Got mine from Amazon for $10.
 
In looking more at the pictures you supplied:
The fire box does need a vent, either in the rear or on the right side at the bottom. Slider works well. You should also think about being able to remove ash/embers while fire is going on. Angle iron and a grate are fine to provide space under the fire.
Deflector should channel the direct heat & smoke across the bottom of the cooking chamber then to the stack. Clockwise circular flow inside the cooking chamber from bottom to top.

Use angle iron across the length of the cooking chamber instead of across the width to maximize cooking area. The cooking grates can go across the width.
Brackets welded or bolted for the workspace area. Stained wood can work well although I like the expanded metal as I use the shelf to also use a chimney type starter and the embers drop to the ground. Thin angle iron and expanded metal welded/bolted together work well for a shelf.

Mobility. I think the resting angle is a bit too great of a slope. Either smaller wheels or increase the height of the legs on the left side. You do want a positive flow of oils, grease and other liquids to go to the ball valve drain, just not a tidal wave. It is unclear in the picture, but a lifting handle on the left side helps to move it around, if needed.
 
Your plan sounds about right. for a grate - number nine /3/4” flat expanded metal and 1/2” or 3/4”angle iron. It may be worth taking to a sandblaster and getting inside and outside sandblasted first .

For the expanded metal im guessing stainless would be best here?
 
In looking more at the pictures you supplied:
The fire box does need a vent, either in the rear or on the right side at the bottom. Slider works well. You should also think about being able to remove ash/embers while fire is going on. Angle iron and a grate are fine to provide space under the fire.
Deflector should channel the direct heat & smoke across the bottom of the cooking chamber then to the stack. Clockwise circular flow inside the cooking chamber from bottom to top.

Use angle iron across the length of the cooking chamber instead of across the width to maximize cooking area. The cooking grates can go across the width.
Brackets welded or bolted for the workspace area. Stained wood can work well although I like the expanded metal as I use the shelf to also use a chimney type starter and the embers drop to the ground. Thin angle iron and expanded metal welded/bolted together work well for a shelf.

Mobility. I think the resting angle is a bit too great of a slope. Either smaller wheels or increase the height of the legs on the left side. You do want a positive flow of oils, grease and other liquids to go to the ball valve drain, just not a tidal wave. It is unclear in the picture, but a lifting handle on the left side helps to move it around, if needed.


*FIREBOX VENT*
This is shown in the additional picture I have in this post. There is a circular vent on the side of the box that has no dampening feature. Any suggestions on what I should do here? I feel like a conventional rotating circle vent may not provide enough air.

*COOKING GRATE*
The dimensions are 34 3/4" wide by 22 3/4" deep for the cooking area. This seems to mean i need to make this. Any suggestions on the material and build.

*RESTING SLOPE/MOBILITY*
From what I see there is no built in slope, this is just angled in the picture because the smaller wheels on the left are sinking into the ground.
There is a lifting handle on the left, however it really doesn't help much with the wheels that are on there now. The large ones are rusted into place. Got the casters rolling nicely so far.
 
In looking more at the pictures you supplied:
The fire box does need a vent, either in the rear or on the right side at the bottom. Slider works well. You should also think about being able to remove ash/embers while fire is going on. Angle iron and a grate are fine to provide space under the fire.
Deflector should channel the direct heat & smoke across the bottom of the cooking chamber then to the stack. Clockwise circular flow inside the cooking chamber from bottom to top.

Use angle iron across the length of the cooking chamber instead of across the width to maximize cooking area. The cooking grates can go across the width.
Brackets welded or bolted for the workspace area. Stained wood can work well although I like the expanded metal as I use the shelf to also use a chimney type starter and the embers drop to the ground. Thin angle iron and expanded metal welded/bolted together work well for a shelf.

Mobility. I think the resting angle is a bit too great of a slope. Either smaller wheels or increase the height of the legs on the left side. You do want a positive flow of oils, grease and other liquids to go to the ball valve drain, just not a tidal wave. It is unclear in the picture, but a lifting handle on the left side helps to move it around, if needed.

FIREBOX VENT
This is shown in the additional picture I have in this post. There is a circular vent on the side of the box that has no dampening feature. Any suggestions on what I should do here? I feel like a conventional rotating circle vent may not provide enough air.


GRATES
The dimensions are 34 3/4" wide by 22 3/4" deep for the cooking area. Smitty suggested to use expanded and angle irons. This the best option?


SLOPE/MOBILITY
From what I see there is a slite slope on the Deflector, this is just angled in the picture because the smaller wheels on the left are sinking into the ground.

There is a lifting handle on the left, however it really doesn't help much with the wheels that are on there now. The large ones are rusted into place. Got the casters rolling nicely so far.


NEW QUESTIONS/CONCERNS
1. There is a pipe/drain hole on the lower left of the unit, however this is not connected to the Deflector Plate. Would it be a good idea to open up the chamber from underneath to extend this train to the tray and also bang out/add an angle iron to have a channel/more of a slope?

2. Cleaning. I do not think this thing has ever really been cleaned. I took a sparkle knife and scraped a bunch of carbon/crud from the chamber, but I cannot reach below the deflector plate and up the exhaust. Is there anything I should/could do here. I did see some of that white fuzzy mold I have been hearing about all along that area. If I am not opening up the bottom to do the drain, should I worry or would a burn be more than enough.

3. Any other suggestions/questions that could help me have a better direction? Thanks again for the help.
 

Attachments

  • Side Firebox.jpg
    Side Firebox.jpg
    56.7 KB · Views: 10
  • Inside Firebox.jpg
    Inside Firebox.jpg
    83.5 KB · Views: 10
Back
Top