kwas68
is one Smokin' Farker
- Joined
- Jun 9, 2010
- Location
- Oak Forest, IL
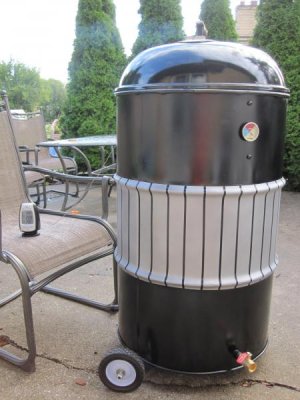
A couple of months ago, I was looking for a reason to build a UDS as I’m completely happy charcoal water smoker guy. You guys urged me on and I finally found some time to build it while raising 2 toddlers and being blessed with newborn twins. I read about the first 200 pages of the master thread (plenty of time in the hospital) and took notes. I felt like I had a pretty good idea of what to do. It took a lot of time to get through, but the reward was that the assembly was pretty painless.
Some of my observations on the build:
· Costs can add up. Man, stainless gets expensive! I was still able to build a smoker I’m proud of for less than $200.
· The Harbor Freight stepped drill bit lasted at least this one build. I feel like I got my money’s worth.
· A jig saw going through porcelain coated steel of the Weber base is as LOUD as all get out. Glasses and earplugs are necessary.
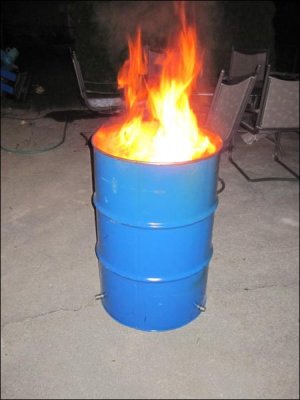
· The burn was fun because fire is cool! However, I thought I’d want to sit around and watch it but the burning exterior paint fumes suggested otherwise.
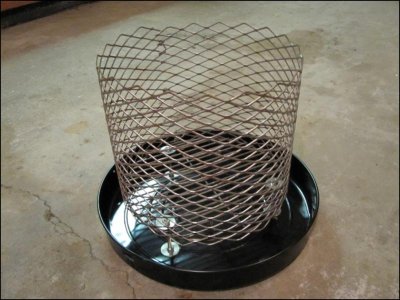
· The most complicated part of the build is the charcoal basket. Tying the expanded metal with rebar wire is a slight pain. Welders probably have an advantage here. I also had a hard time finding expanded metal and think I ultimately overpaid for it at Metals Supermarket.
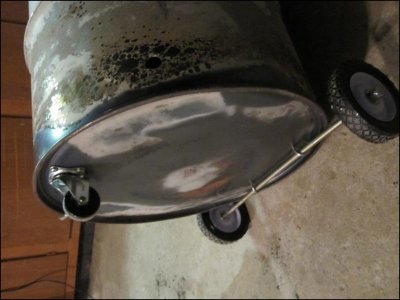
· The UDS moved pretty well on the wheels. I need to add some handles though.
· I was surprised by nothing. The thread was extensive and I was confident that what I was doing was going to work. And it did.
· Pointing out to my wife while watching BBQ Pitmasters that a BBQ champ like Bigmista was using a UDS, just like the one I was building, was pretty cool.
· I definitely felt a sense of pride in making it myself. I am excited to show people pictures of it.
The next planned mods are a large White Sox logo and a shelf with hooks for tongs and a beer opener (of course). The shelf can act as a handle for me to push the UDS around on the big wheels. I also need to put a handle of some sort on my charcoal basket.
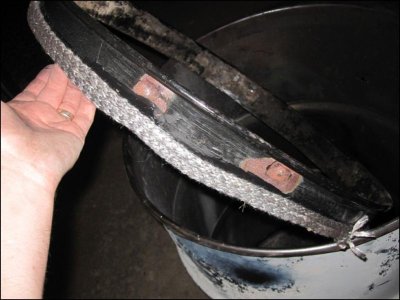
I smoked a fatty yesterday to season it. Found that the dial thermometer on the side read about 15° hotter than the temperature in the center. Had one ¾” plug removed and the ball valve opened ¼ of the way to maintain a 240° for a couple hours. It was a short run but I was impressed with the consistency.
I can’t wait to get more experience with it.
Big thanks to the Brethren for the expertise. I’m really glad that I found your site. Besides the UDS, I’ve learned about MOINKs, ABT’s, Chuckies, etc. Man, I didn’t know what I was missing. Thanks for the knowledge!
Some of my observations on the build:
· Costs can add up. Man, stainless gets expensive! I was still able to build a smoker I’m proud of for less than $200.
· The Harbor Freight stepped drill bit lasted at least this one build. I feel like I got my money’s worth.
· A jig saw going through porcelain coated steel of the Weber base is as LOUD as all get out. Glasses and earplugs are necessary.
· The burn was fun because fire is cool! However, I thought I’d want to sit around and watch it but the burning exterior paint fumes suggested otherwise.
· The most complicated part of the build is the charcoal basket. Tying the expanded metal with rebar wire is a slight pain. Welders probably have an advantage here. I also had a hard time finding expanded metal and think I ultimately overpaid for it at Metals Supermarket.
· The UDS moved pretty well on the wheels. I need to add some handles though.
· I was surprised by nothing. The thread was extensive and I was confident that what I was doing was going to work. And it did.
· Pointing out to my wife while watching BBQ Pitmasters that a BBQ champ like Bigmista was using a UDS, just like the one I was building, was pretty cool.
· I definitely felt a sense of pride in making it myself. I am excited to show people pictures of it.
The next planned mods are a large White Sox logo and a shelf with hooks for tongs and a beer opener (of course). The shelf can act as a handle for me to push the UDS around on the big wheels. I also need to put a handle of some sort on my charcoal basket.
I smoked a fatty yesterday to season it. Found that the dial thermometer on the side read about 15° hotter than the temperature in the center. Had one ¾” plug removed and the ball valve opened ¼ of the way to maintain a 240° for a couple hours. It was a short run but I was impressed with the consistency.
I can’t wait to get more experience with it.
Big thanks to the Brethren for the expertise. I’m really glad that I found your site. Besides the UDS, I’ve learned about MOINKs, ABT’s, Chuckies, etc. Man, I didn’t know what I was missing. Thanks for the knowledge!