
|
|
|||||||
| Q-talk *ON TOPIC ONLY* QUALITY ON TOPIC discussion of Backyard BBQ, grilling, equipment and outdoor cookin' . ** Other cooking techniques are welcomed for when your cookin' in the kitchen. Post your hints, tips, tricks & techniques, success, failures, but stay on topic and watch for that hijacking. |
 |
|
|
Thread Tools |
 09-08-2014, 03:49 PM
|
#1 |
|
Got rid of the matchlight.
Join Date: 07-24-14
Location: Highland, Utah
|
Thanks to many on the forum for sharing their builds. I spent some time gathering the necessary parts, and building my own finally. I basically used Norco's method except I added a third row of bolts for a diffuser/water bowl down right by the top of the charcoal basket, and also I figured I could hook on those bolts with some U-bolts hooked in the charcoal basket later -- then the smoker could be used as a grill if I want, but I haven't put the U-bolts on yet to try it.
First, I got $20 used donor Weber grill. I'm going as cheap as possible, so using the grill, dome, charcoal grate, and handles (I chiseled the handles off, but haven't mounted them yet).  I then found a drum (3 actually) that fit the dome perfectly. It was food grade, with agave syrup in them.  Lid fit perfectly:  Then I chiseled the lid off with an air chisel I bought at Harbor Freight: $8   Then I drilled out the intake holes and burned it out:   The paint came off pretty good and the liner too, especially at the top. On the bottom it was more of a bear -- and I looked like a coal miner when I got it down to bare metal. The inside of my nose (even with a mask on) was black. (no pictures -- you're welcome!) Once I got it to bare metal, I wanted to stop the rusting, knowing I couldn't get to welding and final assembly for awhile. So I coated the inside with cooking spray and painted the base coat on the outside. Turned out this was a mistake for two reasons. 1. It made the welding a little harder -- but mostly because I didn't know what I was doing; and 2. The oil came out through the hardware holes and are messing up the paint job.  A while later, I got the charcoal basket complete, and the intake nipples welded in, and started the seasoning. You can see the paint problems a bit in that picture:  Here's a picture of the inside after seasoning overnight. It looks good except for the bottom which didn't bake on. I assume because it was shielded from the heat by the ash catcher. Hopefully you brethren have some ideas there?  So here's the charcoal basket from the side. I got the #9 expanded metal as a scrap for $5, and used the large grate from the donor grill -- just to save money, not because I needed anything bigger :) The ash catcher is a 16" cheap pizza pan I found at walmart for $4. 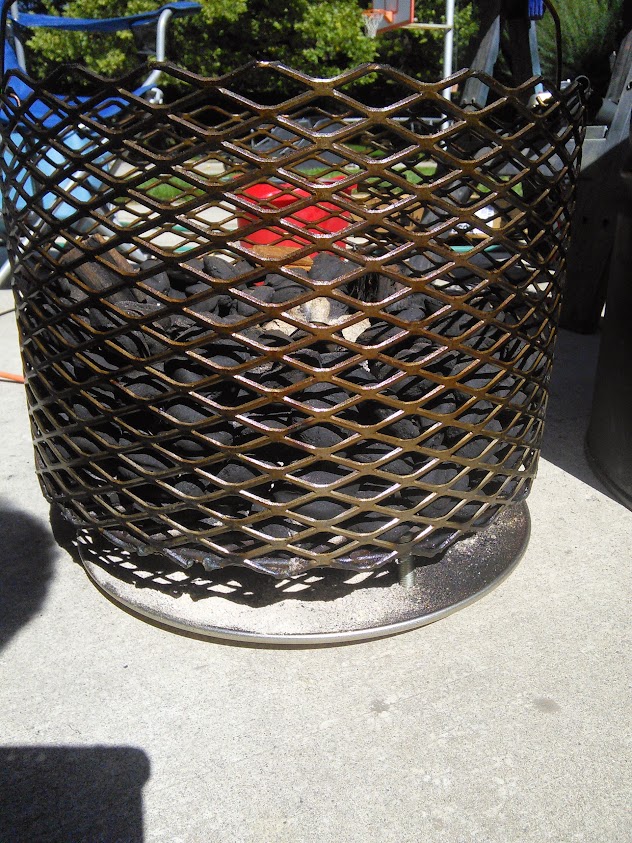 The charcoal in there is what's leftover from the seasoning the night before (ran for about 8 hours, 2 of which were full boar, open all the way) I started with a 20 lb bag of Kingsford blue, and 4-5 fist size pieces of hickory chunk. The handle is just ripped off a 5 gallon bucket. Here's a top view:  Yesterday, she ran for her first cook. I was in a hurry, so I didn't learn to trim the ribs properly from full spare to St. Louis (had only done St. Louis cut before). And I just did a simple cracked pepper and salt rub with a little paprika. I should have used more paprika, and some garlic and onion powder, and a little less pepper (it was VERY strong) But they came out good, were cooked properly. However, I think they would've been a bit better with a water pan. We'll find out next time! Two spares, and some cut off ends -- (not properly done)  I foiled them after about 3 1/2 hours -- they were looking a little dry (why I think the water pan would help) and they ended up having PLENTY of smoke on them, so it was probably good to foil them anyway. With my Masterbuilt electric, I never foiled, and never thought they were too smoky either though. Not sure if it's just the water, or the smoke quality -- probably a little of both. Here's what they looked like when I pulled them:  And a sliced view: 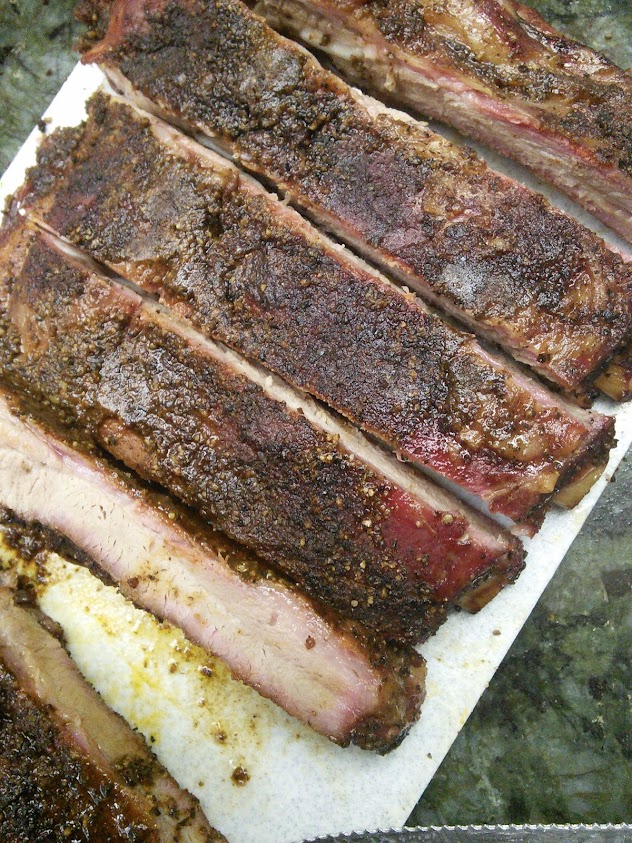 And proof that, most of them, were cooked correctly, the bone is clean!  Thanks everyone! I plan on having a bunch more fun with the UDS! It was fun to build, and made good food. I've also got some friends, neighbors, and relatives pretty jealous :) I should add the the smoker performed awesomely. Maintained reliable temps, though the temps changed with the food in -- probably due to the way the air flowed. |

|

|
| Thanks from: ---> |
|
09-08-2014, 04:09 PM
|
#2 |
|
is One Chatty Farker

Join Date: 06-12-14
Location: Charenton, La
|
Sweet build... Thanks for posting... Im getting closer to building my own
__________________
Primo Oval XL(Bernie),2 Weber Kettles,Weber Q,Masterbuilt Smoker,Maverick et-733,thermowand |
|
|
|
|
09-08-2014, 05:43 PM
|
#3 |
|
Babbling Farker

Join Date: 05-09-07
Location: God's Country Ossipee-Osceola NC
|
OutStanding build and first cook!!!
thanx for sharing... |
|
|
|
|
09-08-2014, 06:46 PM
|
#4 |
|
is One Chatty Farker

Join Date: 06-08-14
Location: Pa.
|
Nice build and good first cook.
__________________
Every cook is a learning experience....Big offset, Kamado, Blackstone |
|
|
|
|
09-09-2014, 06:02 AM
|
#5 |
|
Babbling Farker
  Join Date: 08-23-13
Location: Detroit Mi
Name/Nickname : tom
|
Nice build! As the temp drop, depending on how much meat you put on the grates will affect your cooking temp, just adjust. Looking at your ribs, did you flip/rotate them at all? A water pan should not be required, though some do use them. Most of us don't. Some folks wrap, some don't. What temp did you smoke them at? You will end up with grease coating/covering the bottom of your drum at some point at it will end up becoming baked on.
|
|
|
|
| Thanks from:---> |
|
09-09-2014, 02:42 PM
|
#6 | |
|
Got rid of the matchlight.
Join Date: 07-24-14
Location: Highland, Utah
|
Quote:
When I got back about 3 1/2 hours later, the temp was roughly equivalent at the rack and on the side @ about 210 degrees. I was wanting to be around 225-235, but it was what it was since I couldn't be there that time. Thanks for all the advice, look forward to any other info! |
|
|
|
|
|
09-09-2014, 04:23 PM
|
#7 |
|
Babbling Farker
 
Join Date: 07-19-11
Location: Live Oak, Florida
|
Nice looking UDS and the ribs look good as well.
__________________
Char-Griller Akorn, Webber 22.5 grill, performer, UDS. |
|
|
|
|
09-10-2014, 04:55 AM
|
#8 |
|
Babbling Farker
Join Date: 08-23-13
Location: Detroit Mi
Name/Nickname : tom
|
Get a cheap stand alone thermometer and put it in the middle of what ever your cooking if you don't have access to a probe thermometer to see what your grate temp next to the food is really cooking at. Once you learn what the temp differences are, you don't always have to measure the grate temp. Unless you want to. Also if your using "used coals" in your basket, you typically need a lot more intake air to reach the same temps as you would with fresh coals. At least on my smokers that has been my experience.
|
|
|
|
|
| Tags |
| drum, ribs, smoke, smoker, uds, ugly |
|
|


 How I Fire Up That Ugly DrumPit Smoker!!!!
