Hey Hyper, I would get rid of the tabs on the tool hanger and bolt/crew it to the side if you want it. It is gonna cause an air gap that is going to screw with your temp control.
drum1.jpg


Just trying to help Swamprb out! :p[/QUOTE]

This is what I did...just flatten the tabs out and bolt in on...I need a table now!
 
looks like I better do some more reading before I go drilling into this barrel.. I'm going to burn it now though :clap2:

Tough to screw up a burn, so have at it! While your doing that, read away. You might have 2 or 3 burns ahead of you with that red liner that your barrel has. You gotta start somewhere! The simple build is showcased a few times in there, and was created by Norco(?).
 
Second build

Hello all. Just Picked up 2 more drums the other day from a guy who said they had soy bean oil in them. This will be my second build (I won't bother posting pics of the first- it was kind of a disaster, but I leared a lot and it makes "OK" BBQ). Probably do a build blog this time around. I'll put up a link when I get it goin.

I really learned a lot from this massive thread. Hoping to put some good ideas to use.
 
Looks to me like he's got 8 tool hangers already on there! They just have acorn nuts on the ends of them instead of hooks!

You nailed it. I bought all the stuff at the same time however once I put it all together, it became apparent that the tool hooks weren't really necessary. I toyed with the idea of shortening the screws and then capping them with the acorn nuts however I kind of like it the way it is. :thumb:
 
maiden run

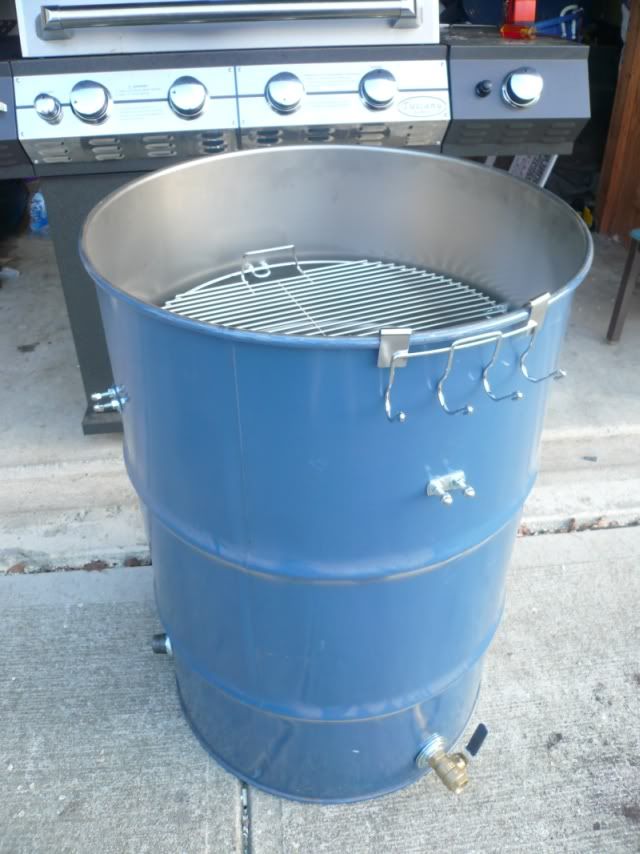
Finally finished my first UDS and took him out for a trial run. I thought this was going to be an easy Cheap build after getting 2 free open lid drums. Wrong, got just about $150.0 into that free drum. $10 for a donor kettle (not a weber) from craigs list.Cooking and coal grates,new. Four thermometers,2 of which are electronic,programable,remotes.one,3" dial with a about a 3" stem and the otherone was a cheap 12" fryer thermo.

I did run into a slight problem using the 3-2-1 method for a slab of ribs. Slightly burned. I used the large dial Thermometer to set the cooking temperature of 225* to 250*. Dialing that in was sweet, and it held.

The 12" fryer gage (center of drum)gave me up to 120* higher readings than the large one with the 3" probe., Lesson learned. Plug the hole for the large gage and put in the center of the lid,or just work with the fryer gage and the electronic ones for the internal meat temperatures.

My Fatty went from 60* to 165* internal temp in just about 1 hour, paying more attention to the large gage which hung at about 230* for the most part,and not paying that much attention to the small gage.

Made my drum with 2 lids, flat one when only useing the bottom grate, and dome lid when i'm useing 2 grates. got a little prOn to go with post.

All in all, had great time building it, and THANKS to all of folks that contributed to this thread and made it all possible. Thanks again. leonard
 
Last edited:
Sooooo, what are you saying? The "large" guage had a short probe, and the "small" guage had a long probe? As in, using the long probe at the rack level is the better option for getting a good cook temp. The other option is to use a digtal with a probe lead on the grill, suspended in something to keep it off the rack (block of wood w/ a hole). Right?
 
That is what i am saying McGurk. Yes to all of your questions. My slab of ribs should not have been burned using the 3-2-1 method. Smoking for 3 hrs. at 225* to 250*looking at the short stemed thermometer. The actual temps were in the neighborhood of 350* to 380* on the long stemed gage. The temp is much hotter in the center of the drum than on the outer sides.

I will use my second digital probe next to the meat in a block of wood the next time i am smoking. I will also relocate the short probed gage as close to the center of the lid as i can.

Does all this make any sense to you folks ????? Or am just messd up from reading 386 pages ,over 5787 posts.?
 
I don't think you should have 100 degree difference between the two. I usually find 40 and then that goes down to about 20 on a long 225 cook. I would pull the 12" guage out 9" and see if it reads the same as your 3". 3-2-1 is long for ribs on a UDS. The UDS are like their owners- quicker than most!! At 250 I do 2 1/2 hrs and start checking. I seldom foil and when I have nice pull back and flex- then I'll sauce some of the ribs to taste and mop mine with a scotch/cider a few times.
UDS are easy cookers but liek anything good, they still do have individual quirks. Experience on them usually solves that.
 
new barrel is all burned out.. except for the lid it still has the lining on it....
looking for suggestions on the intake and the lid..
what would be the best way to drill the wholes..

My last one just had 4 1" capped holes...
hard to say how well it worked because it wasn't air tight.. this one I hope to build better
 
Got some more done tonight.

smalluds22.jpg

Rack mounts

smalluds23.jpg

Racks, all from donor grills. Need some cleaning.

smalluds24.jpg

Outside, not much to say.

smalluds21.jpg

Probe mount

smalluds25.jpg

Hardware used, needed to drill it out with an 1/8th inch bit, and now it's a snug fit.

Gotta do some last-minute things and some final prep, and it's initial cook should come soon!
 
new barrel is all burned out.. except for the lid it still has the lining on it....
looking for suggestions on the intake and the lid..
what would be the best way to drill the wholes..

My last one just had 4 1" capped holes...
hard to say how well it worked because it wasn't air tight.. this one I hope to build better


It sounds like this your second build, so what did you use the last time to drill your holes? And when you say it wasn't air tight, are you referring to the intake holes or to the lid? If you were talking about the lid, it isn't as critical as the intake holes. If you had (4) capped holes on your old drum, you could just buy a ball valve to thread onto one of the nipples and continue to use the other (3) caps for intake control. Browse through your hardware store's plumbing department and see waht fit. They usually run around $9-$11 for a 3/4" threaded ball valve.
 
It sounds like this your second build, so what did you use the last time to drill your holes? And when you say it wasn't air tight, are you referring to the intake holes or to the lid? If you were talking about the lid, it isn't as critical as the intake holes. If you had (4) capped holes on your old drum, you could just buy a ball valve to thread onto one of the nipples and continue to use the other (3) caps for intake control. Browse through your hardware store's plumbing department and see waht fit. They usually run around $9-$11 for a 3/4" threaded ball valve.

this was what happened with my old drum.. I didn't have a big enough drill bit and didn't want to pay the 40$ they wanted for the step bit.. So I bought the cheapest thing, a concrete bit.. this didn't work at all! So I decided to weld them in the not so round hole.. That didn't work either burned holes right through the barrel.. So the I took a brazing rod and tried to seal them up the best I could..

As for the lid it was just a board that became more warped over time.. I feel like I was doing more grilling than smoking..


So If I understand this right... Do I still need 4 intake holes or just 1 with a valve?
 
The intent of the intake is to have absolute control of the volume of air going into the smoker for temp control, from all open (hot) to completely shut (cold/dead). There are many methods out there but they all come down to that. The "industry standard" (but not necessarily the best method) that can be pulled from this lengthy post is to use 3) holes that will hold 3/4" iron pipe nipples. They require a 1" hole to be drilled, either using a 1" hole saw ($7) or a large "step bit" ($30-$40). Ask your hardware store about them. Then, get 3/4" caps for 2) of them, and a 3/4" threaded ball valve for the third one. Now you have 3) holes in your drum, so thread the 3) nipples in. Either weld them in or use conduit nuts and washers to hold them in. Thread the Ball valve onto one of them and leave the other two open. These are now your completed intakes.

Now for the smoking: Leave all of the intakes open for your initial warmup after you've started your charcoal/lump, and watch your temps as they rise. When you are getting to 180 degrees or so, you'll want to cap the two threaded intakes. Leave the ball valve open, but get ready to start manipulating it to reach your desired temp. It is easier to bring your heat up to your desired temp (close them early), than to go past and try to bring it back down (close them late).

Other variations of this use ball valves on each nipple, more holes and nipples, just open holes and flat magnets for control, or one LARGE intake that can be controlled with some sort of valve.

I think you need to READ MORE OF THIS THREAD!!! The answers are all there, but are mixed in with a bunch of back and forth between creators. But, it's all there.
 
know the answer are all there, this is where I got the idea to build my first one.. I have a step-bit now, I picked it up at arbor freight for like $4 and it worked like a knife in butter when I was installing my temp gauge.
 
I think I understand a little more now, last time I had 4 holes with conduit nuts and caps. This time I only need 3 holes one with a valve? I guess I'm confused on if you still have intake holes with caps their either open or closed... does the valve really let you adjust air intake that much?
or is the idea to have them open to get you heat up. cap them back up then use the valve to fine too your temps?

I think of the pipe caps and the ball valve like a three-speed transmission. First gear: All caps on, adjust flow with ball valve. Second gear: One cap off, adjust flow with ball valve. Third gear? Yep, 2 caps off, adjust flow with ball valve. In first gear the ball valve will give you adjustment from 0 to 100%. In second gear, the ball valve will take you from 50 to 100%. In third gear, the ball valve will take you from 66 to 100%. So yeah, it adjusts intake air significantly.

What I've heard, although I haven't tested it, is that three open 3/4" pipes will run at about 400 degrees. If you don't want to go hotter than that, it doesn't make much sense to have a huge intake. Three 3/4" pipes (0.82" inner diameter) have about the same open area as a single 1.42" inner diameter intake. A 1-1/4" pipe fitting has an inner diameter of 1.66", which is almost exactly the same as *four* 3/4" pipes, and is PLENTY of open area. Based on this, a 1.5" diameter piece of exhaust tubing would be a nice size for a single intake (it's almost exactly the same open area as 3 3/4" pipes). Going much bigger than this would seem to me to result in an intake damper that is VERY sensitive to adjustment at the low end, i.e. if you're trying to run the smoker at 225, since it'd flow a lot of air even when barely cracked open.

Those with 2" or larger single intakes: Does this happen to you, or does it work out just fine?
 
I think I understand a little more now, last time I had 4 holes with conduit nuts and caps. This time I only need 3 holes one with a valve?
Short answer; Yes. 4 would work though: 3) with caps and 1) with a valve.

I guess I'm confused on if you still have intake holes with caps their either open or closed... does the valve really let you adjust air intake that much?
Yes.

...or is the idea to have them open to get you heat up. cap them back up then use the valve to fine too your temps?
Yes! Yes! Yes!
 
Rodney- it doesn't matter if its a 6 inch hole- it only matters how much is open. My car has more HP than I could ever use but all that matters to my wife is how much I open 'er up. Justa touch and she stays happy. I don't find the 2" hole on my barrel hard to use and infact I prefer it to multiple holes and caps. I have the same intake on the egg and I don't find it hard to control on there either.
The neat thing about drums is you can do what ever you like and if it doesn't work then you can adjust it.
 
Back
Top