kcmike
is Blowin Smoke!
I made this picture tutorial back in 2006, and it's been around the internet a few times, but has recently dropped into obscurity. So, since I've seen questions posted frequently here about how/when to separate the point from the flat, I thought I'd share my thoughts and process with The Brethren.
First, a little background... Flash back about 10 years... One of my favorite bbq foods to eat is burnt ends. However, I was having a hard time nailing down the exact process to produce the very best burnt ends possible. When I first started cooking brisket, I just cooked the entire thing until the flat was done and then separated the point/flat, but back then I never put the point back on the grill. A little while later I heard about cooking the full packer until the flat was done, then separating the flat from the point; the flat went into foil and a cambro and the point went back on the grill for a couple more hours. It was at that point that I thought I had found the Holy grail of burnt ends....
That was until one fateful day when I stopped in at LC's BBQ in Midtown Kansas City. I was blown away. Their burnt ends were big, tender, juicy, and had a wonderful black bark on all three sides. These were (and are) still the best burnt ends I've ever had from a bbq joint, and they were a hell of a lot better than what I was making at the time.
So, I set out on a quest to figure out how to duplicate LC's burnt ends. In the years between 2002 and 2006, I was competing and catering pretty heavily so this gave me ample opportunity to so some heavy R&D as I was regularly cooking cases of brisket at a time. Using my current method at the time of separating the point from the flat after the flat was finished and continuing to cook the point for several more hours, I knew the number one thing my burnt ends were missing was that awesome bark all the way around, and they also could have been cooked down quite a bit more so they weren't still so fatty. The extra 2-4 hours on the grill just wasn't forming a good bark on the "scab" side of the point and the fat wasn't rendering well enough.
I knew if I wanted a good bark all the way around, I was going to have to figure out some way to cook the point all by itself for the entire time. I also figured this cooking method would also help render more of the fat out as well. I was right. The resulting burnt ends where every bit as good as LC's (if not a bit better if I do say so myself...), and as an added side benefit, I could now cook a 14 lb. packer brisket to perfection in about 8 hours. Not a bad benefit...
I'm sure I didn't invent this process, I just happened to stumble upon it by lots of trial and error. So, here's a quick picture tutorial on how to butcher a whole brisket BEFORE cooking...
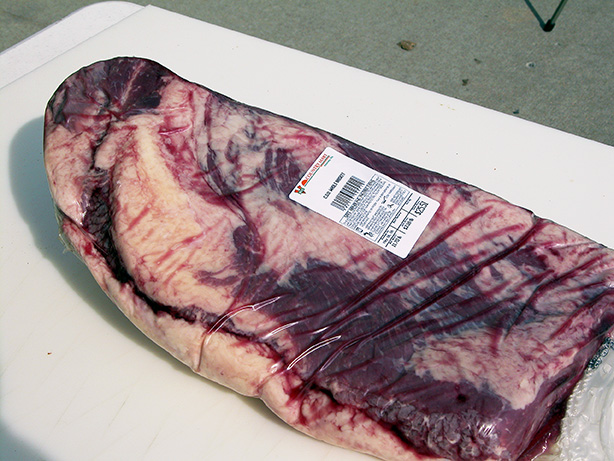
One whole packer brisket...
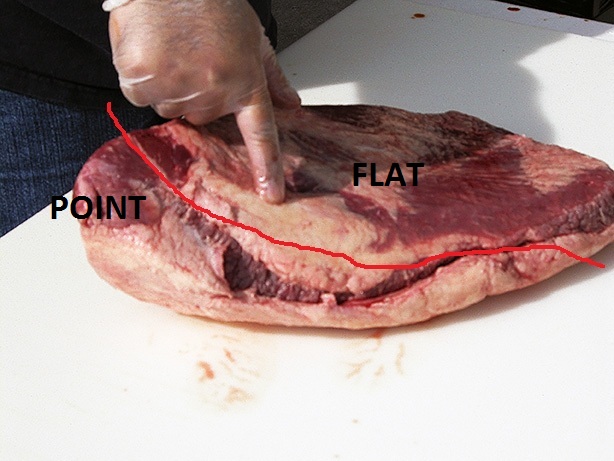
This picture shows the location of the point and flat. I'm pointing to the "kernel" as I call it. It's a big lump of fat and the first things I cut out...
This picture shows the kernel removed. With it out of the way, you can clearly see the vein of fat that separates the point from the flat...

This is the brisket rotated 90º and it shows the same fat vein from the other side. It's this vein that you'll follow with your knife as you begin to separate the two muscles...

Begin by making an incision in the fat vein and with one hand pull up and back with steady pressure as you follow the fat vein with the TIP of a very sharp knife. Just use the very tip of the knife...

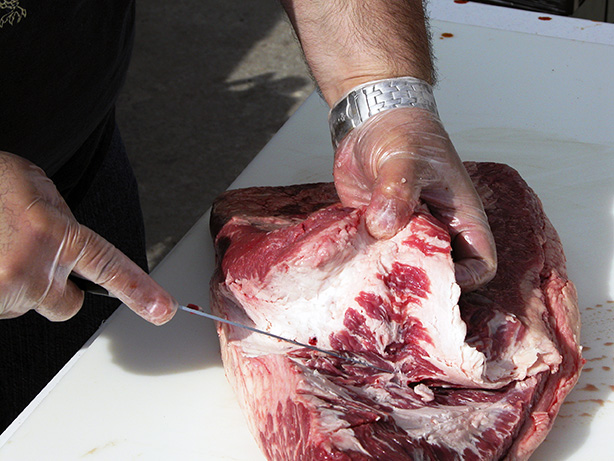
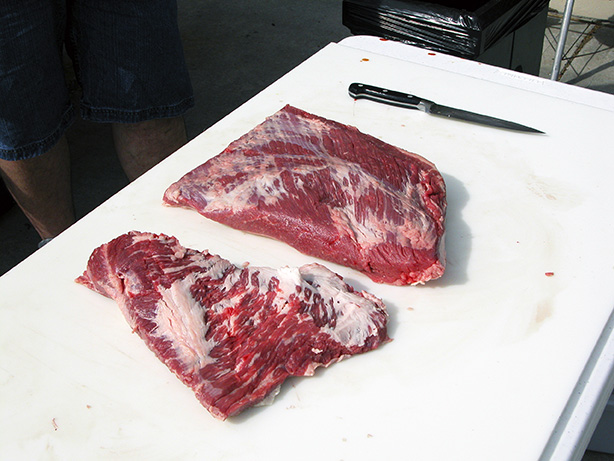
Keep following it back until you reach the back or "fat cap" side of the brisket. Be careful as the fat vein does get rather thin as you move toward the middle of the brisket flat. Just go slow and take your time until you get the hang of it. When you reach the table, you're done...


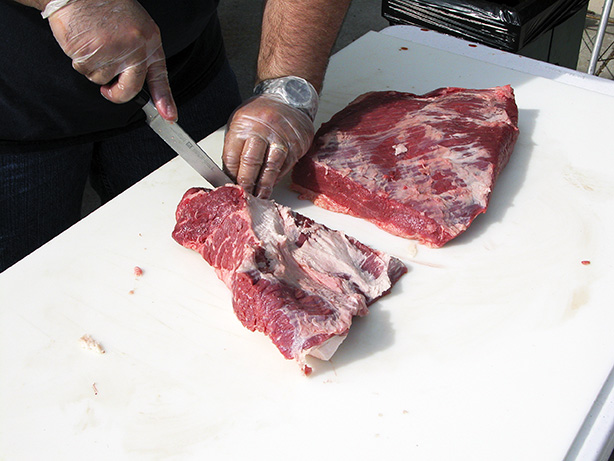
Now, begin trimming nearly all the fat from the outside of the point. It has plenty of fat inside, so it doesn't need any fat on the outside. Plus, in order to create bark you have to get down to bare meat since bark won't form on fat...

Done, fat side... (this picture was taken over 5 years ago, if I were trimming this today, the point would have been much leaner still and I would have trimmed more fat of the fat cap on the flat too...)

And lean side...
Next, brush all surfaces with a light coating of plain yellow mustard...

And apply an ample amount of rub to all sides...

These can go right on the smoker or you could wrap them in plastic wrap and fridge them for up to 12 hours first.
Cooking method is simple.
Hope this helps someone. Holler with any questions.
Mike
First, a little background... Flash back about 10 years... One of my favorite bbq foods to eat is burnt ends. However, I was having a hard time nailing down the exact process to produce the very best burnt ends possible. When I first started cooking brisket, I just cooked the entire thing until the flat was done and then separated the point/flat, but back then I never put the point back on the grill. A little while later I heard about cooking the full packer until the flat was done, then separating the flat from the point; the flat went into foil and a cambro and the point went back on the grill for a couple more hours. It was at that point that I thought I had found the Holy grail of burnt ends....
That was until one fateful day when I stopped in at LC's BBQ in Midtown Kansas City. I was blown away. Their burnt ends were big, tender, juicy, and had a wonderful black bark on all three sides. These were (and are) still the best burnt ends I've ever had from a bbq joint, and they were a hell of a lot better than what I was making at the time.
So, I set out on a quest to figure out how to duplicate LC's burnt ends. In the years between 2002 and 2006, I was competing and catering pretty heavily so this gave me ample opportunity to so some heavy R&D as I was regularly cooking cases of brisket at a time. Using my current method at the time of separating the point from the flat after the flat was finished and continuing to cook the point for several more hours, I knew the number one thing my burnt ends were missing was that awesome bark all the way around, and they also could have been cooked down quite a bit more so they weren't still so fatty. The extra 2-4 hours on the grill just wasn't forming a good bark on the "scab" side of the point and the fat wasn't rendering well enough.
I knew if I wanted a good bark all the way around, I was going to have to figure out some way to cook the point all by itself for the entire time. I also figured this cooking method would also help render more of the fat out as well. I was right. The resulting burnt ends where every bit as good as LC's (if not a bit better if I do say so myself...), and as an added side benefit, I could now cook a 14 lb. packer brisket to perfection in about 8 hours. Not a bad benefit...
I'm sure I didn't invent this process, I just happened to stumble upon it by lots of trial and error. So, here's a quick picture tutorial on how to butcher a whole brisket BEFORE cooking...
One whole packer brisket...
This picture shows the location of the point and flat. I'm pointing to the "kernel" as I call it. It's a big lump of fat and the first things I cut out...
This picture shows the kernel removed. With it out of the way, you can clearly see the vein of fat that separates the point from the flat...
This is the brisket rotated 90º and it shows the same fat vein from the other side. It's this vein that you'll follow with your knife as you begin to separate the two muscles...
Begin by making an incision in the fat vein and with one hand pull up and back with steady pressure as you follow the fat vein with the TIP of a very sharp knife. Just use the very tip of the knife...
Keep following it back until you reach the back or "fat cap" side of the brisket. Be careful as the fat vein does get rather thin as you move toward the middle of the brisket flat. Just go slow and take your time until you get the hang of it. When you reach the table, you're done...
Now, begin trimming nearly all the fat from the outside of the point. It has plenty of fat inside, so it doesn't need any fat on the outside. Plus, in order to create bark you have to get down to bare meat since bark won't form on fat...
Done, fat side... (this picture was taken over 5 years ago, if I were trimming this today, the point would have been much leaner still and I would have trimmed more fat of the fat cap on the flat too...)
And lean side...
Next, brush all surfaces with a light coating of plain yellow mustard...
And apply an ample amount of rub to all sides...
These can go right on the smoker or you could wrap them in plastic wrap and fridge them for up to 12 hours first.
Cooking method is simple.
- Put trimmed/rubbed point and flat on cooker at same time. Flat to the cooler side and point to the hotter side.
- Cook flat to around 165º internal and then wrap flat loosly in a layer of aluminum foil. Leave the point alone, don't wrap it, don't touch it. This is typically at around the 6 hour mark (if cooking at 250º).
- Cook flats about 2 more hours, or until a temp probe slides into the meat with very little effort.
- Typically, I can remove both foiled flat and naked point at the same time. Sometimes tiny points might get done an hour or so earlier, so just keep an eye on them during the 7-8 hour mark.
- Once the points are off the grill, wrap them in foil and let them rest for at least 30 minutes.
- Slice flats and chunk points into 1" cubes. Typically, no additional sauce or rub is necessary (maybe a splash of apple juice) and no additional cooking is needed.
Hope this helps someone. Holler with any questions.
Mike
Last edited: