My NanoQ arrived friday, and I began my quest: the final mod of my 22.5 Weber kettle.
It had been a long process.
I started by changing out the stock grate for a cast iron replacement. From there, I bought a high quality themostat/temperature gauge and installed that on the lid: a much needed, and major improvement (note: if you do this yourself, spend the extra money and get a good gauge. You won't be sorry). In what I thought would be my last addition, I ordered the Cajun Bandit rotesserie and and ring, and added some charcoal baskets and, of course, a grill cover.
But, pinpoint temerature control intrigued me. So, I decided on one last mod: the NanoQ.
It wasn't an easy decision. It would involve drilling another hold: not something a Weber owner relishes. And then, there's the peer pressure.
On a recent thread, I had been warned against this modification... strongly. But in the end, I decided to do it.
I had scouted all of the available temperature units, but I finally decided on the NanoQ. What sold me on it was the fact that it did not have a temperature display built in: I didn't need it. I'd already installed a good thermometer/temp gauge, and a digital readout of the same data seemed redundant.
So the first order of business: drill a 1 1/4 inch hole for the fan to mount into. Lowes had exactly what I needed:

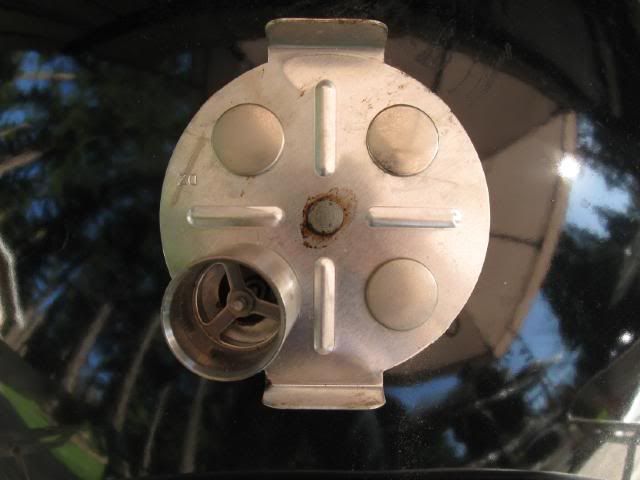
The NanoQ comes with a "kill" plug: a 1 1/4 inch rubber plug that will insert into the hole when the grill is not in use, so choosing a spot on the bottom of the kettle that will not interfere with the opening and closing of the air intake vents is critical: you may want to grill up some hotdogs, and the NanoQ will not be necessary, so you want to be able to rotate the vent cover. I was able to drill a nice, clean hole.
But then came the proverbial monkey wrenches in the machine. The stainless steel fan with the patented "magnetic mount" wasn't magnetic. Instead, they provide a mountable side bracket.
One major problem: there's nothing to securely mount it to on a kettle, short of drilling another hole and installing a metal bracket. Who wants to do that?
Enter some good old yankee ingenuity.
Another trip to Lowes and I had my solution: I bought a 1 inch round conduit hanger and replaced the square tightening bolt on it with a wing nut:


One dollar and 32 cents later, it's mounted and ready to go. Easy on, and easy to take off: no tools needed.
I was now ready to take the NanoQ on its maiden voyage of smoke.
But then another monkey wrench in the machine: some drunk slammed his Mercedes 350 into one of my SUV's. My test run would have to wait until Sunday:

Did I mention the SUV was parked on the next street? It's my old vehicle, and our son uses it to tow his trailer when his band plays gigs. The 25 year-old drunk who slammed into it was doing 60 in a 25 MPH zone (a residential street) and passed out. The crash woke him up, and despite having no front end, he tried to back up and flee. But he had one major problem: the trailer hitch Uhaul installed had a hold on his engine, and he couldn't get free. He tried to run, but made it just 3 steps before collapsing. The cops and ambulance showed up a few minutes later and carted him and his totalled 350 away. Interestingly enough, the cop found a week old speeding ticket in his glove box: he was cited for doing 110 mph in a 55 mph zone.
On Sunday, I was ready to go.
The plan? Smoke a chicken @ 225 degrees until done. Would the NanoQ be up for the job? Below are pictures taken at regulat intervals during the cook:


The NanoQ worked to perfection! It never wavered, and recovered quickly all 3 times I opened the lid to add charcoal, hickory chips, and take physical temp readings.
During the cook, I was watching Primal Grill, and it was the episode where he cooks the African chicken, and gives a mini-history lesson on BBQ.
I must say, pioneering this on the Weber Kettle made me feel like the 1st caveman (probably named Ogg) must have felt in front of his tribe on that historic day:
First Caveman: "What Ogg doing? That not spear, it round. Wait... Ogg invent wheel!"
Loud applause from the tribe.
Second Caveman: "That not wheel. Ogg invent Kettle grill."
Standing ovation from the tribe!
The NanoQ mod: total success.
It had been a long process.
I started by changing out the stock grate for a cast iron replacement. From there, I bought a high quality themostat/temperature gauge and installed that on the lid: a much needed, and major improvement (note: if you do this yourself, spend the extra money and get a good gauge. You won't be sorry). In what I thought would be my last addition, I ordered the Cajun Bandit rotesserie and and ring, and added some charcoal baskets and, of course, a grill cover.
But, pinpoint temerature control intrigued me. So, I decided on one last mod: the NanoQ.
It wasn't an easy decision. It would involve drilling another hold: not something a Weber owner relishes. And then, there's the peer pressure.
On a recent thread, I had been warned against this modification... strongly. But in the end, I decided to do it.
I had scouted all of the available temperature units, but I finally decided on the NanoQ. What sold me on it was the fact that it did not have a temperature display built in: I didn't need it. I'd already installed a good thermometer/temp gauge, and a digital readout of the same data seemed redundant.
So the first order of business: drill a 1 1/4 inch hole for the fan to mount into. Lowes had exactly what I needed:
The NanoQ comes with a "kill" plug: a 1 1/4 inch rubber plug that will insert into the hole when the grill is not in use, so choosing a spot on the bottom of the kettle that will not interfere with the opening and closing of the air intake vents is critical: you may want to grill up some hotdogs, and the NanoQ will not be necessary, so you want to be able to rotate the vent cover. I was able to drill a nice, clean hole.
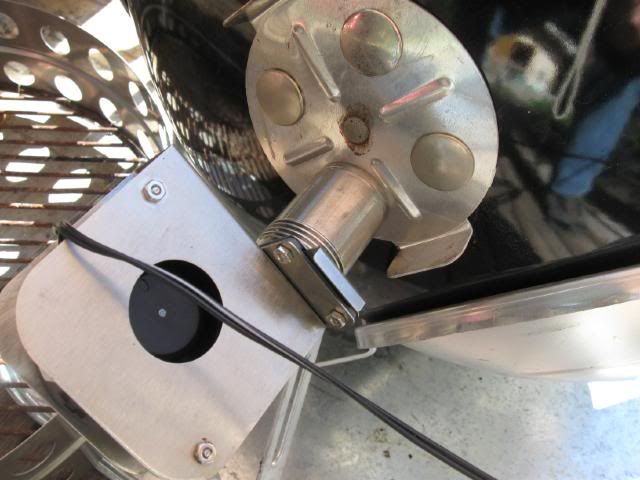
But then came the proverbial monkey wrenches in the machine. The stainless steel fan with the patented "magnetic mount" wasn't magnetic. Instead, they provide a mountable side bracket.
One major problem: there's nothing to securely mount it to on a kettle, short of drilling another hole and installing a metal bracket. Who wants to do that?
Enter some good old yankee ingenuity.
Another trip to Lowes and I had my solution: I bought a 1 inch round conduit hanger and replaced the square tightening bolt on it with a wing nut:
One dollar and 32 cents later, it's mounted and ready to go. Easy on, and easy to take off: no tools needed.
I was now ready to take the NanoQ on its maiden voyage of smoke.
But then another monkey wrench in the machine: some drunk slammed his Mercedes 350 into one of my SUV's. My test run would have to wait until Sunday:
Did I mention the SUV was parked on the next street? It's my old vehicle, and our son uses it to tow his trailer when his band plays gigs. The 25 year-old drunk who slammed into it was doing 60 in a 25 MPH zone (a residential street) and passed out. The crash woke him up, and despite having no front end, he tried to back up and flee. But he had one major problem: the trailer hitch Uhaul installed had a hold on his engine, and he couldn't get free. He tried to run, but made it just 3 steps before collapsing. The cops and ambulance showed up a few minutes later and carted him and his totalled 350 away. Interestingly enough, the cop found a week old speeding ticket in his glove box: he was cited for doing 110 mph in a 55 mph zone.
On Sunday, I was ready to go.
The plan? Smoke a chicken @ 225 degrees until done. Would the NanoQ be up for the job? Below are pictures taken at regulat intervals during the cook:
The NanoQ worked to perfection! It never wavered, and recovered quickly all 3 times I opened the lid to add charcoal, hickory chips, and take physical temp readings.
During the cook, I was watching Primal Grill, and it was the episode where he cooks the African chicken, and gives a mini-history lesson on BBQ.
I must say, pioneering this on the Weber Kettle made me feel like the 1st caveman (probably named Ogg) must have felt in front of his tribe on that historic day:
First Caveman: "What Ogg doing? That not spear, it round. Wait... Ogg invent wheel!"
Loud applause from the tribe.
Second Caveman: "That not wheel. Ogg invent Kettle grill."
Standing ovation from the tribe!
The NanoQ mod: total success.