Just beginning smoking - restore old New Braunfels offset or not?

You guys have convinced me beyond a shadow of a doubt! Thanks for getting me back on the right track. I don't consider myself a hugely emotional guy (who would) but 16Adams, your post genuinely moved me - thank you.

Just bought a 48"x48" sheet of expanded metal on Amazon for $19 :)

I did happen to be at Home Depot on the way home, and a "smoker" caught my eye - sure enough, a true COS in its natural habitat. I went over and lifted the doors, and instantly realized the difference between a COS and my smoker. It was like comparing Justin Bieber to Frank Sinatra. I am sold!

I will post pictures and measurements tomorrow, but I'm almost certain now that this NB is no COS. I'm really going to enjoy getting it into peak condition - with a little (lot) of advice from you all! Questions inbound once I get pics up!
 
Love our kettle!

We have had our Weber for almost 20 years and have loved it! Try a turkey on it! Rub your bird generously inside and out with seasoning salt and any other spice you like, then refrigerate overnight. When you fix your grill, put your fire on both sides (we use Webers side pans) and a large water pan in center. Put your bird on breast down. We put a loose sheet of aluminum foil over it to keep the back and wings from over drying. Check the charcoal each hour. Takes a little over 2 hours but you will never bake a turkey again.
 
Alright - here she is! Calipers said 1/8" all around. The reason there's a bucket and 2x4 under the firebox is because I've gotten all but one nut and bolt off that hold the firebox on, and don't want it to get damaged hanging there while I find another vise grip :) I've taken most of the hardware off - I don't believe anything was missing before I started.


So several questions! So grateful for the expertise here.

1. I've been told not to bother resurfacing the firebox as "it will just burn off again" - yes/no?

2. My plan based on an averaging of several suggestions has been to use a wire brush on the inside and outside, then use a palm sander with rough-grit paper on the outside for painting prep - does that sound about right?

3. Should I bother with hi-temp primer before I apply the hi-temp paint?

4. In the second-to-last pic, you can see both how far the chimney extends down and also a bolt hole on the righthand (front) wall. First, would there be any benefit to using roofing flashing or something to extend the chimney down further? Second, it's been a few months since I first tore this thing apart, but I believe the grates rested on the bolts that were through this and other holes, which are the same level as the lip that comes off of the firebox. However, there's no such bolts or holes on the back wall of the smoker - I wonder what held the grates in place and kept them from tilting over? Can anybody with a similar setup weight in? I could always just rest the grate on the lower sides of the barrel, but I've read that it's better to get the meat high so it gets more smoke, so I imagine it would be best to get it to the level of those existing bolts...

5. I've got my 48" x 48" expanded metal sheet coming, and I'm hoping to have enough left over after making the grates to fabricate a basket for the firebox to keep the fire small and hot (blue smoke please, Jesus!), and also to put unlit charcoal on the bottom so the temp will stay stable for a long time...what size should I make the basket?

16Adams, that rig is absolutely beautiful - I hope to achieve even half of that!

You guys are amazing - many, many thanks, all.
 
Well I had my whole reply written and then my PC took a dump :doh: Take 2!

Got some pics of the old girl today - here she is! 1/8" all around; I've taken several parts off but I don't think anything was missing before I started. The reason there's a bucket and 2x4s under the firebox is because I've taken all the one of the connecting nuts and bolts off and don't want it to bend/get damaged while I try to find another set of vise grips.


A few questions! So grateful for the expertise here.

1. Some people have told me not to bother refinishing the firebox because "it will just burn off anyway" - yea/nay?

2. My plan for refinishing based on an averaging of recommendations is to wire brush the inside and outside then use a palm sander with rough-grit paper on the outside - does this sound about right? Then, should I bother with hi-temp primer before I apply hi-temp paint? And obviously just the outside...

3. My 48" x 48" piece of expanded metal is wending its way through USPS towards the rolling green hills of Middle Tennessee; after I make new grates with it, I'm hoping to have enough to fabricate a basket for the firebox in order to keep the fire small and hot (blue smoke please Jesus!) and be able to put unlit charcoal on the bottom to keep the temp stable over time - what size would you all recommend for the basket? I'll have a grate under it as well so ash can fall through.

4. In the second to last pic, you can see both how far the chimney comes down and also a bolt hole on the right (front) side. First, would there be any benefit in using something like roofing flashing to extend the chimney lower, hopefully forcing the smoke to fill more of the barrel? Just wondering...it's obviously not been necessary before now :) 
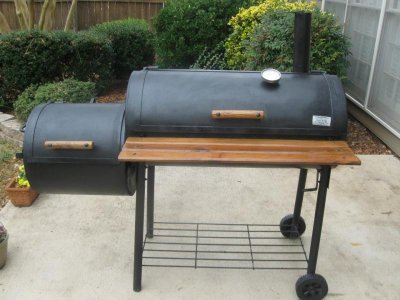
Just trying to make up for shoddy cooking skill with fancy equipment! At least I think that's how it works... Second, it's been a few months since I initially took this apart, and I'm pretty sure that the grates in the smoker itself rested on long bolts, two of which are still in the front edge in the middle, and there's two holes (one visible in the pic) on the far ends of the front as well. This makes sense as it puts the grates as high as possible, but there's no holes or bolts in the back wall - how does the thing not tilt over? The lip on the smoker side of the firebox is the same height, so that could help support the grates...I'm sure I'm missing something here. Anybody with a similar setup mind weighing in?

16Adams, that rig is absolutely gorgeous - I hope to achieve half of that!

You all are amazing - thanks so much for all the help and encouragement!
 
Thats the Hondo or black diamond. The very first offset I started on. Which one it is depends on length of chamber and the wheel setup.. one had wagon wheels. I think the hondo was longer and was unique in that it had the flat spot on the firebox to put a pot on top of(I used it to preheat splits). It later became known as the silver smoker. I gave mine to my buddy, who still has it.. its almost 25 years old.. I got it in 1989.

download the bandera 101 document from the download section for the mods for it.
1 - Baffle mod,
2 - relocate the exhaust either by extending the stack inside the smoket to below the shelf, or relocating it to thelower part of the end.
3 - firegrate
4 - firebox door seal.

you have an awesome cooker.. especially for chicken...


id skip the grinding wheel and just use a wirewheel to get the rust off.

better anser llater when i can find my glasses and get some sleep. :)
 
You have a very nice New Braunfels Black Diamond. It is easy to restore and a couple minor mods will make that a great looker and cooker for life. I found one in average shape a couple years ago and turned it into this. The warming plate was optional.
 

Attachments

  • BlackDiamond.jpg
    BlackDiamond.jpg
    71.2 KB · Views: 165
Awesome unit... So glad you asked the Brethren. That unit is a ripper. Started on a similar banderra (much more recently) and once you have got the art of running it well, you can operate anything. Just do it!

Cheers!

Bill
 
Getting closer, guys! As luck would have it I have a Makita grinder that takes smaller than standard attachments (and wrench, or course) - I'll be getting her refinished as soon as I can find the right stuff online for the grinder!

So hi temp primer before paint, yea or nay?
 
1. I've been told not to bother resurfacing the firebox as "it will just burn off again" - yes/no?

I would wire brush and repaint, but you will probably need to repaint it every couple years. After you get it cleaned up and start using it you can also give it a quick whipe down with cooking oil (yep, the outside) as it cools down

2. My plan based on an averaging of several suggestions has been to use a wire brush on the inside and outside, then use a palm sander with rough-grit paper on the outside for painting prep - does that sound about right?

Just confirming, don't paint the inside, just season it with cooking oil.

3. Should I bother with hi-temp primer before I apply the hi-temp paint?

Depends on the paint, I do not use primer. If you are using Rustoleum High Temp, specifically the ultra satin that comes in bulk (quarts/gallons) they specifically suggest no primer. That's what I use on my builds.

4. In the second-to-last pic, you can see both how far the chimney extends down and also a bolt hole on the righthand (front) wall. First, would there be any benefit to using roofing flashing or something to extend the chimney down further? Second, it's been a few months since I first tore this thing apart, but I believe the grates rested on the bolts that were through this and other holes, which are the same level as the lip that comes off of the firebox. However, there's no such bolts or holes on the back wall of the smoker - I wonder what held the grates in place and kept them from tilting over? Can anybody with a similar setup weight in? I could always just rest the grate on the lower sides of the barrel, but I've read that it's better to get the meat high so it gets more smoke, so I imagine it would be best to get it to the level of those existing bolts...

No experience with this cooker. If you are stuck, post a close up of the cooker racks and I'll be happy t give you my $0.02

5. I've got my 48" x 48" expanded metal sheet coming, and I'm hoping to have enough left over after making the grates to fabricate a basket for the firebox to keep the fire small and hot (blue smoke please, Jesus!), and also to put unlit charcoal on the bottom so the temp will stay stable for a long time...what size should I make the basket?

Biggest that will fit the firebox and still allow good airflow.
 
Let's see a pic or two. If you plan on burning sticks in your stick burner you don't need a basket - just a raised grate that ash can fall thru and for good airflow.
 
It has been my experience that the firebox for these types of smoklers can last indefinately if they are lined with stainless steel sheet. I get mine cheap at a local scrap yard.

Measure the inside width and circumference and make a sheet to that size. Then cut off some to match the size of the door. Then coil it up and slip it in. When it uncoils, it should stay in place. If not, pop rivit it in place. You will need to pop rivit the door liner anyway. You can also make end pieces. I did.
 
I have a NB black diamond offset that I am trying to sell currently. If you need any pictures to see how things went together( like the grate question) let me know and I will take them.
 
Back
Top