Upgrading DrumPit Questions...

N8man

Babbling Farker
Joined
May 9, 2007
Messages
4,236
Reaction score
8,430
Points
0
Location
God's Country Ossipee-Osceola NC
Hello Friends. The last few weeks when time allowed I would sit in my barn and imagineer...I would think what if, and why for....
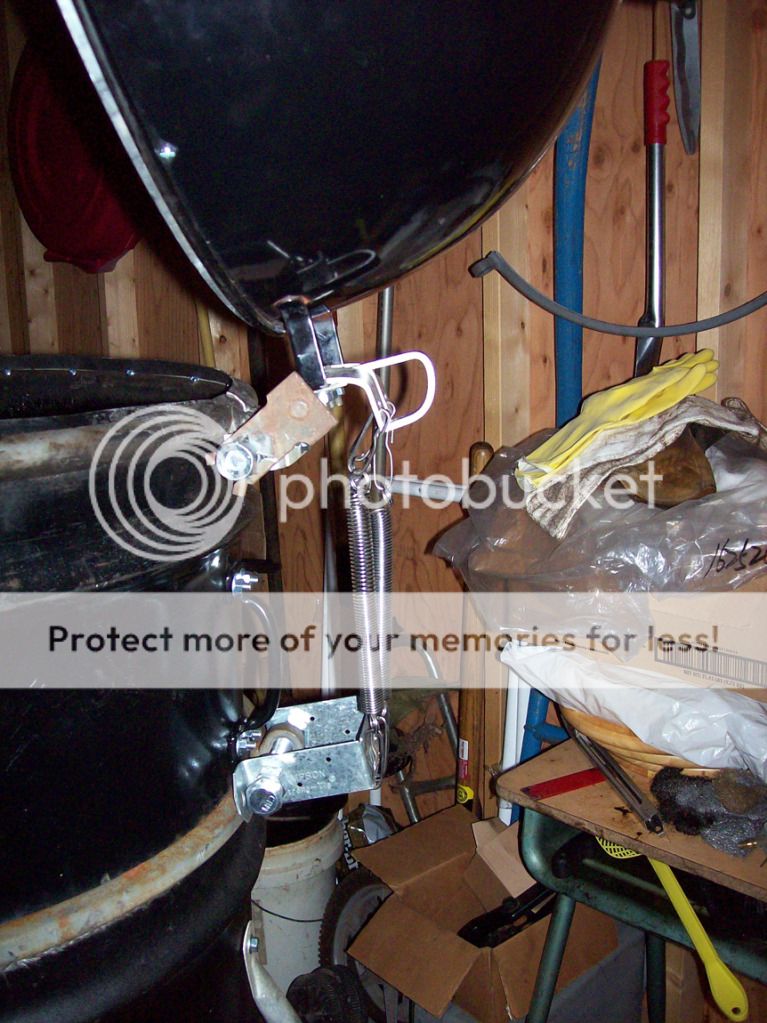
I've had a Weber bottom in my way for far too long and am now undertaking the task of fitting it to my DrumPit for duty as the lid.

100_6135.jpg


I'll post up a more complete detailed account of what I'm doing later, but
for the moment I need advice....I've got the traditional "Front" facing the back of the DrumPit, not like the above picture shows, and I have to come up with a snazzy new handle. Maybe a nekkid lady hood ornament perhaps... Along those lines I also need to decide upon a locking latch or latches that will pull the lid down tight. Any suggestions for said latch??? Any and all ideas are welcomed and encouraged......
 
Honestly, as far as latches, I think that "lid" will be heavy enough to seal on its own. I used to think that you need to be completely air tight but that just isn't the case. Besides, a good bit of grease will seal it up nicely. I have had my fire go out after closing the bottom intakes and forgetting to close the top vent. Are you putting a ring around the inside to hold the lid in place? If you do really want latches, there are two types that come to mind. First is the twist type that you find on trunks and cases like this:

big_twist_latch.jpg


You could also just go with a latch like this that would be a little easier to use possibly:

images


^^^You could probably raid your barn and find a few of these on old tool boxes.
 
Indeed I am making use of two bands
of metal in the construction. One is mounted to the inside
of the Weber the other is mounted on the inside of
the DrumPit.....
Confused yet????
I'll try to get some shots of this tonite to better illustrate
my setup.....
 
Indeed I am making use of two bands
of metal in the construction. One is mounted to the inside
of the Weber the other is mounted on the inside of
the DrumPit.....
Confused yet????
I'll try to get some shots of this tonite to better illustrate
my setup.....

I think I know where you are going with that. I really think that between the weight and how the bands will interlock, you shouldn't need latches unless you need to lock it up to keep people from stealing your food :becky:

Are you going to hinge the lid? That might play more into how you have all of the rings and such as a hinge might interfere with how the lid pivots.
 
I believe some have used toggle clamps with good results. Maybe some brethren who have used them can chime in?
 
Gather ‘round chitlins whilst I whittle ye out a yarn..
Way back in ‘07 or so, I cuts me off a rib from a drum
while making an extension to my DrumPit, and also,
a DrumGrill........

100_0836copy.jpg


It’s that very rib I have futher trimmed down, kids,
to fit real snug like inside the DrumPit, up against the side
of the lip ........

cutribmounted1.jpg


No squinting needed, a little closer look, for the weak eyed amongst us ........

ribanglemounted3copy.jpg


I used a piece of bar stock
to form a lip on the inside
of the Weber Grill bottom,
bent it with me teeth, I did........

aluminweber6copy.jpg


Dry fitted and it is a fine marriage of all parts.
Comfortably Snug........... Hey! Ain’t that a song, man!?!?........

lidonrib4copy.jpg


Temporary handle, I am no Marty Leach........

opengap9copy.jpg


Salvaged heavy steel vaccum frame hinge
aligned perfectly to the Weber handle holes!!
It’s my lucky day!!!! I best goes play the lottery........

hingefitting7copy.jpg


Used the 1” bar stock to make an anchor bracket
for attaching the bottom hinge half onto the bolt
of the drum band clamp and for making the spring receivers
bolted to the top hinge half. On the lower band clamp bolt
I’ve fitted a metal fence bracket for the springs to a'fasten........

springsstretched8.jpg


Upon opening, the springs provide both
the right amount of tension for lift assist
and keeps the lid stable when raised........

springsstretched12copy.jpg


A lawnmower wheel mount was fitted to
the band clamp bolt and postioned behind
the upper hinge half to act as a backstop.
It’s sure gosh’a’mighty sturdy right there, too ........

ribmounting11copy.jpg


Under the hood I’ve bolted the Weber ash tray
to dampen the vent holes on the Weber bottom.
I’ll adjust the spacing when next I set spark to flame .......

webervent15copy.jpg


Gaping maw of barbecues to come.......

lidopenhigh10copy.jpg


I've still much to do.............
 
I say you are having fun! I use the bottoms on two of my UDS. I left the ash sweepers in place and use them as adjustable vents. However they are always wide open when in use. I only shut them to choke out the fire at the end.I have never understood the worry about a super tight fitting lid that has to have air vents in it? I don't care if a little smoke comes out around the lid. It has to come out some place. I have no use for latches except for in transporting it. The weight of the lid is enough for me. Have fun with your project! It is looking great! :clap2:
 
Did I mention I'm doing this with hand tools, i.e. hand hacksaw,
hand drills, metal file, 5" c-clamps and spring clamps???
 
Last edited:
On the refurbished DrumPit buggy
complete with a front bumper....

bumper16copy.jpg


Securing the DrumPit to it's buggy has never been
a concern of mine before, but I gots friends that
wants me to visit them, bringing along
the DrumPit, of course, and I'm trying to make it
travel ready....Bracing the sides....

bracing14copy.jpg


And the rear support...just fleshing it all out now, gonna replace the Weber
leg with some heavier metal piping....

bracing13copy.jpg


More adventures to follow.......
 
Well you've got the pop-up top. Now you need to add a foot pedal like the pop top garbage cans have. THEN WE WILL BE IMPRESSED. :p

Lookin good my man.
 
Some Augmentation......

The Weber handle metal is not
designed for the purposes I have in
mind so I set about to create a support
brace to take the load bearing weight.

Laying out the metal for the brace....

bracket-fitting_a.jpg


Checking the bends for fit.....

bracket-fitting_b.jpg


Bird's eye.......

bracket-fitting_c.jpg


UniBit makes short work of drilling bolt holes......

unibit_weber_d.jpg


Support Brace in place.....

bracket-mounted_e.jpg


I think so far that the upgrades are
progressing nicely.....

bracket-mounted_f.jpg


Words of Extreme Caution!!!! Take Heed!!!!!

When one is well gifted with facial hair, be awares
of the surroundings at all times......
I was inspecting hinge clearance when a spring
reached out and plucked a mustache hair.........
I half way expected to hear "Froggy went a'courtin'!"
drifting through the air from a mousey hole in the corner....

moustache_hair_g.jpg


More to come..........
 
Back
Top