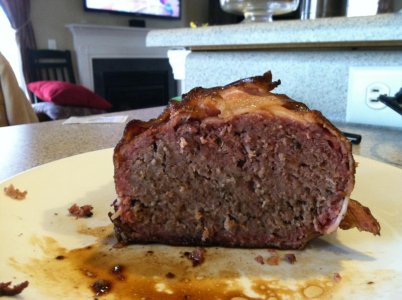
• working on DNS.. links may break temporarily.
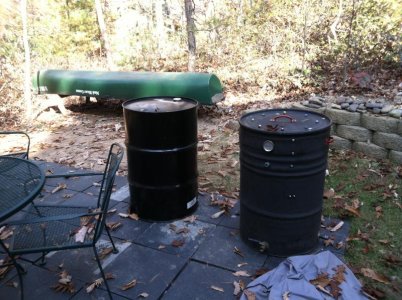
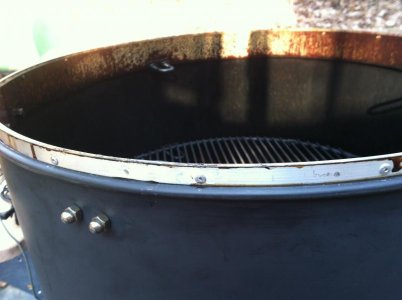
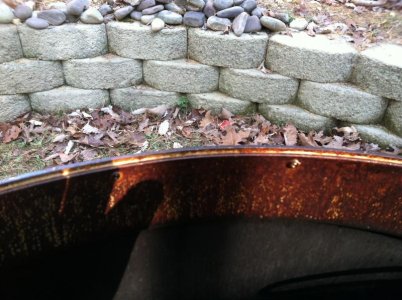
Sandblasting here is $60 ish.

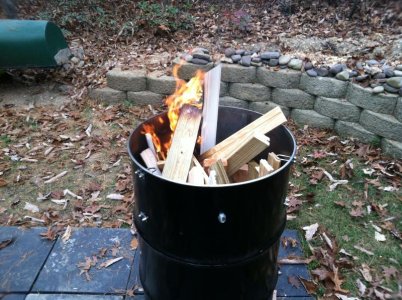
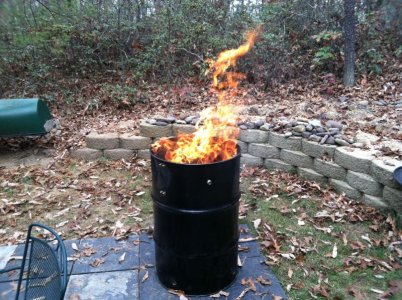
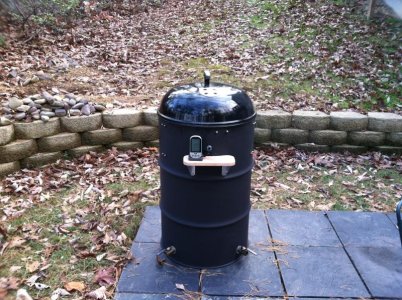
What about the turkey fryer idea? Someone on here suggested cranking up a propane turkey fryer and placed the drum upside down over it. Propped it up and drilled some holes. Would that work?
 
I have read it described that red liners are also known as "the dreaded red liner"
and can prove to be a double handful of hard work and wringing sweat in the removal of same....

I shopped around for a reconditioned barrel to use for my build. In the reconditioning process the drums get blasted in a furnace then repainted on the outside and a rust inhibitor sprayed in the interior..I burnt that sucker good when I got it home....
Here's my burnout, from a couple thousand pages back.....

http://www.bbq-brethren.com/forum/showpost.php?p=450931&postcount=405

attachment.php


"Fire Good!"

Granted I did not have a liner to deal with excepting for the sprayed on inhibitor, but I still managed a complete burnoff of the drum
both inside and out by the amount and positioning of the wood I used
as the fire burned.....
 
I post this question in earnest, in the hopes of beginning a civil discussion
on the subject of Barrel Burning.....This is something I have pondered on a while..
Riddle me this, if a food grade barrel that has the methyl-ethyl-poly-bad-stuff liner, or not, in it, gets burned out completely to bare nekkid metal and is thought to be safe to BBQ with, why then is the run of the mill barrel, that contained stuffs without a liner be considered an unwise choice if it also is burned out in the same fashion???....
And I'm talking the reddish-white, glowing metal kinda burn........

Thoughts???

I'm *not* a chemist or physicist or metallurgist, but it makes sense to me that the spray-on liners aren't liquid enough to penetrate into the porous steel of the drum the same way liquid chemicals may embed themselves only to be released over time into food. So I'd think once burned off, the red / tan liners leave the steel pretty clean and ready for sealing via seasoning burn, like cast iron.

My 2 cents.
 
Built my drum!

Well folks I got my drum mostly built today. I used the norco method of building. I didn't take a ton of detailed pics but ill share what I have. I ended up welding the nipples into the drum and also welded my fire basket. I think it turned out good. I just need handles on the drum and gotta figure out something for the basket and ash pan and it'll be ready for a test burn/season. Here's the pics!

20121103_114558.jpg

20121103_141712.jpg

20121103_151819.jpg

20121103_151828.jpg

20121103_151845.jpg


:clap2::clap2:
 
My opinion on barrels.........

Many are expressing the opinion that you need a "food grade" barrel.:confused:
"Food grade barrels" speaks to the liner in the drum.

I would rather have a drum that had some sort of oil (cooking oil would be my favorite) in it rather than the "remnants" of a burnt off epoxy(?) food grade liner. A food grade drum was safe for food contact with the liner. That does not mean the burnt-off-liner barrel is "food grade" safe. I do agree with the idea that the liner burnt off, the metal sanded, and the drum seasoned is safe!!! Barrels that contained cooking oil, motor oil, degreaser, especially water based products when burnt, cleaned, and seasoned are IMHO safer.


I got lucky with my barrel. It was brand new and clean bare metal inside, best of all FREE! I started with one that had the red liner, I didn't trust it so I got rid of it.
 
I just finished my burn out of a food grade drum with the tan liner. It came off really easy with the weed burner. My question is after I used a wire brush to remove the chunks of ash and what not, there is still really fine ash left on the metal. How do you guys clean the metal to get to true bare metal? Do you just use soap and water? Does that make it rust right away?
 
Finally got it right

This is my second drum, the first was great but a lot of booboos. Here are some pics of my beauty. I broke her in this morning with a fatty. Needs a couple of more smokes to get the lid to seal up nice. When I buned the drum out I put my shop vac in rev. attached a pipe and stuck it in a vent hole on the bottom, the heat was very very intense. I would think this would get rid of those red food liners/paint jobs.
 

Attachments

  • IMG_0157.jpg
    IMG_0157.jpg
    108.9 KB · Views: 804
  • IMG_0192.jpg
    IMG_0192.jpg
    115.4 KB · Views: 806
  • IMG_0203.jpg
    IMG_0203.jpg
    136.9 KB · Views: 807
  • IMG_0246.jpg
    IMG_0246.jpg
    66 KB · Views: 804
  • IMG_0250.jpg
    IMG_0250.jpg
    141.6 KB · Views: 808
  • IMG_0252.jpg
    IMG_0252.jpg
    67.6 KB · Views: 808
Is that an aluminum ring to hold the lid?

Sent from my GS3 via Tapatalk 2
 
Is that an aluminum ring to hold the lid?

Sent from my GS3 via Tapatalk 2

Yes it is aluminum. There is also another smaller width of aluminum flat bar around that not shown to make the lid fit perfect. It is easy to bend and worked flawlessly.
 
What are the two widths of the flat bar?

Sent from my GS3 via Tapatalk 2
 
What are the two widths of the flat bar?

Sent from my GS3 via Tapatalk 2

I used 2" attached to the inside of the barrel it stuck up about 1/2" above the lip of the barrel. I then used pop rivets every 4" to attach a 1/2" piece of flat bar to the outside of the 2" flat bar. I used the two clamps and one small pair of vise grips to hold the flat as I worked around the barrel drilling and riveting. If you would like I can take pictures of the 1/2" flat tomorrow. Btw everything was bought at Lowes
 
I used 2" attached to the inside of the barrel it stuck up about 1/2" above the lip of the barrel. I then used pop rivets every 4" to attach a 1/2" piece of flat bar to the outside of the 2" flat bar. I used the two clamps and one small pair of vise grips to hold the flat as I worked around the barrel drilling and riveting. If you would like I can take pictures of the 1/2" flat tomorrow. Btw everything was bought at Lowes

I would be interested in pics. :clap2:
 
I had the dreaded red liner. I decided to hit it with the weed blaster. Oh boy was it loud! The ol' miss came out and timed how long it would take in one section to turn it that ashy pink color. Approximately 90 seconds. As a test, I immediately hit it with a 2500 PSI pressure washer. That big circular blob in the upper left is just that. (NOTE: There are lots of places where the propane burner peeled the liner right off. Had I taken the time, I probably would have just hit it with the burner to peel it off but, well, I was impatient. And a little inebriated.)

AfterBurner.jpeg


So I'm thinking that heating it from the outside might actually release the chemical bonds from the steel. Mind you, I'm not a chemist so for all I know, the red liner may have just said "f u, its getting hot, I'm out of here."

Here's the Mrs's taking over torching duty while I go have some whiskey and find some beers.

OlMiss.jpeg


After we blasted the outside so that the inside was all ashy pink, I hit it with the pressure washer again. It got quite a bit out but I still wasn't satisfied. I decided to risk it and throw in all the scrap plywood I have, along with 1/3rd of a bag of briquettes. Woah.

Fire.jpeg


Glad the neighbors were not home to call the fire department on me (they're a bunch of squares). After the burn, there is still some pink in there. I may hit it with the orbital sander but my gut tells me that if after everything I did and the pink still wont come off, I'm good.

Lesson: Red liner is bad, but not as bad as people made it sound. Hitting it from the outside is definitely the key. I think those that have tried were hitting it from the inside or didn't hold it in one spot long enough. If (when) I do this again, I am going to bring it somewhere that I can start a massive fire. Then I'd throw it in the fire and fill up the inside with hot coals.
 
I would be interested in pics. :clap2:

Here ya go! Sorry not new anymore, got a little broken in over the weekend. BTW I only added the 1/2" flat bar because the lid was still very loose with just the 2" flat bar by it self.
 

Attachments

  • IMG_0256.jpg
    IMG_0256.jpg
    81.4 KB · Views: 780
  • IMG_0253.jpg
    IMG_0253.jpg
    39.3 KB · Views: 775
  • IMG_0255.jpg
    IMG_0255.jpg
    89.1 KB · Views: 778
Last edited:
Am I doing my math correctly here? Lots of popular builds on here have three .75" intake holes. That's a total of 1.32" of intake.

My biggest bit is .5" so I put in four, for a total of .78" of intake...which is quite a bit less than using 3/4" intake holes. (And before someone says it, no, I don't plan on getting a step bit in the near future).

My question is this: should I add more intake holes or is what I have enough? I thought about building this kind of intake cover, so more holes isn't a big deal:

103200971.jpg
 
Am I doing my math correctly here? Lots of popular builds on here have three .75" intake holes. That's a total of 1.32" of intake.

My biggest bit is .5" so I put in four, for a total of .78" of intake...which is quite a bit less than using 3/4" intake holes. (And before someone says it, no, I don't plan on getting a step bit in the near future).

My question is this: should I add more intake holes or is what I have enough? I thought about building this kind of intake cover, so more holes isn't a big deal:

Assuming your drum is otherwise reasonably airtight, you probably won't be able to get the temperature above 250 degrees with four 1/2" holes. Initial heating up to cooking temperatures will also be more difficult.
 
I picked up a second barrel. This one had paint and the paint was held in a plastic bag. I hit it from the outside with the weed burner. The barrel was black and that paint did not want to burn off.

1) The metal actually turned a glowing red. Is that good enough or do I really need to burn the paint off? I'll hit it with paint stripper later on.

2) There was a fair amount of rust inside. Not enough that it was caking off and when I hit it with a rubber mallet, a little dust came off. I hit it with a wire wheel on my drill and can definitely get to the steel, but that's a lot of work. I've read that this amount (not caking off) is insignificant and I should just season over it. Thoughts?

3) I found a set of black oxide hole saws in an old tool box in my garage. Can I use this on the drum?
 
1) The metal actually turned a glowing red. Is that good enough or do I really need to burn the paint off? I'll hit it with paint stripper later on.

This is my ideology… no matter how the UDS looks from the outside [that's why it's called "ugly"]; from the inside it should be "treated" properly. The paint MUST be removed

2) There was a fair amount of rust inside. Not enough that it was caking off and when I hit it with a rubber mallet, a little dust came off. I hit it with a wire wheel on my drill and can definitely get to the steel, but that's a lot of work. I've read that this amount (not caking off) is insignificant and I should just season over it. Thoughts?

It might seem a lot of work, but it isn't; just grab the drill with the wire wheel... this is what worked for me

7088024.jpg


3) I found a set of black oxide hole saws in an old tool box in my garage. Can I use this on the drum?

for the holes you mean?

Yes you can... if they're for metal; there are hole saws for wood, that look just like the ones for metal:

IMG_3040.jpg
 
Back
Top