• working on DNS.. links may break temporarily.
I've got my charcoal basket built. Weber charcoal grate with 3/4 x #9 expanded steel. Cheapie charcoal grill pan for attached ash pan. Used rebar ties all the way around to fasten the expanded to the grate. Three bolts with fender washers at the seam.


Sent from my iPhone using My Fingers.
 
7475987094


Just completed the charcoal basket!


Sent from my iPhone using My Fingers.
 
OK, so the drum was finished last week, had time to do a couple cooks on her and get her loaded up for the comp this weekend. I was unsure of the overnight butt cook but I brought a spare anyway so I just opened one nipple cap, ball valve full open stuffed the basket and hoped for the best.

When I got up in the morning, there she was, in all her glory, dead on at 225 and working the butt through the stall. Had lots of comments from folks that wanted to build their own and just plain loved the concept. Fun cooker that lays down excellent smoke.
 
Has anyone used firebricks in the base of their UDS? I was thinking of bringing up my basket a little bit and retaining some heat while at it by putting a base of fire bricks under it. I have the heat deflector resting on top of the basket so my temps no matter how full open I have it, rarely ever approach 300 degrees yet.
 
Sorry for the multiple posts guys. I was having trouble getting my posts to show up. Now I don't seem to have the ability to remove them. There's not even an edit button available.

That being said, I've pretty much finished my build and I'll have pictures in a bit once I figure out what happened above. Thanks for your understanding!
 
New UDS user and new to the group

Hey
What a wealth of info available on this site, thanks to all who have contributed.
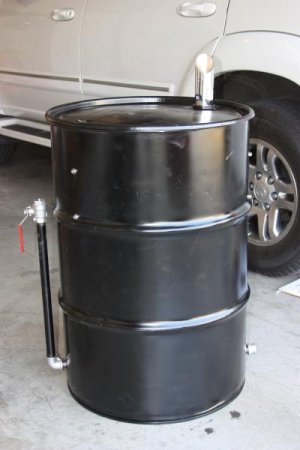
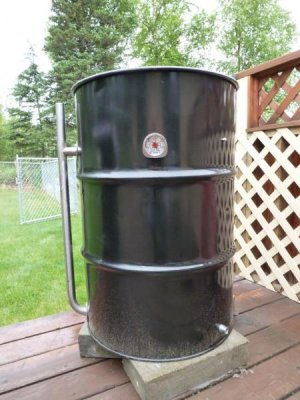
Finished my drum, if I can figure out how to attached pics, I'll do so.
Initial burn with royal oak last nite, temp went to 350+ in no time at all,
with all intakes open, time was 5:40 pm
started choking it down and temp stabilized at about 250 by 6:15 with just the riser intake fully open, went to bed at 10:15 after opening one additional intake and temp stabilized about 310. Got up this morning and the drum was cold, still some heat in the embers, don't know what time it went out, this was with about 4lbs of lump.
Going over to some friends this afternoon for the 4th, but tomorrow, there's rib's for dinner.
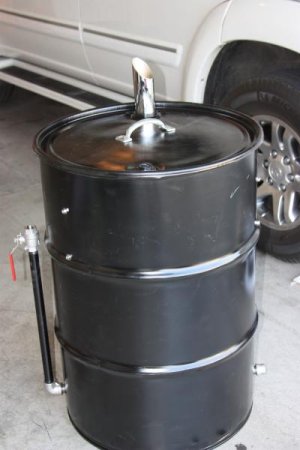
Some info about the build:
The riser intake is a stainless steel hand rail for the bathroom, cut down to size, and scored for free, had it for 5-6 years, knew I kept it for a reason, still have one more.
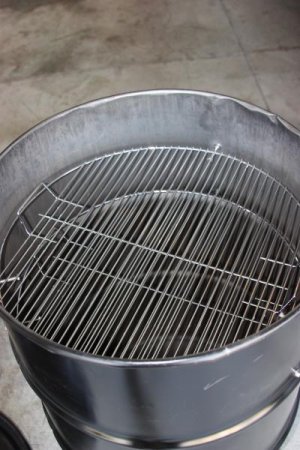
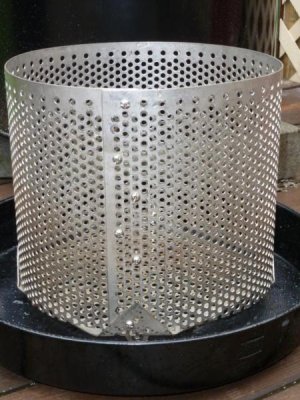
The charcoal basket is ss and material also was scored for free, size 10" high, 11.5" dia, still have the better part of an eight foot by four foot sheet left. Those are 1/4" holes in the material, so this was an easy put together. I was concerned the basket would not have enough draw to stay lit, but I think those worries are behind.
Again, thanks for all the info, now I'll be looking at recipes.
akjerry
 

Attachments

  • valley_trash_can.jpg
    valley_trash_can.jpg
    50.5 KB · Views: 702
  • the_puzzle.jpeg
    the_puzzle.jpeg
    109.3 KB · Views: 694
  • charcoal_bucket.jpg
    charcoal_bucket.jpg
    58.1 KB · Views: 692
  • inside.jpeg
    inside.jpeg
    114 KB · Views: 691
I posted it in another thread but i thought i would put in the UDS thread for others to see. Its made of a SS drum and the color is from the heat of the burn out. It left it a nice golden color


2012-07-04_11-33-38_740.jpg
 
Um could somebody please nuke the first post, I forgot to scale the pictures down :icon_blush:

I read the first 200 pages of the thread, dunno if I can rfead them all, but here is my effort :).

Like most others I wanted to be "like but different", so I used FIVE 3/4 inlets, one with a ball valve. I made NPT threaded bungs to weld on the inside. I made mine in the lathe with a 3/4 NPT tap, but I could have saved a LOT of time, and others could make their own by either slicing off the ends of unions (two bungs per union) or using reducers (aka bushings). I drilled the holes with a good quality 1" hole saw I had already, the 3/4 hardware did thread right in sort of. But I'd rather have a tighter fit. The drum had some kind of alcohol in it, the inside is flipping gorgeous.

cu18j.jpg


SdmbI.jpg


5alFx.jpg

I added another little machinist trick with the Thermo bungs, drilled the proper side hole through the middle of a 3/8" hex bolt.

The drum is so nice inside I hate to do a face cord of hardwood style burn out
UXgJN.jpg


The Grates I got from Menards, Porcelain covered for a whole $7.99 each.

Bill
 
OK here it is all burned out, still wet from washing. Scrubbed it inside with a scotchbrite pad and water, nothing really on it to speak of.

NbzF1.jpg


Here it is all painted up, the old gas grill chassis needs a bit of work yet, but it will work (stolen idea from another brethren).

GnHU5.jpg


And finally the coal basket and ash/drip pan. Snagged two of the cheap $10 grills from walmart, wired the two grates together to form square openings on the bottom. Coaxed some expanded metal into a hoop and wired it together.

EZOB0.jpg


The basket is probably deeper than it ever will NEED to be, should be no harm in having a little extra depth :). it should be about 15" in dia and 12" tall.

Bill
 
Looks great. I too am attempting to add an ATC without all the mess of wires. Can you give some details?
Looks like he is using a standard BBQ Guru setup (with a custom DigiQII mount), but does not have the blower or probes in the picture (the blower adaptor is shown on the bottom of the drum) DC power, fan, pit probe and meat probe plug into the bottom of the DigiQII unit pictured.

I don't really care for all the wires on mine either. I just used the bracket that came with the DigiQII to mount mine (tried magnets, but it always slid and fell off). The mount is close to the probe holes and the excess probe wire is coiled with leader keepers.

I have considered putting on a vertical air intake pipe and attaching the DigiQII to the blower assembly and mounting it on the top of the pipe. That would get the fan wire out of the way. Technically I could also switch to a battery powered system (rather than wall wart), but A/C is very convenient.
 
Rookies first UDS build

Thanks to all the knowledgable folks on this site I've been able to build this. I'm quite done yet, all I need to do is build the fire box and get a temp gauge installed Does anyone have a clever idea on how to attach the expanded metal to the grate without welding? The jury is still out on the handle and exhaust pipe, but I put them there just to see what it looks like....thoughts?
 

Attachments

  • IMG_5788.jpg
    IMG_5788.jpg
    26.7 KB · Views: 772
  • IMG_5784.jpg
    IMG_5784.jpg
    46.9 KB · Views: 761
  • IMG_5782.jpg
    IMG_5782.jpg
    26.1 KB · Views: 759
There are some great looking smokers on here. the one thing i want to mod on mine is some side tables
 
Thanks to all the knowledgable folks on this site I've been able to build this. I'm quite done yet, all I need to do is build the fire box and get a temp gauge installed Does anyone have a clever idea on how to attach the expanded metal to the grate without welding? The jury is still out on the handle and exhaust pipe, but I put them there just to see what it looks like....thoughts?

I just used soft steel wire (probably electric fence wire) and twisted it with safety wire pliers, but you could just as readily twist it with the small vice grips probably, just loop it around, cross the wires, clamp at the cross point, and twist until it is tight.

I just happen to have a set of safety wire pliers leftover from sprint car racing adventures, if you do not I bet the needle nose vicegrips would work fine, the key thing is to grab the wire and keep hold til all twisting is done.
JVfRe.jpg


Here is what it looks like twisted

tAYC1.jpg


Harbor Freight shows a set of the safety wire pliers for like $12 bucks.

They call them.................(I did not link thinking that is verboten, just go to HF and search them)

9" Safety Wire Twister

They work like a yankee screwdriver in reverse sort of :).

Bill
 
GkuM5.jpg


Here it is running on the first run through empty with the inside coated with veg oil. Seems like I can hit 225 with just the ball valve, 300 not too hard one plug out and about 1/4 on the ball valve. Ran it the first time with some RO Briq that was on sale along with a chimney full of RO chunk to light it off.

It is HOT here today so I dunno maybe the first 200f is all solar :) ?? So hot the camera lens fogged up :).


Bill
 
I have a question. I can get an empty SS barrel from work that had 67.2% Nitric Acid in it. Would this be safe to use? I know you can use Nitric Acid to disinfect SS. I was thinking that I could pour in some baking soda to neutralize anything that might be left in it, and then rinsing it out and burning it off. Anyone have any experience with this?
 
Back
Top