My apalogy brother! Just a few hours to get rid of the new build nasties and you are good to go. Putting on a good greasy fatty, or bacon for pig candy work good. Just a simple burn is just fine...then fire er up and smoke something bro.
 
Thanks brotha! I let her run 2.25 hours she was beautiful - held at 250 with ver MINOR adjustments! I didnt cook anything on the first go because I am on a "diet" for the past two weeks. Next week I will let 'er rip! I love my drum smoker.... I cant wait to post pic's!
 
Build a simple drum, cook on it while you build your masterpiece, then sell or pass along your old faithful. Spread the love.
That was my plan...

Two years later, I'm still smoking happily on my first drum. I've got three virgin drums behind the garage I just never get to.

I suck.
 
Thanks brotha! I let her run 2.25 hours she was beautiful - held at 250 with ver MINOR adjustments! I didnt cook anything on the first go because I am on a "diet" for the past two weeks. Next week I will let 'er rip! I love my drum smoker.... I cant wait to post pic's!


If you are on a diet, throw some veggies on it.:p
 
The easiest way to make a thermometer mount requires a drill press or milling machine with a vise. Clamp a piece of scrap metal, then drill using a 27/64" bit. Do not remove the piece from the vise. Clamp a 1/2-13 tap in the chuck and lower the quill with one hand while starting the tap with the other, until the tap gets started, then loosen the chuck and raise the quill and put on your tap wrench and finish tapping the hole. Now
you have a 1/2-13 tapped hole in line with your spindle axis. Screw a 1/2-13 short bolt into it, and through drill it with the size of your thermometer stem. You can make several at once for multiple smokers if you like, or change the bit for different things.

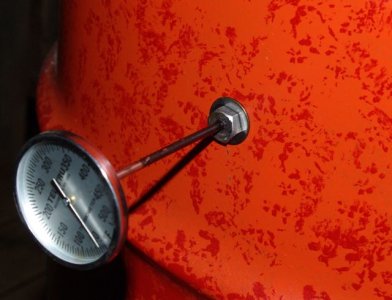
On your smoker, use the skinny step drill in your set, the one that only goes up to 1/2", and run it all the way in. Use a jam nut on the inside with a wrench to tighten your thermometer holder. Now you can just slip your thermo in easily, and take it out which can really help with clearance for removing the charcoal basket.

It's a lot easier to do than to write, and there are much easier ways to do it especially if you have a metal lathe, but that require more sophisticated machine tools.

seattlepitboss
 
Weber lid mod

Just to make sure I have enough exhaust, using the weber lid, I added an extra vent from a WSM. The carriage bolt( 2 1/2 in. long stainless), acts as a fastener and a hook.
 

Attachments

  • weber lid 001.jpg
    weber lid 001.jpg
    107.6 KB · Views: 1,109
  • weber lid 002.jpg
    weber lid 002.jpg
    37.3 KB · Views: 1,107
  • weber lid 003.jpg
    weber lid 003.jpg
    20.2 KB · Views: 1,109
Well IMHO the easiest way to make a thermo holder is to buy a 3/8 x 1 stainless nut and bolt and drill a hole in the bolt. It holds the thermo nice and level and I think it cost me $1.10.
 

Attachments

  • SG102345.jpg
    SG102345.jpg
    46.6 KB · Views: 1,080
Well IMHO the easiest way to make a thermo holder is to buy a 3/8 x 1 stainless nut and bolt and drill a hole in the bolt. It holds the thermo nice and level and I think it cost me $1.10.


Thanks for this idea. I just need to go to our fab shop and go shopping:biggrin:
 
Well IMHO the easiest way to make a thermo holder is to buy a 3/8 x 1 stainless nut and bolt and drill a hole in the bolt. It holds the thermo nice and level and I think it cost me $1.10.
Yep, quick, cheap and easy. You can also easily slide a 12" therm in or out to check side temps, not that it really matters but gives me something to do if I get bored.
 
Yep, quick, cheap and easy. You can also easily slide a 12" therm in or out to check side temps, not that it really matters but gives me something to do if I get bored.

You lost me here, "check side temps"?
My 12" is just below the cooking grate and gives me temp in the center of the drum. I slide it in as soon as I pull out the weed burner and put the grate on.
 
Trying to save my grill....and some money

Question....this is a grill which came with the 2nd hand Weber that I bought a while ago.
It was very rusty.
Last week I had it sandblasted and after that I used a wire brush.
I discovered that the grill was covered with small dents and there are still some small rust stains in those dents.
Don't know if it's been the rust or the sandblasting or whatever that caused the dents.
Is it safe after a good seasoning to cook on,should I try another method or just buy a new one?
Thanx alot!
 
Last edited:
Question....this is a grill which came with the 2nd hand Weber that I bought a while ago.
It was very rusty.
Last week I had it sandblasted and after that I used a wire brush.
I discovered that the grill was covered with small dents and there are still some small rust stains in those dents.
Don't know if it's been the rust or the sandblasting or whatever that caused the dents.
Is it safe after a good seasoning to cook on,should I try another method or just buy a new one?
Thanx alot!

That is safe.
 
You can get a new one for a good price on ebay but rhe one you have is just fine to use.
 
Question....this is a grill which came with the 2nd hand Weber that I bought a while ago.
It was very rusty.
Last week I had it sandblasted and after that I used a wire brush.
I discovered that the grill was covered with small dents and there are still some small rust stains in those dents.
Don't know if it's been the rust or the sandblasting or whatever that caused the dents.
Is it safe after a good seasoning to cook on,should I try another method or just buy a new one?
Thanx alot!

Just spray it with Pam or oil it down with lard/veggie oil and your good to go. Once you heat it up it will season it much like a CI pan.
 
Has anyone used the 18.5 Weber lid on a 30 gallon UDS? How do you fit it on?
 
Pick my tool of choice, to cut the end of my 55 gal I have a Sawzall, a rotozip, or an angle grinder. Which of those 3 would you recommend to make the cleanest cut on my closed ended barrel?
 
Has anyone used the 18.5 Weber lid on a 30 gallon UDS? How do you fit it on?

Fit this closed top drum perfect.
IMG_3116.jpg
 
Back
Top