
|
|
|||||||
| Q-talk *ON TOPIC ONLY* QUALITY ON TOPIC discussion of Backyard BBQ, grilling, equipment and outdoor cookin' . ** Other cooking techniques are welcomed for when your cookin' in the kitchen. Post your hints, tips, tricks & techniques, success, failures, but stay on topic and watch for that hijacking. |
 |
|
|
Thread Tools |
 08-12-2008, 03:26 AM
|
#76 |
|
Full Fledged Farker

Join Date: 06-11-08
Location: Vancouver, BC, Canada
|
Well, it's been a few weeks since Bakeout #2, which resulted in a fine smattering of small bubbles in the furnace cement of the firebox and one big bubble in the base. Since then, I've done Bakeout #3, also "low and slow." This was followed by 6 cooks where I watched my temperatures and kept things under 500F.
All I can say is that I shouldn't have bothered mortaring the inside of the dome and the bottom. CONCLUSIONS: The furnace cement did not bond very well to the claypot material. Upon curing, the mortar has shrunk and pulled away from the cooker walls. It's only a matter of time before the cement all delaminates and falls off. So far, the mortar cracks are mostly in the base. More appear after every cook.  I thought the dome was immune, but the mortar has started bubbling there too. Note the sheen of condensation on the surface of the mortar.  A tiny gap can be seen between the mortar and the cooker wall where the mortar has cracked and flaked off. I expect the mortar to eventually all separate and fall off.  The furnace cement applied over Humpty's newly painted surface is also debonding and flaking off. More so with every cook as the heat weakens the paint-mortar bond. (The cement was used to repair the cracks that developed after the cooker had been painted.)  SIGHHH.... I'M THROWING IN THE TOWEL!!! NO MORE REPAIRS!!! I WILL COOK ON HUMPTY FOR AS LONG AS EVERYTHING HOLDS TOGETHER. __________________ MayDay Project Humpty: SLIDESHOW, PHOTO ALBUM Kamado/BGE, Cobb |

|

|
|
08-13-2008, 12:10 AM
|
#77 |
|
somebody shut me the fark up.

Join Date: 10-27-06
Location: Bothell WA
|
I know exactly how you feel! I got the same results with my Large Big Green Egg. I just said "No Mas, No Mas" and put it on the cart and wheeled onto my concrete patio away from the deck and table. I've been sick over it and put a down payment on a demo Egg from the PNW Eggfest. I cooked next to a guy, last weekend with 3 LBGE's and a couple of his are patched up with JB-Weld so I'll just roll with it.
That is strange about the paint flaking off too?
__________________
Brian - Left Hand Smoke BBQ PNWBA 2010 Team of the Year BGE's/WSM's/Pellet Pro WSM/BWS Gater/BDS Clones/Cookshack 008/Weber Performer w EZ-Que/Cajun Bandit/Rib-O-Lator Test Pilot/La Caja China/BBQ Guru/Weber 1000 RK Drum Coffee Roaster Follow Left Hand Smoke on Facebook!http://www.facebook.com/pages/Left-H...462391?sk=wall KCBS CBJ/PNWBA CBJ www.pnwba.com |
|
|
|
|
08-13-2008, 08:19 PM
|
#78 |
|
Full Fledged Farker
Join Date: 06-11-08
Location: Vancouver, BC, Canada
|
Thanks Brian. Too bad about your LBGE.
But I'm really surprised not much has been posted about the furnace cement bubbling and not bonding well to the claypots. The cement flaking off the paint was to be expected. Even though I tried to roughen up the new copper paint, it would never have bonded as well it I had mortared over the original green finish. Oh well, live and learn. Sure learnt a lot in the process. On to "just cooking" now. |
|
|
|
|
08-13-2008, 08:59 PM
|
#79 |
|
Full Fledged Farker
Join Date: 06-11-08
Location: Vancouver, BC, Canada
|
It's official... Humpty's repairs are over and he's a keeper.
 As part of his new status, Humpty's been moved to new digs and gone up in the world. He's now in a new cradle and has moved from the ground floor backyard up to the back balcony. Humpty's now sits in a Primo cradle on casters (2 locking) with retractable stainless steel side tables. Originally, the tables sloped a bit, but a couple of tire irons were used to gorilla the handle frames sit just right. The tables come in real handy and the extra height from the cradle is great. I LOVE IT!!!  PS: Now that I KNOW I don't have a BGE and can't do super-high cooks __________________ MayDay Project Humpty: SLIDESHOW, PHOTO ALBUM Kamado Claypot, Cobb |
|
|
|
|
08-14-2008, 03:47 AM
|
#80 |
|
somebody shut me the fark up.
Join Date: 10-27-06
Location: Bothell WA
|
I'm taking my time and letting areas thouroghly air dry before I do any burns. The clay parts that I could heat in the oven have turned out fine, with no bubbling or cracking. I took apart my Large Imperial Kamado to check the repairs I did on the firebox a few years ago and it is still solid.
__________________
Brian - Left Hand Smoke BBQ PNWBA 2010 Team of the Year BGE's/WSM's/Pellet Pro WSM/BWS Gater/BDS Clones/Cookshack 008/Weber Performer w EZ-Que/Cajun Bandit/Rib-O-Lator Test Pilot/La Caja China/BBQ Guru/Weber 1000 RK Drum Coffee Roaster Follow Left Hand Smoke on Facebook!http://www.facebook.com/pages/Left-H...462391?sk=wall KCBS CBJ/PNWBA CBJ www.pnwba.com |
|
|
|
|
08-14-2008, 02:36 PM
|
#81 |
|
Full Fledged Farker
Join Date: 06-11-08
Location: Vancouver, BC, Canada
|
I also took my time to air dry the mortar before doing the bakeout (1 whole week). Even then, I kept things around 250-300F for a few hours before going up higher, but nothing more than 400F for the first few firings since mortaring. But I got little bubbles the first time, then more and bigger ones with each additional firing. Some of the mortar bubbles are as large as my palm.
Now that Humpty's insides have been mortared, I've noticed condensation on the mortar almost every time I lift the lid after he's cooled down (say overnight or longer). At first I thought it was due to our West Coast humidity - it rains a lot here. After all, Humpty is kept outside under cover but doesn't get rained on.  However, now I'm wondering if the condensation is due to the trapped moisture that collects on the mortared walls when I snuff out the coals by closing the bottom damper and use the ceramic top. After all, water is a by-product of combustion. However, now I'm wondering if the condensation is due to the trapped moisture that collects on the mortared walls when I snuff out the coals by closing the bottom damper and use the ceramic top. After all, water is a by-product of combustion. This picture of the dome was taken after Humpty had cooled down overnight after a cook. The shiny sheen is condensation. It's usually wetter near the neck opening but the condensation also extends down into the bottom walls too.  For what it's worth, I never noticed condensation on the bare claypot walls before mortaring the entire inside. So, I'm thinking that the trapped condensation diffuses back into the "cured" mortar. Then when I fire up again, the water makes steam, which gets trapped in the mortar causing it to puff up and make more bubbles. One thing about curing the mortar in an electric oven is that it is a DRY environment as there is no combustion happening to produce water (can't say the same for a gas oven). Because the mortar continues to bubble after each firing and cookout, this tells me it has not fully cured.
All this might explain why other people's mortar repars are NOT bubbling and why mine IS continuing to bubble... but then maybe not.__________________ MayDay Project Humpty: SLIDESHOW, PHOTO ALBUM Kamado Claypot, Cobb |
|
|
|
|
08-14-2008, 04:35 PM
|
#82 |
|
Full Fledged Farker
Join Date: 07-16-08
Location: Texas
|
I am late to the party, but I thought I should reply in case my 2 cents are useful (probably not).
it looks exactly like the clay hibachi cooker I bought years ago from an importer of pachinko machines (markings, color, clay feet, cradle, hinges, clay top, metal top etc.). I believe they were intended to be kamado knockoffs. It worked well for low heat applications but cracked very easily once the heat got to 400. I would nt grill on it if I were you, but any kind of bird will come out better that you can achieve on a grill, offset, pellet, drum etc. I ultimately got rid of mine because it cracked more than once and I learned about the ceramic units. It looks like you did a great restoration job. |
|
|
|
|
08-14-2008, 05:39 PM
|
#83 | |
|
Full Fledged Farker
Join Date: 06-11-08
Location: Vancouver, BC, Canada
|
Quote:
After all's been said and done, I'll probably bite the bullet and eventually get myself a CERAMIC cooker. I'm learning via this forum that the ceramics can do a whole lot MORE than what the claypots can. Perhaps a BGE or Primo... but that's for later. After I get my cooking's worth out of this one. |
|
|
|
|
|
08-14-2008, 05:48 PM
|
#84 |
|
Full Fledged Farker
Join Date: 06-11-08
Location: Vancouver, BC, Canada
|
Thanks OrangeBlood! Not sure I would put so much effort in next time....
|
|
|
|
|
08-14-2008, 09:21 PM
|
#85 | |
|
Is lookin for wood to cook with.
Join Date: 06-27-08
Location: Philadelphia, PA
|
Quote:
|
|
|
|
|
|
08-15-2008, 09:32 AM
|
#86 |
|
Full Fledged Farker
Join Date: 07-16-08
Location: Texas
|
MayDay - Jim Beam is right "use it till it crumbles."
My was great for low temp cooking (isnt that what our forum is supposed to be about?). had i known it couldnt take the high heat before I tried high heat cooking it still might be in service now. Not a bad cooker - its just one that has to be used right. |
|
|
|
|
08-16-2008, 05:32 PM
|
#87 |
|
Full Fledged Farker
Join Date: 06-11-08
Location: Vancouver, BC, Canada
|
Thanks Jim Beam, OrangeBlood. That's what I intend to do USE IT TILL IT CRUMBLES!!!
Ahh, the freedom... now that I'm out of repair mode and into "user" mode. It doesn't matter anymore....  |
|
|
|
|
01-21-2009, 08:54 PM
|
#88 |
|
Found some matches.
Join Date: 12-07-08
Location: Roseville, CA (N.Cal)
|
May - You were my inspiration. I was fortunate enough to be the recipient of a Kamado Pot in distress. The fire box required repair, as did the ring above it. Lots of grime and rust to clean up, new gasket, replaced a couple of casters, and paint..... but the results were worth the effort. I've always used Weber kettles (I have four!) Now I just need to learn how to use the Pot for slow cooking and smoking!
A before and after....... Thanks again - Phil |
|
|
1 members found this post helpful. |
|
01-21-2009, 09:40 PM
|
#89 | |
|
somebody shut me the fark up.
Join Date: 10-27-06
Location: Bothell WA
|
Quote:
I left my Hibachi Pot refurb covered outdoors and the furnace cement repairs leached through the black BBQ paint. When the weather warms up I'll have to sand it down and use some Zinsser primer over the patch job, then repaint it. Check out the Naked Whiz site and run a copy of the Pachinko Palace Kamado Manual, it'll get you going on the right track. 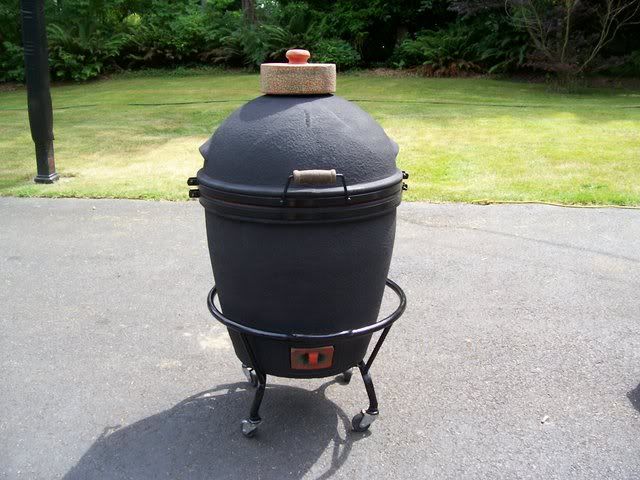 
__________________
Brian - Left Hand Smoke BBQ PNWBA 2010 Team of the Year BGE's/WSM's/Pellet Pro WSM/BWS Gater/BDS Clones/Cookshack 008/Weber Performer w EZ-Que/Cajun Bandit/Rib-O-Lator Test Pilot/La Caja China/BBQ Guru/Weber 1000 RK Drum Coffee Roaster Follow Left Hand Smoke on Facebook!http://www.facebook.com/pages/Left-H...462391?sk=wall KCBS CBJ/PNWBA CBJ www.pnwba.com |
|
|
|
|
|
01-21-2009, 10:50 PM
|
#90 |
|
somebody shut me the fark up.

Join Date: 05-10-06
Location: Overland Fark, KS
|
Wow! Nice. Great idea. Wondering what happened with May Days cooker, was it ever working like he wanted it to?
__________________
Asshattatron Farkanaut, CGCFO Chief Galactic Crockpot Foil Officer Certified MOINK Baller & IMBAS Certified MOINK Ball Judge #0003 - Are you MOINK Certified? Sole recipient of the Silverfinger and fingerlickin Awards! Don't forget about the Throwdown Thingies! The Secret Squirrel Society doesn't exist - Zero Club Duh. |
|
|
|
| Thanks from:---> |
|
| Tags |
| bge, claypot, copper, Kamado, mortar, refurbish, repair, restoration, Vancouver |
 Similar Threads
|
||||
| Thread | Thread Starter | Forum | Replies | Last Post |
| The long-awaited Imperial Kamado restoration project :) | W_2004 | Q-talk | 26 | 06-16-2014 04:52 PM |
| Kamado Restoration Project | Midnight Smoke | Q-talk | 65 | 11-14-2011 10:31 AM |
| **Imperial Kamado** CL Score/Restoration Project | swamprb | Q-talk | 83 | 05-15-2011 08:45 AM |
| ** Oh No! Not another Kamado Restoration Project? ** | swamprb | Q-talk | 17 | 07-26-2008 08:09 AM |
| Thread Tools | |
|
|


