Most find a PID/fan/ATC not really needed to maintain steady smoking temps with a UDS but go for it. I almost get walked into by people all day long who cannot go the the break room without looking down at their cellphones every step. Folk do like their gadgets but don't confuse like with need.
 
My first UDS

After researching some of the great ideas that the brethren have posted, I decided to build my own UDS that I'm pretty happy with. Started on it last weekend and completed it this weekend, about 4 short days all tolled. I loaded about 20 lbs of mesquite charcoal in it to season the internals and racks.

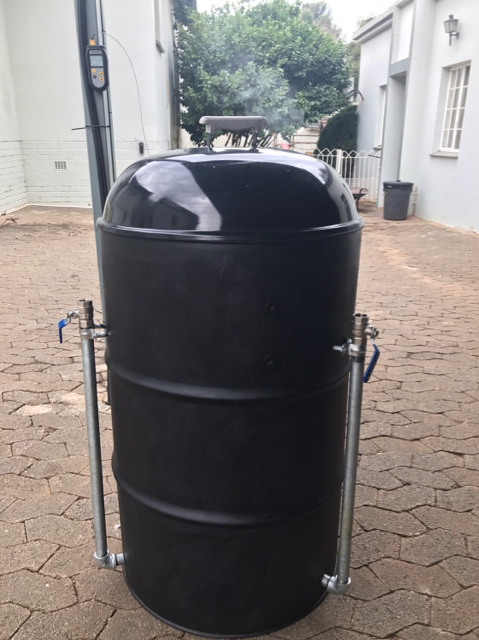
I started with a new barrel with no coatings of any sort that ran me $80. Because I wasn't completely certain about the final design I ended up buying more hardware that I decided I wasn't going to use. And I bought a Weber cooker on Craiglist just for the lid. I have a welder and fabrication tools, so I utilized that which seemed easiest and hassle-free.

I opted to use three-point suspension for everything. As long as measurements are on spot there shouldn't be any reason to use more. The Weber lid mod consists of 1/8" x 1 1/2" aluminum strip pop riveted to the inside of the drum, about 3/8" above the lip of the drum. I used one pop rivet every 7" around the perimeter.

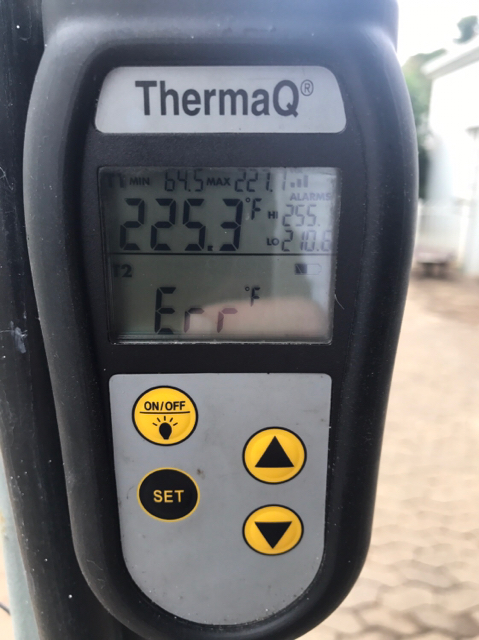
Bought a Thermo Pro dual remote thermometer for it which is really nice, warning me of presettable upper and lower temps for the smoker and meat, and programmable cooking time. Next step is to add a PID controlled fan to maintain steady smoking temps.

I think I've figured out the image posting protocol, so here are some images of construction details and comments.

uds-1.jpg
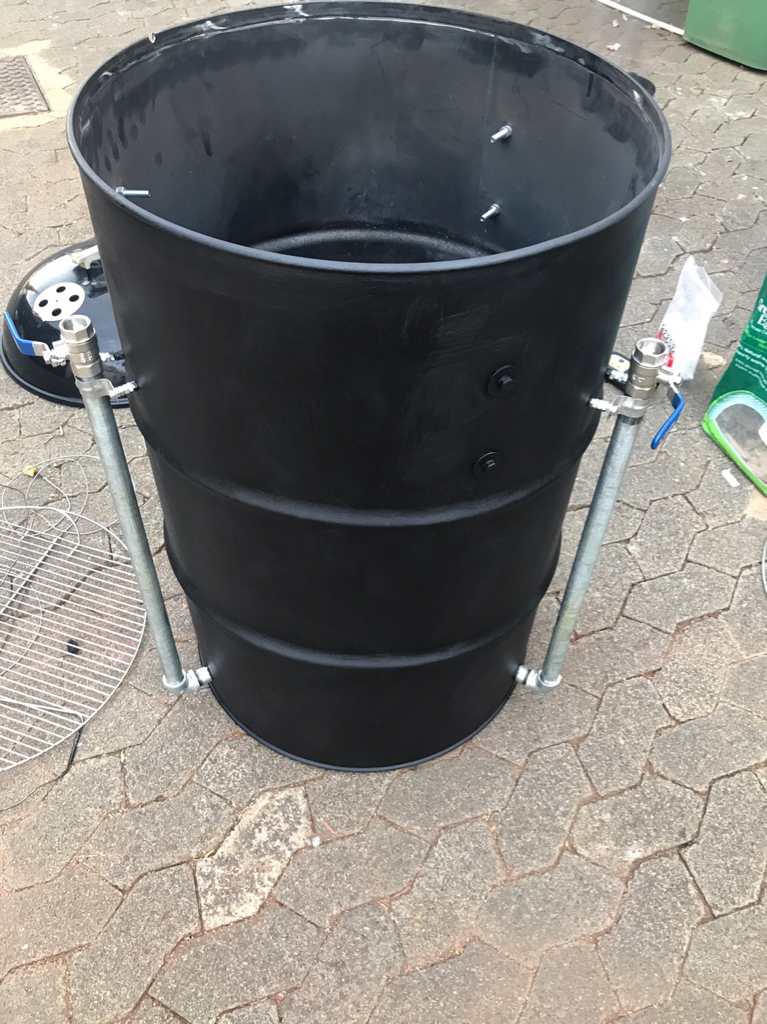
This was the barrel with my final choice of hardware attached. I opted to use 3/8" eye bolts to support the two 3/4" air intake and valve assemblies. Used the head of a ball peen hammer to slightly expand the eye opening to fit over the pipe. Cleaner ans easier than using a strap. Still needed to figure out how I wanted to design my fire basket and ash catcher tough...

uds-2.jpg
This weekend i got it painted, my ash catcher and a water pan/diffuser support fabricated. A cheap barrel dolly makes for easy movement...

uds-3.jpg
I have four air intakes, two with ball valves. The one on the rear is for a PID controlled fan, my next project...

uds-4.jpg
The rear vent is for a PID controlled fan...

uds-5.jpg
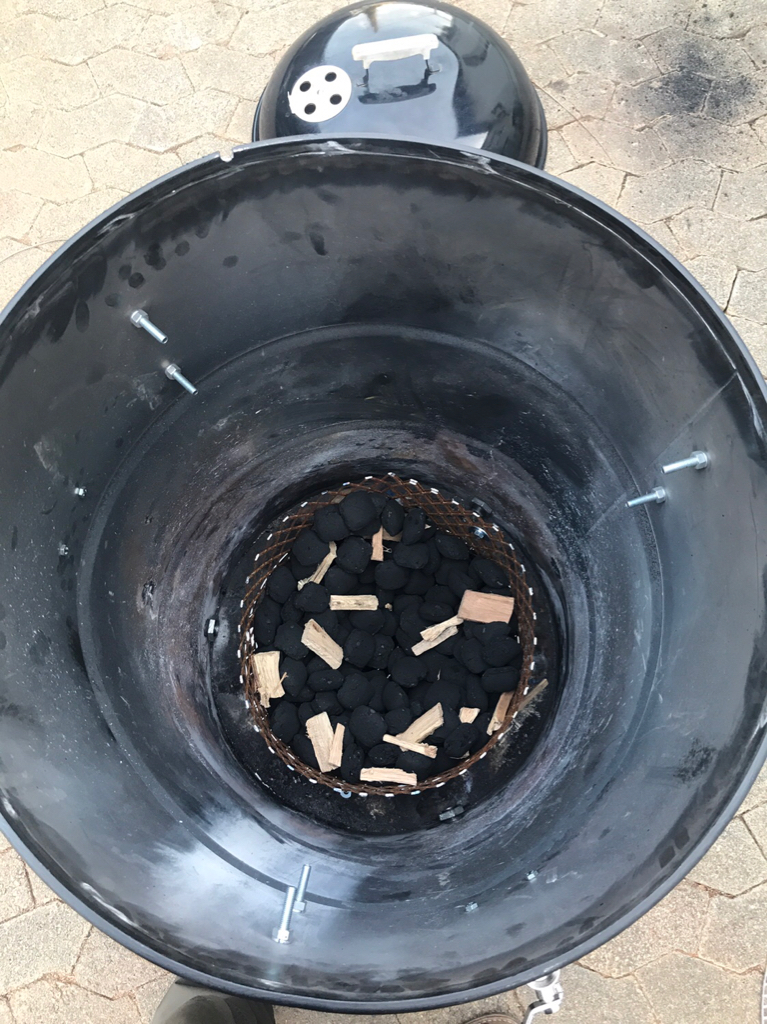
Here is 20 lbs of mesquite charcoal "seasoning the drum internals and racks...


uds-6.jpg
This is the burner stack. I'm using a Weber ash pan that sits on a cheap pizza pan, with the 19 1/2" tripod welded to a Weber charcoal grate for the water pan/diffuser that uses another Weber ash pan (for now). I used more of the expanded metal wired to the sides of the basket so that smaller charcoal wouldn't fall throught the Weber charcoal grate. The basket is wired to the grate rather than using fasteners...
uds thermo.jpg
I absolutely LOVE the Thermo Pro dual remote thermometer! Cheap and efective. Takes a lot of guesswork and uncertainty out of the equation.

Once again, many thanks to the brethren who have cleared the path
 
Build looks great! What color is that you used? Also, just my .02, a water pan isn't needed in these drums. It's a very moist cooking environment as it is. I'd use that lower grate for a diffuser plate and even direct grilling. I also have that same thermo, works great and customer service has been top notch. Probes have gone bad but replaced without issue.

Sent from my SM-G920V using Tapatalk

Agree on the water pan. On my last cook whenever I opened the lid I got steam cover on my glasses. Not smoke but steam and there was no water added anywhere in the UDS.
Also use that same thermo and enjoying it very much.

The build looks fantastic iowahill. Makes me wish I had some welding skills...
 
I'm trying to keep my build as DIY as possible. I wanted to add a nice vent like this one.
[ame]http://m.ebay.com/itm/181915005897?_mwBanner=1[/ame]

So I bought some parts and cut and drilled an ugly piece of metal with my new angle grinder :

y4mPsnirXjSrGleHcGc1dB7YHxEbyHq8-D4l1S2rtIQvi016at6Rvhm6E1IGpgFWaNHYL3vGTBASdbfJ4Kw_AfcEgpyLwTSa7ZjECCpZJJSKOfnyLXwucvJxYP2GGX02seLLfxJCWXimohLT--QrgNobKz1Wu1mg2f7d8XlsIp49kXnp6JWEk7WDcRHK8vSYkOcwoL-FePYG5Ly0yUuUbHuzw


Assembled and operational

y4m5wcETvHBbW2dNk1irgoHk7fbHm4TRp2NcURmhzjYVf-ixTMaTC2N0GtgAm8GsqeYfoWauQMm7tXkqsbE6INKthHwm70eg7dakIDrok0WD1_bopF12kXGgWS9vTof9vMoZ9c0HXawj7GaOkWANDtT8ibdiyJna_-c97f2oxaLbe92_YqfaWBaTDkGM3YXj7vEAjlzNaOErcwAdMTOmUSwiw


y4msRUMqq3nKbq9YgUrETnme0EULuXRSJOV_8Y34GoqqiY3NoSidxvpnDgaGDtU334oL2cey_y6fJfvcmcxWK5OfXngTKWGqYU8qAPe7uOf_MrjcZXEpRKB7Vhi3B6sIkxAMjlsGla32bXA-TK2Zw0rQnWbCLVeZmJ2zsKghhyOxLHX2wkJviBwVDBhk6iSRJm6rVc-kSjPGZhfhD5ZHBQoWQ


Does it work? I'll find out in a few hours.
 
Worked out very well. I'm now able to get higher temps. Above 300f.
Reverse seared steaks

y4mR6sJpr8Dgvcj1KF3CfxxZk5q9LCDDOavQHwYaUWTvlLzKocXYgXvMFGNN0nXBht_8H69x05wuIVJeaQ4k4zg3FsviMtaGPghZEvj_vboS8Ja-iH1LzFuX7RcCJrIyd1gQqCxSimH9eqa2xZYSYiXUhJdWvJvTrkfrvsfH2UiY_1GfSd5FD3ySg6felDwatJphH1kd304M5FHYvTvPALWBQ


Shrimps and veggies with the lid on

y4mY1HzZTFBH3U0Q7Y94xUj931B77Td487TFyyxA0TEHfxtZDSSCiq8aWa_bTM2pO5KnAOtpTUcUQAmoIB_7dQWwH5pNKo1yvvFAjhWe2d6dZPcC4xjTT9Cu7VKe9_8Pl2fS2kzhDG6qquiHddFHl4ky6RpePBaGLin2AZp7K3xKTvO0M8XVmJ9bY3YFc6DtZt2NDiL3OM8OKy-0d8FiI2uuw


And seard with lid off

y4mF3KSbBraB6ROW4ABBaQZUCeloWAVTpLqfQDMK_kkhnvdRBnCKijCZZMegxrLI9zbTtSTihQjhwYnmDpidHzIcIgQ5NLJKNSFt3IqsL7a1IYJEySFa7y6CDtrxLNuAU0aP1iB2ov5gx0nJKcT3AQiHW0aXLLa41Gk4W-AiCwFsgPm_nw9bl2EAU62AOtlLsAzawmwqMe6ot0WSdxFnrmLvA
 
Hello I'm currently working my way through this monster of a web forum! Currently on page 560, nearly there! I've started my build and have a question. I've gone for the three intake design, using one ball valve (included in the three). I've just realised I've drilled 1/2 holes using 1/2 nipples, and my ball valve is 15mm internal opening (sorry I'm from the UK so don't know 15mm is in old money!). I've realised everyone is using 3/4 intakes and balls valve. Am I going to have an issue with temps using this smaller size? Thanks in advance, and this forum is awesome!
 
You guys have inspired me so much I have built my own PBC this week.

Used an old free oildrum, burnt it in twice with big fires overnight.
Installed the hardware and did a dry run with my ThermaQ probes to see the temps. I was amazed at the length of time that this thing can go on one batch of charcoal briquettes. I used a 5kg bag (11 pounds) and started the cooker up at 17:00. Next morning at 07:00 it was still on temp. At about lunch the temps started dropping despite max airflow throught the bottom vents.

Doing some pork ribs for my first run. Here are some pics:

382425e5cf060b2601826f8faf12c354.jpg

ef82ffeff9092f31de8ef6b4c3dd8d38.jpg

c49ba66e42afb7ab9ade384c50a482f4.jpg

9193b5901fece8f7ca5b9fe7c416f976.jpg

5c6471735539bc6068948f61336d322f.jpg
 
Started the UDS at 12:30. Sprinkled Maldon Salt on the ribs the previous evening. Dusted with Memphis Dust before going on the grill. Kept temps between 225 and 235 till about 20:30 the evening.
Lightly basted with Kansas style homemade sauce and chargrilled on hot coalbed for about 5 minutes to caramelize the sauce.

Maybe I left them a bit to long in the pit because they were very tender. But it was quite a thick rib rack so I thought they might take a little longer.

All in all I am very happy with the result. Planning to do a brisket cook in the bush on my upcoming hunt next week.

I'm going to pop the UDS into the back of my pickup and take it along on the trip.

Thanks a lot for all the tips and plans and howto's on this forum - for BBQ noobs like me it is a great resource!! [emoji1303][emoji1303]
 
Hi All,

been a member for a couple of years now; built my UDS from a lot of knowledge gained through this excellent thread, though first time posting. First of all, thanks heaps for sharing all your findings and knowledge here!

I put in a fair bit of effort in my UDS, it worked real well from the get go and I have done lots of smokes with each and everyone coming out a treat. it hold temps really well once dialled in (3 x 25mm holes at the bottom, covered up with fridge magnets)

Though the tinkerer in me started experimenting with electronic control, and to the UDS purists here - I agree the UDS need no electronic control.


I had an old OMRON PID controller laying around for the best part of 17 years, I intended to help a friend building an incubator for his exotic bird breeding in Sth Africa but never got to it before I immigrated to Australia. So i whipped together three crude enclosures with a small computer fan and a small servo opening and closing the intake. When the PID controller kicks in, the intakes opens fully and the fans run at max speed. When the PID switch the output off, the intakes close completely and the fans are off. This worked great with maintaining the temps within one degC over the +-8 hour cooks I have done at the time.


But then I read of the HeaterMeter which sparked my interest, I ordered the bits from the US, built the electronics and toyed with a few ideas on the damper/fan setup. As the HM continuously vary the air-intake opening and fan speed to maintain pit temps I could not re-use my previous damper/fan idea. Eventually I ended up with the HM electronics and the damper in one enclosure and having the 3 fans underneath the UDS with some copper tubing with holes to direct / spread the air underneath the coal basket.


I have recently done a 12 hour cook using the HM, and spent most of that time away from home but able to log into its website and keep an eye out on how the cook progress and can adjust the set temp remotely was great.


Here some piccies of my setup.


XZKFMZzm.jpg


My UDS with the HM mounted

1ATsxN9m.jpg


My HM / Damper combo

qhfRZj6m.jpg


And its guts...

qSdB07jm.jpg


The base where the air is channeled to the fan-pods on the bottom

awFPtGKm.jpg


The fan-pods

A6FYwlPm.jpg


All connected and running


6VxdN5Tm.jpg


Pit probe (Thermocouple) and 3 meat probes (Maverick 733 probes)

00qpYYXm.jpg


Air diffuser underneath coal basket

xzXEhBem.jpg


Coal basket ready to be lit.

hAVHrmdm.jpg


UDS Hinged lid

0cM9tUlm.jpg


Testrun, dialling in the PID values (Orange is the pit temp, red is the set temp, degC)
 
Hello I'm currently working my way through this monster of a web forum! Currently on page 560, nearly there! I've started my build and have a question. I've gone for the three intake design, using one ball valve (included in the three). I've just realised I've drilled 1/2 holes using 1/2 nipples, and my ball valve is 15mm internal opening (sorry I'm from the UK so don't know 15mm is in old money!). I've realised everyone is using 3/4 intakes and balls valve. Am I going to have an issue with temps using this smaller size? Thanks in advance, and this forum is awesome!

It depends on the temps you are trying to achieve.

More air flow = higher temps

I can get my UDS up to 475F (246C), if I need to, and that's with 3/4" intakes.
 
hi all just joined the group from the uk I am picking up my first barrel next week to make my first uds this thread has been a brilliant source of advice and ideas and to see how people have adapted the uds idea from the first posts is brilliant I will post pictures of mine when I have finished the build
 
Hi guys, im working on my first uds and was wondering if I could also use it as a grill. I've seen people who raised their charcoal basket, but I was wondering what kind of temps can I get at the top grate with all the valves open and the charcoal basket at the bottom? Thanks
 
hi all just joined the group from the uk I am picking up my first barrel next week to make my first uds this thread has been a brilliant source of advice and ideas and to see how people have adapted the uds idea from the first posts is brilliant I will post pictures of mine when I have finished the build

Good luck. It's a great experience building and using it.

Hi guys, im working on my first uds and was wondering if I could also use it as a grill. I've seen people who raised their charcoal basket, but I was wondering what kind of temps can I get at the top grate with all the valves open and the charcoal basket at the bottom? Thanks

I use it as a grill without raising the basket. I get ~300-400c after a few minutes with open vents and no lid. It's really hot.

KPh3Dydh.jpg


29fPWmxh.jpg


Sear marks and all.
 
Hi guys, im working on my first uds and was wondering if I could also use it as a grill. I've seen people who raised their charcoal basket, but I was wondering what kind of temps can I get at the top grate with all the valves open and the charcoal basket at the bottom? Thanks
Your max temps will be determined by how much intake and exhaust volume you build into your UDS. I can get 750* F + Without a problem. Coal/wood basket still on the bottom.
But if you want to sear fast/hot. Raising the basket shortens the time to get a crispy sear. More so at 750*+.
 
Back
Top