
|
|
|||||||
| Q-talk *ON TOPIC ONLY* QUALITY ON TOPIC discussion of Backyard BBQ, grilling, equipment and outdoor cookin' . ** Other cooking techniques are welcomed for when your cookin' in the kitchen. Post your hints, tips, tricks & techniques, success, failures, but stay on topic and watch for that hijacking. |
 |
|
|
Thread Tools |
 10-09-2017, 01:59 PM
|
#12871 | |
|
is One Chatty Farker
Join Date: 10-01-17
Location: North Texas
Name/Nickname : EL Luchador
|
Quote:
nicely done. the basket is the only challenging part of the whole UDS build, and I contend that there must be an affordable product out there that one could just drop in so as not to have a basket. Heck, I think that two chimney full of charcoal could probably power a uds at 275° for a good 8 hours. |
|

|

|
|
10-09-2017, 05:48 PM
|
#12872 |
|
Babbling Farker
Join Date: 08-18-13
Location: Texas
|
My first UDS fire basket was the bottom foot of an El Cheapo Brinkman. I left the feet on it, left the grate in the bottom, put a piece of baling wire across the top. It worked pretty damned good- I gave it to my SIL- he still uses it. I saw everyone using expando and figured it would be "better" since everyone used it and all... it wasn't. The ECB made a better fire basket than a smoker - that's for sure.
__________________
I started out with nothing and I got most of it left. |
|
|
|
|
10-09-2017, 07:16 PM
|
#12873 | |
|
is One Chatty Farker
Join Date: 10-01-17
Location: North Texas
Name/Nickname : EL Luchador
|
Quote:
sweet. thats a pretty bright idea |
|
|
|
|
|
10-09-2017, 09:09 PM
|
#12874 | |
|
is One Chatty Farker
Join Date: 10-01-17
Location: North Texas
Name/Nickname : EL Luchador
|
Quote:
this time, I had more than enough exaust, and no smoke was coming out of the bottom of the barrel. All the smoke was going past the meat. Ohhhh boy. Way more intense smoke flavor than before. I do believe Im finally getting the stick burner taste I was looking for. Thank for the input btw, the smoker was going in this pic. if you look closely you can almost see that beautiful thin blue smoke.  |
|
|
|
|
| Thanks from:---> |
|
10-10-2017, 04:13 AM
|
#12875 |
|
Babbling Farker
  Join Date: 08-23-13
Location: Detroit Mi
Name/Nickname : tom
|
I'd bet you burned alot less wood too.
A lot of your flavor is really coming from the dripping fat onto the burning wood. Not as much flavor from the type wood you burn cooking this way. Different flavor than doing over charcoal. |
|
|
|
| Thanks from:---> |
|
10-10-2017, 07:39 AM
|
#12876 | |
|
somebody shut me the fark up.
 Join Date: 02-08-10
Location: Howell, MI
|
Quote:
__________________
Two Weber daisy wheel kettles A: 1979 P: 1993, and an unused ECB |
|
|
|
|
|
10-10-2017, 07:47 AM
|
#12877 | |
|
is One Chatty Farker
Join Date: 10-01-17
Location: North Texas
Name/Nickname : EL Luchador
|
Quote:
I did burn a ton less wood, and the cooking flavor coming out of the drum was unreal. I do like the dripping fat flavor , but for now I still had a diffuser in there mainly because Im still tuning and didn't know what to expect. AND, every vertical ive ever seen has that diffuser. I AM going to try something though. I have a suspicion that if I took the diffuser out, I could cook on wood at 250° using just a bed of 4-6 coals, adding a new chunk every 15 minutes. Im going to find a large coffee can and make a chunk burner to test this theory. |
|
|
|
|
|
10-10-2017, 09:39 AM
|
#12878 | |
|
Babbling Farker
Join Date: 08-23-13
Location: Detroit Mi
Name/Nickname : tom
|
Quote:
Would be easier using a weber style lid and your grate 1" below the lip of the drum. As the greater distance between fire/food helps. You will still get flames that kiss the food off/on. Very small splits, add one about every 15 minutes. No coffee can, let the fire breath. And you might start thinking about add a spacer that holds the cooking grate around 4" above the top of the drum. The extra exh from that 4" gap, no exh on the weber style lid. You can cooking wings, burgers etc at 550-650* and not burn the food with a real nice fire burning. 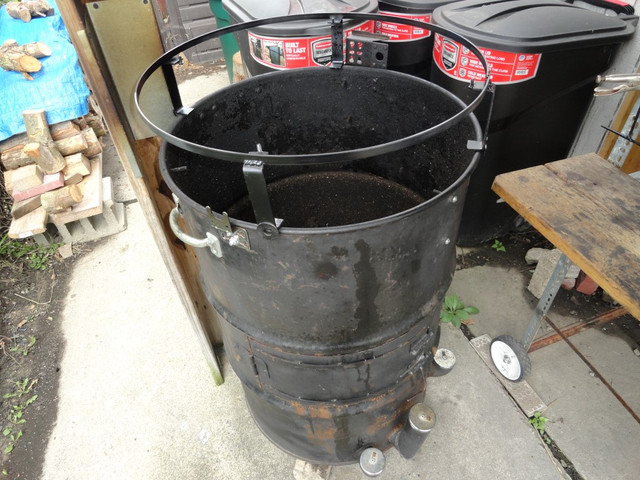 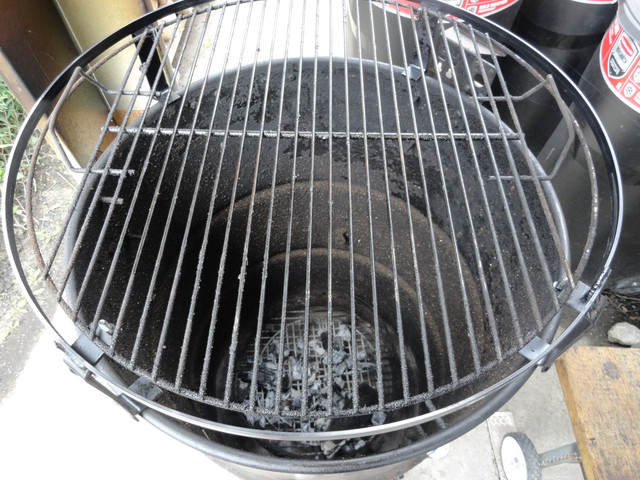 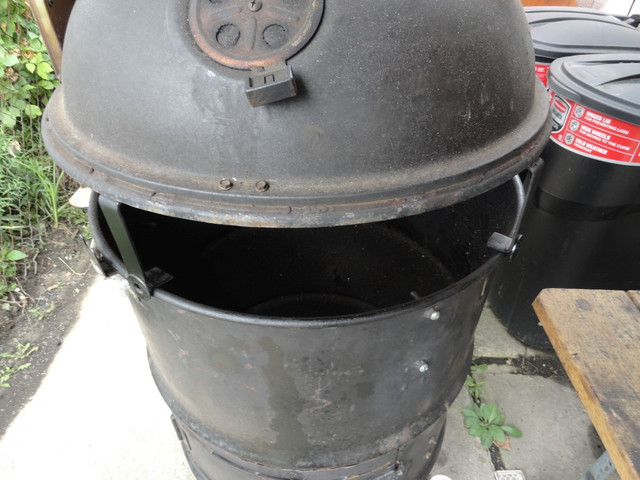 Last edited by ebijack; 10-10-2017 at 09:53 AM.. |
|
|
|
|
|
10-11-2017, 07:47 AM
|
#12880 | |
|
is One Chatty Farker
Join Date: 10-01-17
Location: North Texas
Name/Nickname : EL Luchador
|
Quote:
very nice thinking there :) |
|
|
|
|
|
10-11-2017, 09:48 AM
|
#12881 | |
|
Babbling Farker
Join Date: 08-23-13
Location: Detroit Mi
Name/Nickname : tom
|
Quote:
Worked so well, I never made a purdy one. If I'm cooking below 350* I do not use the 4" riser ring. Just the 1" down from the lip cooking grate sitting on bolts. Weber knock off lid. |
|
|
|
|
|
10-11-2017, 08:16 PM
|
#12882 | ||
|
is One Chatty Farker
Join Date: 10-01-17
Location: North Texas
Name/Nickname : EL Luchador
|
Quote:
Quote:
|
||
|
|
|
|
10-14-2017, 04:44 PM
|
#12883 |
|
Found some matches.
Join Date: 09-17-17
Location: Maple Grove
|
My first UDS
. I read through 1/2 of the posts before I started and I appreciate all the insights. The first picture is my dry run before the burn out. Drum for $51 new, unlined. Burned out once and then used a wire wheel brush to get down to bare metal. I purchased engine primer and paint from AutoZone for about $18 (1 primer, 2 cans of paint). I think the paint job looks pretty good for a first time and it evened out really well. I left the lid alone since it was white and I'm too lazy to change it. Looks pretty good though. Lid exhaust is a 2" black pipe, 2" cap both of which I also painted. Grate is from my old 22.5" Webber. Grate is supported by bolts. The ones I installed are to short. I'll have to get longer ones. Charcoal basket grate is from the Weber as well. I used two sheets of 12x24" expanded metal with some sort bolts, washers, hex nuts. I also bought a cheap 12" metal trashcan and used the handle for the basket, perfect fit. I bent the metal easily Judith a tree log. Put the metal flat, put the log in to and use your hands to roll the metal and the log. The basket legs are 5/16" and 3.5" long. Put a washer on each side and two bolts. I found some neat clips to attach the expanded metal to the grate. Funny / dumb, but I knew my pizza pan wouldn't be wide enough but luckily the pan fit snug in between the legs.  I think it will still get the ash. I think it will still get the ash. Intakes are 3/4" close nipples. Drilled the 1 inch hole and used 3/4" conduit washer things to get a snug fit. 90* elbows and 3/4" x 24" extension pipes. Ball valves to control the air. I also have one other 3/4" intake on the back side with a 3/4" cap. I think with the Minnesota winters I'll probably need that one completely open. I went back and forth on how to support the intake extensions and ended up going with hooks that were threaded into the side and the pipes slid into. Looks like I'll need to get some nuts to secure the hooks better because it's not the greatest fit. Hardest part about the build was getting the intakes installed. A lot of pieces and not a lot of twisting room once you install the support hooks. Total estimated spent: $120. I'll update once I know the exact price. Tomorrow is my first season with a breakfast fatty. The wife has zero interest in trying the fatty. Last edited by bakerk7; 10-21-2017 at 11:07 PM.. Reason: Completely updated post with more text and pictures. |
|
|
|
|
11-03-2017, 06:51 PM
|
#12884 |
|
Babbling Farker
Join Date: 06-24-17
Location: Monroe, GA
Name/Nickname : Viet King Cong
|
Well... I am waiting for my 110 gallon drum to be shipped and for Mark Hunsaker to send me my custom 20" Vortex basket. I am leery of ordering any 30" grates in case the barrel is dented or oddly shaped. But this will be fun...
__________________
Boathouse Smokers Big Black Cabinet |
|
|
|
|
11-04-2017, 05:57 AM
|
#12885 |
|
Got rid of the matchlight.
Join Date: 11-02-17
Location: Dallas, Texas
|
My first UDS was Classic Pit Barrel Cooker but I am thinking to build a customized one.I have a fire place too in my house. I need a seperate place to keep this drum.
Last edited by leohnoz; 11-09-2017 at 10:16 PM.. |
|
|
|
|
| Tags |
| divided circle template, uds, ugly drum, ugly drum grill, ugly drum smoker |
 Similar Threads
|
||||
| Thread | Thread Starter | Forum | Replies | Last Post |
| Ugly Drum Smoker | ironslob | Q-talk | 2 | 09-19-2010 10:16 AM |
| Ugly Drum Smoker - Need Help | Bartkowiakj | Q-talk | 10 | 06-18-2010 09:38 PM |
| One Ugly Drum Smoker | Steve_B | Q-talk | 15 | 09-21-2009 10:32 PM |
| My (not-so) Ugly Drum Smoker. | hav | Q-talk | 47 | 11-05-2008 02:30 PM |
| Ceramic Cooker Meets Ugly Drum Smoker - BUDCS - Concept Drum Discussion | Hook_Line_and_Sinker | Q-talk | 9 | 04-26-2008 02:24 PM |
| Thread Tools | |
|
|


 I'm starting my build this weekend! I can't wait!

