Firebox in a UDS?

Rodney

Full Fledged Farker
Joined
Dec 15, 2009
Messages
350
Reaction score
57
Points
0
Location
Antelope, CA (Sacramento metro area)
Hey everyone-

I have an idea, but as I learned long ago, when you're a n00b at something, any ideas you have are rarely new ones... So, I suggest this with full expectations that someone is going to say "Yeah, tried it, it's a no-go."

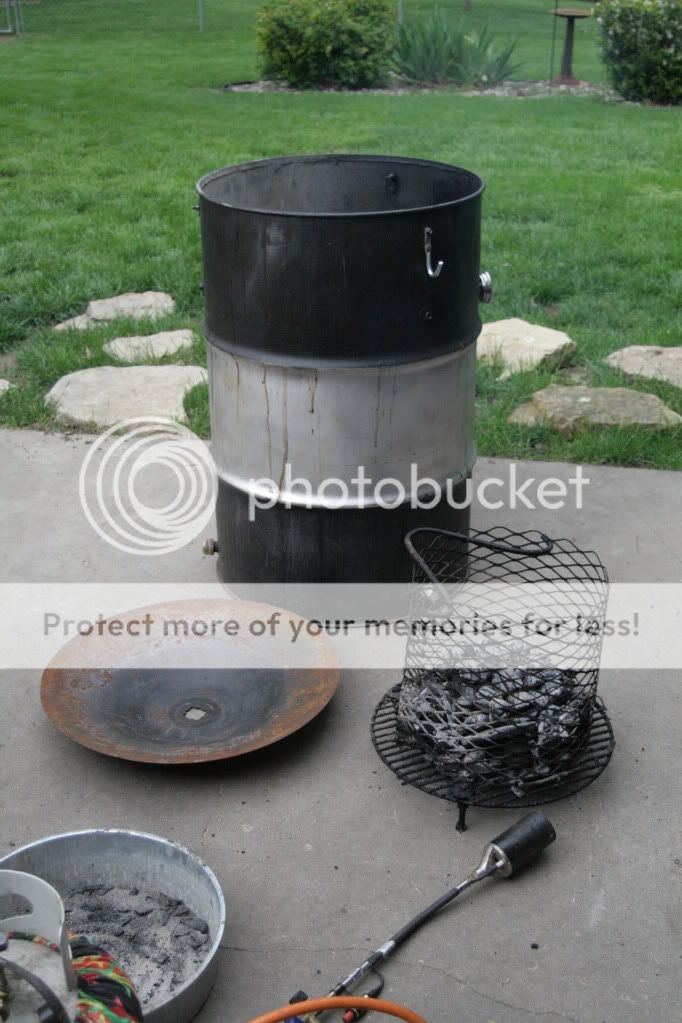
One of the main issues with a UDS, as I see it, is that when you take the lid off the fire gets a rush of air. After the lid is replaced, the temp goes up, and takes some time to stabilize, even if you do block the intakes before removing the lid. Managing the temperature swings takes some getting used to, and I'm in the midst of that right now. Don't get me wrong, I'm going to learn how to use a standard UDS, but my struggles got me thinking...

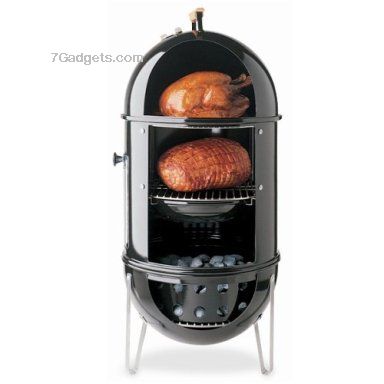
What if there was a plate in the UDS that more or less divided the drum into a firebox and a cooking chamber? It'd sit on bolts above the charcoal basket and closely fit against the wall of the drum, sealing the chamber below it off from the cooking chamber with the exception of some deliberately placed holes (or specifically sized gap around the perimeter of the plate) with an open area roughly equivalent to a 2" bung hole. The effect *should* be that the fire has a well-defined inlet and outlet, just like when the lid is on a standard UDS, but might have almost no reaction to the lid being removed from the cooking chamber. I recognize that this is exactly the way horizontal/offset smokers work. The plate could be lined with foil to act as a drip pan as well, which would make cleanup easier, especially if it was built with a rim around it.

Of course, a cheaper variant of this to try first would be a 22.5" grate covered with foil, with rolled up foil stuffed along the sides except for ~4 1" wide spots.

I tossed together some images of what I'm talking about...

Thanks for any feedback!

-Rodney

picture.php
picture.php
 
Thats a pretty sweet design you drew up. What did you use to make it? I think what you are describing is what others have been calling a heat diffuser. If you do a search on heat difusser you'll see what others have done. I do like the idea.

Patrick
 
At this point you are just turning a UDS into a Weber Smokey Mountain Cooker. Will it work good? sure. There are a lot of happy WSM owners out there.

You don't need to have the diffuser flush with the walls of the drum. Another option for your heat diffuser is a ceramic potting saucer from home depot.
 
I have WSM's and can tell you that the heat will spike with the lid off of those as well. Not quite as bad as a UDS, but you still want to be very quick about things you are doing with the lid off. There is more air that is capable of moving between the pan and the WSM walls than are needed to get the fire really going, so it's not a whole lot different.
 
Cool drawings!

One of the features to cooking on a UDS is the 'open pit' flavor, which is generated from the fat from the meat dripping on the coals. That would be lost, of course. Not everybody likes that flavor, though, so to each, his or her own. One thing people do is close all of the intakes for a while before an intended opening, so that the fire loses some momentum. I guess if you time it right, opening the lid for a minute or two would let the fire get back up to where it was before throttling it. Just be sure you don't close the exhaust (until you are done cooking) as this generates creosote and stale smoke that smells and tastes nasty. I just go ahead and let mine spike; it doesn't seem to hurt any that I've noticed, although I'm no expert, that's for sure. So far, everything I've cooked has been fine, temperature spikes and all.
 
You also have to compensate for the charcoal usage....with the smaller fire box area its gonna be hotter down there and eat up the coals faster.
 
The phenomenon I'm addressing is this: When you take the lid off, the hot exhaust in the smoker rises quickly. As it moves upward, it speeds up and squeezes together into a narrower plume. As this happens, air is sucked in along the walls of the smoker and goes all the way down to the fire, feeds the fire, increases the amount of hot exhaust going upward, which increases the amount of air sucked in, and the fire builds and builds.

With this block-off plate in place, there is positive outflow from the fire chamber through the plate's smaller openings (equivalent to ~2.25" dia. or ~4 square inches), meaning the exhaust is rushing through the holes fast enough that no air can squeeze in next to the plume of exhaust and feed the fire... exactly what is achieved by the hole in the lid on the UDS. We're just moving the lid downward. See what I mean?

A heat diffuser, as I understand it, simply blocks the direct path between the coals and the food, but does not serve to significantly restrict airflow between the coals and the cooking chamber, and would allow an eddy of air to shoot down the side of the drum to the flames.

Regarding the WSM, based on this image:

41q6qhx3nvl__ss384_.jpg


It looks to me like the bowl is 2-3" from the wall all the way around. This would allow an eddy of air to swirl in and hit the coals when the lid is opened, right? Isn't that how the flare-ups happen in a WSM?

See what I mean?

As for the pit flavor, yeah... that'd be sacrificed...

-r
 
A simpler solution is to minimize the time the lid is off the cooker. If you need to mop, re-rub, foil, whatever, lift out the grate full of meat, and cover the UDS while taking care of it outside the cooker. At best, the cooker lid is off for 15 seconds, and your temp spike is minimal.

Restricting the airflow per your idea has merit, don't get me wrong. I have to wonder what the negative fallout is, like possibly the inability to get up beyond a certain temp. Sometimes you'll want to get up to 350F in a hurry, and limiting your airflow might not allow it. Or perhaps it'll generate creosote.

Nothing wagered, nothing gained. Give it a try, and let us know how it works for you.
 
Professor Salt said:
Nothing wagered, nothing gained. Give it a try, and let us know how it works for you.

That sounds like a good plan, except that I need to get basic fire management skills down first. ;-) I'll try it at some point. I see it as at least a theoretical benefit, but wanted to check it against the experience that you guys already have with cooking in a UDS.

EDIT: Good call on taking out the whole grate full of meat. That's why I'm the n00b... I don't think of simple stuff like that. ;-) I'll still try this idea out at some point though, especially if it almost totally eliminates flare-ups like I think it might!
 
You also have to compensate for the charcoal usage....with the smaller fire box area its gonna be hotter down there and eat up the coals faster.

Yeah, I can see that... You've basically got three ways that heat can get out of the UDS: Out the chimney, into the meat, and out the side of the drum. Currently, my UDS is barely warm to the touch at the very bottom of the drum, and if the firebox was to become more confined, it'd probably warm up more. Warmer surface means more heat lost, which translates to more charcoal used when maintaining a given temperature in the cooker. If the inside of the bottom of the drum was lined with foil, it would reflect the heat back inward and keep things cooler down there, possibly saving some fuel...
 
Thats a pretty sweet design you drew up. What did you use to make it? I think what you are describing is what others have been calling a heat diffuser. If you do a search on heat difusser you'll see what others have done. I do like the idea.

Patrick

Glad you like the design! I used Autodesk Inventor Professional. I had modeled up a drum before I bought one and laid out my charcoal basket as well, so I had those models done... I just whipped up the block-off plate and put it in my assembly.
 
Here's a link to an experiment I did last year with a disc used as a heat sink...similar to what you are talking about.

http://www.bbq-brethren.com/forum/showthread.php?t=61202


The pictures have been moved from my orignal post, so here they are...
moz-screenshot-15.png
IMG_0439.jpg


IMG_0444.jpg


To make a long story short, I finally got around to doing a Butt on my UDS with the heat sink in place and it took about 1 1/2 times as long to finish it and had to reload with fuel with the heat sink in (1/2 trimmed off the edges to allow more air flow and handles welded on to remove it)...so I scrapped that idea and never went back...
Yeah, I know...no pictures so it didn't happen...but that's my story and I'm sticking to it:heh:
 
Here's another concept that has a central exhaust port. This way there's only one hole for the exhaust to exit the fire box section, completely eliminating any air paths other than what might leak past the edge of the plate. The circular plate over the exhaust tube would spread the hot exhaust out like a gas stove burner. :cool:

picture.php
 
To make a long story short, I finally got around to doing a Butt on my UDS with the heat sink in place and it took about 1 1/2 times as long to finish it and had to reload with fuel with the heat sink in (1/2 trimmed off the edges to allow more air flow and handles welded on to remove it)...so I scrapped that idea and never went back...
Yeah, I know...no pictures so it didn't happen...but that's my story and I'm sticking to it:heh:

Interesting! So you tried it with 1/2" clearance around all edges and got that result?
 
Interesting! So you tried it with 1/2" clearance around all edges and got that result?

Yep. I even used my weed burner to preheat the disc so it wouldn't take so long to absorb the heat and get up to temp. However, my temp above the sink ran pretty steady around 215 to 220° with the meat on, but could never really get it above that... For clarification the hole in the center of the disc was plugged with foil.
I realized after that experiment that cooking over direct heat... your temps are about 20 to 25° hotter than what you really think...maybe even more. And that the UDS works as a convection more so that what one may realize...
So I stopped there and have not looked back...besides, the butt didn't have that UDS flavor that I've come to love...
 
Butterflies are free (or at least reasonably priced)!

Rodney,

I like your musings about flare control and had a thought that I'd like to throw an idea out there and see if it has been tried or what others may think.

If instead of a static plate or planter dish or whatever what about an internal butterfly damper that could be opened out to quickly restrict airflow while messing around in the upper chamber and then closed again to allow almost unrestricted access to the fuel basket to allow almost the dripping action to occour.

I can't draw but obviously you can Rodney, so maybe you could create the image.

I can see how it could almost be made to be automatic.

If the butterfly were mounted a couple inches below the bottom grate, like an inch below your turkey theromometer.

Hinged to drop down, when the lid is on.

Two small chains or steel cables attached to each wing of the butterfly and to the underside of the lid.

When you take the lid off the chains/cables lift the wings, may need stops to keep at level height, and the weight of the lid keeps them raised as well as keeping the lid out of the way and off the ground.
As you put the lid back on the wings lower back to thier resting position and all the drippings get to fall on the fuel bed.

What do you think?

If you really need a sketch to get what i'm talking about building I can draw something by hand scan it in and post it.
 
First off, nice drawings! Wonderfully analytical approach to drum construction. Just wondered what prompted this design approach? Are you having trouble with temps on your drum, or unhappy with the flavor profile of burning grease, or something else? If so, I'm just wondering what you have tried in the past. The drums are so simple, they are just begging for serious modifications... that being said, there are really only a few that are needed. This is drum cooking; K.I.S.S. is the motto, for good reason. Don't overthink it. So, any specific issues? I'd love to offer my $.02.

Gotta say, I never have the temp spike issues that people seem to complain about. I mean, any cooker will spike with unlimited air flow... why are people removing the lid so often? I just did a ten pound butt; opened the lid to put it on, and opened the lid 17 hours later to remove it. That's all.

The most intensive work I find is doing 3-2-1 spares. Spray with apple juice every 30 minutes (5 seconds open, 5 times total)/remove ribs to foil (10 seconds, max)/replace foiled ribs (5 seconds)/remove foiled ribs (5 seconds)/replace unwrapped ribs (5 seconds). So, during a 6 hour rib cook, the drum is opened no longer than 10 seconds at a time.
 
I had a few problems when I first started using my drum with flare ups after removing the lid but I solved that problem by closing the intakes when opening the lid. This stops the rush of air from removing your lid that comes through the intakes. This method isn't perfect but it gives you more time to mop and wrap without having to worry about the flare ups. It hasn't happened to me since.
 
First off, nice drawings! Wonderfully analytical approach to drum construction. Just wondered what prompted this design approach? Are you having trouble with temps on your drum, or unhappy with the flavor profile of burning grease, or something else? If so, I'm just wondering what you have tried in the past. The drums are so simple, they are just begging for serious modifications... that being said, there are really only a few that are needed. This is drum cooking; K.I.S.S. is the motto, for good reason. Don't overthink it. So, any specific issues? I'd love to offer my $.02.

Gotta say, I never have the temp spike issues that people seem to complain about. I mean, any cooker will spike with unlimited air flow... why are people removing the lid so often? I just did a ten pound butt; opened the lid to put it on, and opened the lid 17 hours later to remove it. That's all.

The most intensive work I find is doing 3-2-1 spares. Spray with apple juice every 30 minutes (5 seconds open, 5 times total)/remove ribs to foil (10 seconds, max)/replace foiled ribs (5 seconds)/remove foiled ribs (5 seconds)/replace unwrapped ribs (5 seconds). So, during a 6 hour rib cook, the drum is opened no longer than 10 seconds at a time.

Thanks!

Yeah, this thought of mine originated from my first run with my UDS... no prior experience. I'm sure that once I use the thing correctly things will get easier. I was cooking three things at a time, getting in and out to check ABT's, removing ABT's and sausage, all while my chuck roast was cooking. Everything turned out great, except for the chuck. My temps were low for a while and my chuck roast took too long to cook, I had to go to bed and get to work early the next day, and the fire ended up going out because I had my valve set too low. Next time I'm cooking ONE thing and ONE THING ONLY. I couldn't even let the drum settle long enough to establish a good valve setting for 250 with all of that food in it. ;-)

Instead of just dismissing my difficulties as rookie mistakes, which they definitely were, I instead entertained the thought that maybe I'd come up with a new idea that was "outside the box", as rookies can and often do bring to the table due to a lack of preconceived notions. Whether it's an idea that addresses a real problem or it's simply the answer to the question nobody asked is another issue entirely... hehe...

-r
 
Rodney,

I like your musings about flare control and had a thought that I'd like to throw an idea out there and see if it has been tried or what others may think.

If instead of a static plate or planter dish or whatever what about an internal butterfly damper that could be opened out to quickly restrict airflow while messing around in the upper chamber and then closed again to allow almost unrestricted access to the fuel basket to allow almost the dripping action to occour.

I can't draw but obviously you can Rodney, so maybe you could create the image.

I can see how it could almost be made to be automatic.

If the butterfly were mounted a couple inches below the bottom grate, like an inch below your turkey theromometer.

Hinged to drop down, when the lid is on.

Two small chains or steel cables attached to each wing of the butterfly and to the underside of the lid.

When you take the lid off the chains/cables lift the wings, may need stops to keep at level height, and the weight of the lid keeps them raised as well as keeping the lid out of the way and off the ground.
As you put the lid back on the wings lower back to thier resting position and all the drippings get to fall on the fuel bed.

What do you think?

If you really need a sketch to get what i'm talking about building I can draw something by hand scan it in and post it.

Interesting concept... I'll have to give that one some thought!

-r
 
Back
Top