Wampus
somebody shut me the fark up.
Hi.....my name's Kempis and I LOVE my ECB smoker.....:becky::thumb:
I'll just come right out and say it.....properly modified, I think this very affordable smoker will perform as well as a WSM. There......I said it.
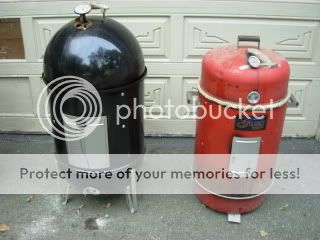
In fact.....I KNOW it. I've cooked on both at the same time on the same cook. Although the 18" WSM is slightly bigger than the ECB Gourmet (at 16"), the performance of these two was DEAD ON identical. In this photo I had 5 butts (all about 7-8 lb each) on the WSM and 2 large butts (about 10 lb each) on my ECB. I fired them both the night before at about 10 pm. Checked them at about 12, and then actually LEFT them (this was at someone elses house) and when I arrived back the next morning at 7 am, they were BOTH cruising at 225-230. The butts were all done at about noon the next day (some were a little stubborn, but all were done relatively at the same time). NO fuel was added to EITHER smoker during these cooks.
Anyhoo......so there seems to have been a lot of inquiries in recent months about how to modify an ECB. I've posted before in many of them, but thought perhaps it would be helpful to just put up a thread that I can link to or folks can just find easier with a quick forum search, so here goes......
Mine is a Brinkmann Gourmet Smoker. If you have a Brinkman Smoke 'n' Grill, the link below is a fantastic tutorial on how to modify one of those:
http://www.randyq.addr.com/ecb/ecbmods.html
BUT....if you have (or are considering getting) the Gourmet model....here's how what a lot of research and note taking brought me to conclude....
There are 2 major problems with the design of this smoker.
1. Airflow control. The design does not allow for airflow to be controlled at all. The smoke just rolls out of the large gap between the lid and the barrell. There's a hole in the bottom that also cannot be closed off to limit the air intake.
2. Ash control. The design prohibits proper shedding of the ash as it builds up around the coals, therefore the coals end up betting choked out and the heat will trail off, leaving you scrambling.
The following 4 modifications will fix both of these issues. Of course, there are different ways to go about getting these results, but here's what I did and it has worked great.
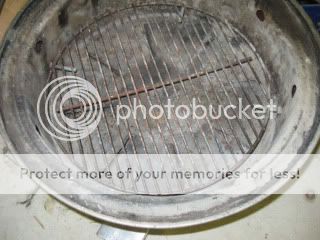
MOD 1: Firepan modification.....add a charcoal grate
Get yourself a Weber Smokey Joe charcoal grate. They measure about 14.5" in diameter and are PERFECT for this. Drill in and install 3 or 4 bolts (NON-GALVANIZED of course) 1" above the bottom of the stock firepan and keep them there with nuts like this....

I've since these photos also just taken some pliers and opened up the vent slits in the bottom of the pan more to also improve airflow.
That will keep the WSJ grate up from the bottom of the pan and will allow the ash to drop away, keeping the fire rolling.....
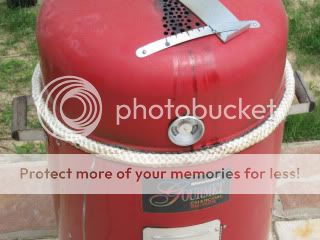
MOD 2: Close up the air gap at the lid/barrell
Get some 1" fiberglass rope. This stuff can be found anywhere that has fireplace or wood burning stove repair. Here's what I bought....

I also bought some high tempurature silicone to properly seal it. I predrilled small holes just below the "rib" in the lid and used some regular old 1 1/4" drywall screws just to hold the fiberglass rope in place while the silicone set. The holes get sealed by the silicone bead, and when it was all done, I ended up leaving the screws there anyway. TIP: Premeasure the rope ahead of time and cut it to length!!! Then, just squeeze out a nice fat bead of silicone just under the lid's "ridge", sit the lid on a flat surface and put the rope in place, hand threading the screws through the center of the rope and into the predrilled holes. Easy peasy.
Here's what it looks like on.....
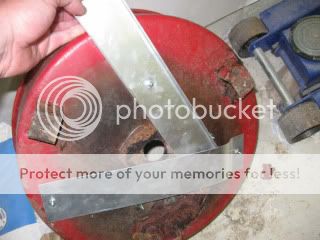
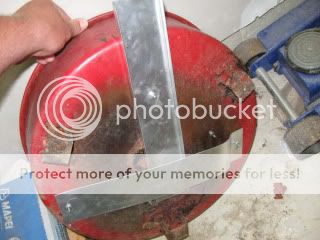
MOD 3: Add vent holes in the lid and an exhaust damper
I just picked up some medium guage sheet metal at Lowe's (you can buy hobby pieces that are around 12" x 12" (if I recall correctly) for decently cheap. I just cut this damper with snips, bent the one end, cut a narrow strap and then fastened it all onto the lid with some small screws with nuts on the inside. THEN I just drilled as many holes as I could within the space that's covered up by the damper. Here's what I have....
CLOSED
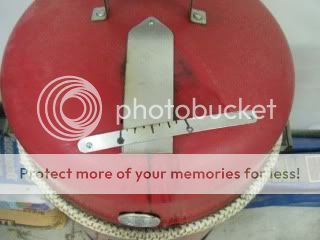
And OPENED

MOD 4: Add a damper to cover up the bottom intake hole
The intake hole I've found to be adequately sized, it just needs a way to close it down. I figured I could always drill MORE holes if I needed, but I've never found that necessary to do.
Again....out of the rest of the sheet metal, I made up the damper pictured below. I just used a basic pivot application with a single small bolt and used additional bolts just as stops to keep it all open and all shut. I ended up also adding the large "strap", bent as pictured so that when the damper is fully closed, the "strap" pushes the damper tightly against the bottom of the cooker.
The shape of the damper is like a channel. The shorter "sides" of the channel act as stiffeners.
OPEN
CLOSED (not fully)
Then I just used a sharpie to mark on the bottom of the cooker so I'd know how much the damper was open. The solid dot indicates CLOSED and the other one indicates OPEN.

I also found no need to change out the thermometer, although that can certainly be done. After much testing with remote thermometers and oven thermometers, I concluded that although the "WARM, IDEAL and HOT" indicators on the stock thermo SUCK in principal, they are (at least on mine) consistent. I just know where the temps are on mine. For instance, The I in "IDEAL" is the sweet spot (about 225). As long as the needle stays between the I and the E, I'm good. If I want to go to 325, I keep the needle to the spot between the L and the H. Change it if you want.....I'm just a real cheap arse.:becky: PLUS, I've used thermometers and just dropped them in through holes in the lid (as in the very first picture in this post), which is easy enough to do.
So, here's my smoker all done and cruisin....

I also find that I usually keep my bottom vent at about 1/4 open and my top vent between 1/2 and full open.
The only "maintenance" or babysitting I've had to do is shake the coals after a long while. To do this, I'll just CAREFULLY lift the top portion off of the firepan (meat chamber with water bowl, meat AND lid) and then shake the firepan to dislodge all the ash. If necessary (and I've not really ever NEEDED to do this, but have as a "CYA" thing) this is also how I'll add coals.
SO.....load it up, distribute smokewood in throughout the coals, FIRE IT UP and kick back and wait. There's ABSOLUTELY no reason this very affordable smoker can't do for you what it's done for me. Have I "graduated up" to larger, better, nicer cookers? YES! Of course! BUT....I still pull the old ECB out once in a while. It's a fine weapon.
Look....I picked it up for $15 used on Craigslist. I have a total of about $35 in it TOTAL.
Good luck getting a WSM for $35.
SO STOP HATIN' ON THE ECB!!!!
GOOD LUCK!!!
SMOKE ON!!!!
Oh, and.......
THIS PLACE ROCKS!!!!
:thumb::thumb::thumb::thumb::thumb::thumb:
I'll just come right out and say it.....properly modified, I think this very affordable smoker will perform as well as a WSM. There......I said it.
In fact.....I KNOW it. I've cooked on both at the same time on the same cook. Although the 18" WSM is slightly bigger than the ECB Gourmet (at 16"), the performance of these two was DEAD ON identical. In this photo I had 5 butts (all about 7-8 lb each) on the WSM and 2 large butts (about 10 lb each) on my ECB. I fired them both the night before at about 10 pm. Checked them at about 12, and then actually LEFT them (this was at someone elses house) and when I arrived back the next morning at 7 am, they were BOTH cruising at 225-230. The butts were all done at about noon the next day (some were a little stubborn, but all were done relatively at the same time). NO fuel was added to EITHER smoker during these cooks.
Anyhoo......so there seems to have been a lot of inquiries in recent months about how to modify an ECB. I've posted before in many of them, but thought perhaps it would be helpful to just put up a thread that I can link to or folks can just find easier with a quick forum search, so here goes......
Mine is a Brinkmann Gourmet Smoker. If you have a Brinkman Smoke 'n' Grill, the link below is a fantastic tutorial on how to modify one of those:
http://www.randyq.addr.com/ecb/ecbmods.html
BUT....if you have (or are considering getting) the Gourmet model....here's how what a lot of research and note taking brought me to conclude....
There are 2 major problems with the design of this smoker.
1. Airflow control. The design does not allow for airflow to be controlled at all. The smoke just rolls out of the large gap between the lid and the barrell. There's a hole in the bottom that also cannot be closed off to limit the air intake.
2. Ash control. The design prohibits proper shedding of the ash as it builds up around the coals, therefore the coals end up betting choked out and the heat will trail off, leaving you scrambling.
The following 4 modifications will fix both of these issues. Of course, there are different ways to go about getting these results, but here's what I did and it has worked great.
MOD 1: Firepan modification.....add a charcoal grate
Get yourself a Weber Smokey Joe charcoal grate. They measure about 14.5" in diameter and are PERFECT for this. Drill in and install 3 or 4 bolts (NON-GALVANIZED of course) 1" above the bottom of the stock firepan and keep them there with nuts like this....
I've since these photos also just taken some pliers and opened up the vent slits in the bottom of the pan more to also improve airflow.
That will keep the WSJ grate up from the bottom of the pan and will allow the ash to drop away, keeping the fire rolling.....
MOD 2: Close up the air gap at the lid/barrell
Get some 1" fiberglass rope. This stuff can be found anywhere that has fireplace or wood burning stove repair. Here's what I bought....
I also bought some high tempurature silicone to properly seal it. I predrilled small holes just below the "rib" in the lid and used some regular old 1 1/4" drywall screws just to hold the fiberglass rope in place while the silicone set. The holes get sealed by the silicone bead, and when it was all done, I ended up leaving the screws there anyway. TIP: Premeasure the rope ahead of time and cut it to length!!! Then, just squeeze out a nice fat bead of silicone just under the lid's "ridge", sit the lid on a flat surface and put the rope in place, hand threading the screws through the center of the rope and into the predrilled holes. Easy peasy.
Here's what it looks like on.....
MOD 3: Add vent holes in the lid and an exhaust damper
I just picked up some medium guage sheet metal at Lowe's (you can buy hobby pieces that are around 12" x 12" (if I recall correctly) for decently cheap. I just cut this damper with snips, bent the one end, cut a narrow strap and then fastened it all onto the lid with some small screws with nuts on the inside. THEN I just drilled as many holes as I could within the space that's covered up by the damper. Here's what I have....
CLOSED
And OPENED
MOD 4: Add a damper to cover up the bottom intake hole
The intake hole I've found to be adequately sized, it just needs a way to close it down. I figured I could always drill MORE holes if I needed, but I've never found that necessary to do.
Again....out of the rest of the sheet metal, I made up the damper pictured below. I just used a basic pivot application with a single small bolt and used additional bolts just as stops to keep it all open and all shut. I ended up also adding the large "strap", bent as pictured so that when the damper is fully closed, the "strap" pushes the damper tightly against the bottom of the cooker.
The shape of the damper is like a channel. The shorter "sides" of the channel act as stiffeners.
OPEN
CLOSED (not fully)
Then I just used a sharpie to mark on the bottom of the cooker so I'd know how much the damper was open. The solid dot indicates CLOSED and the other one indicates OPEN.
I also found no need to change out the thermometer, although that can certainly be done. After much testing with remote thermometers and oven thermometers, I concluded that although the "WARM, IDEAL and HOT" indicators on the stock thermo SUCK in principal, they are (at least on mine) consistent. I just know where the temps are on mine. For instance, The I in "IDEAL" is the sweet spot (about 225). As long as the needle stays between the I and the E, I'm good. If I want to go to 325, I keep the needle to the spot between the L and the H. Change it if you want.....I'm just a real cheap arse.:becky: PLUS, I've used thermometers and just dropped them in through holes in the lid (as in the very first picture in this post), which is easy enough to do.
So, here's my smoker all done and cruisin....
I also find that I usually keep my bottom vent at about 1/4 open and my top vent between 1/2 and full open.
The only "maintenance" or babysitting I've had to do is shake the coals after a long while. To do this, I'll just CAREFULLY lift the top portion off of the firepan (meat chamber with water bowl, meat AND lid) and then shake the firepan to dislodge all the ash. If necessary (and I've not really ever NEEDED to do this, but have as a "CYA" thing) this is also how I'll add coals.
SO.....load it up, distribute smokewood in throughout the coals, FIRE IT UP and kick back and wait. There's ABSOLUTELY no reason this very affordable smoker can't do for you what it's done for me. Have I "graduated up" to larger, better, nicer cookers? YES! Of course! BUT....I still pull the old ECB out once in a while. It's a fine weapon.
Look....I picked it up for $15 used on Craigslist. I have a total of about $35 in it TOTAL.
Good luck getting a WSM for $35.
SO STOP HATIN' ON THE ECB!!!!
GOOD LUCK!!!
SMOKE ON!!!!
Oh, and.......
THIS PLACE ROCKS!!!!
:thumb::thumb::thumb::thumb::thumb::thumb:
")


