• working on DNS.. links may break temporarily.

Rednecked Ugly Drum Smoker

Awesome! so does your fire basket rest on the 3 pipe nipples? If so, is that sufficient room for the ash? or does your basket rest on bolts?
You think a ball valve would work on the vertical air intake? I like the magnet idea, cheaper that a 1 in. valve!:-D

Hey! I'm a full fledged farker! I hope thats good!!!??? or does that mean I have too much time on my hands??
 
Bottoms Up

N8, that's one fine lookin' rig ya got there buddy.

- Did that drum come with a sealed lid rather than removable? If so, how'd you get it off and get the edge of the lid so nice?

- What's with all the geometry on the lid? Doesn't look like you drilled any holes in the lid...

I really like your magnetic vent damper. Pretty savvy piece of engineering.
Thank you very much... This drum is an opened lid variety with a removable top.
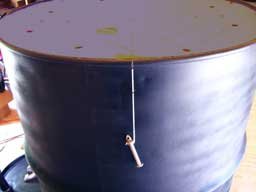
In the picture of the build with the layout lines the drum is actually upside down. divided-circle.jpgI layed out the geometry on my computer for even placement of all the holes that I needed or thought I may need. I printed out the file and trimmed the paper to fit the bottom of the barrel. From there I made sure it was level and using a string with a weight attached I aligned the string to match the layout lines.drum_string.jpg I measured and marked upon the string the location of the hole to be drilled and transfered that to the drum itself.
Then, move string to next alignment, mark drum, etc.
 
Burn Baby Burn

I was assuming you guys were doing some kind of a burn to get rid of the factory paint....how long does that take? Did you consider a weed burner?
I acquired three huge wooden freight pallets from work and broke them down.
I did a total of three burns in the barrel. Filled it to the top with wood each time and let it burn down half way before refueling. I did this when the temps were 95 degrees outside....Man!!! That was one long hot day...
 
Details revealed

Awesome! so does your fire basket rest on the 3 pipe nipples? If so, is that sufficient room for the ash? or does your basket rest on bolts?
You think a ball valve would work on the vertical air intake? I like the magnet idea, cheaper that a 1 in. valve!:-D

Hey! I'm a full fledged farker! I hope thats good!!!??? or does that mean I have too much time on my hands??
Keale, I really liked the way you cut a section of one barrel and attached
it to the other to increase the height...did that work out well for you?
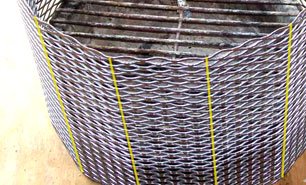
I got two sections of 12 x 24 expanded metal at HD and bent, then bolted
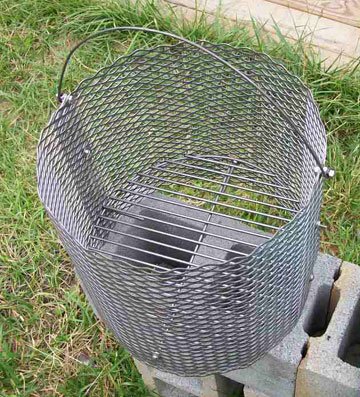
the two halves together.Basket_detail.jpg At the bottom of the basket I placed my bolts 2.25" from the bottom and rested the charcoal grate from my Weber upon them. This then sets in the drum right on the bottom....on my last cook there may have been about 1" of ash on the bottom...plenty of room for air..I am looking for something to use as an ash pan to ease in clean up.
I aspire to be a farker!!!!
 
Thought ya'll might like to see the build
View attachment 8249View attachment 8245View attachment 8244
View attachment 8243View attachment 8242
Once it was wired brushed and shot with paint I laid out the hole placement
View attachment 8246View attachment 8247View attachment 8248
After I holesawed and drilled holes with a stepbit I went on to the basket
View attachment 8240View attachment 8239View attachment 8238
Barrel Complete!!!
View attachment 8241

How did you bend the expanded metal into a nice round circle? Did you wrap it around a 5 gal. bucket or something?
 
Optics

How did you bend the expanded metal into a nice round circle? Did you wrap it around a 5 gal. bucket or something?
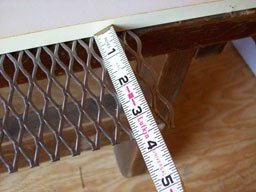
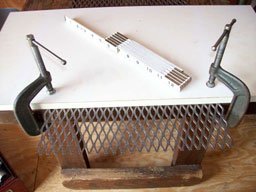
First I got some c-clamps and some old shelving and sandwiched the
metal on top of my work table and measured for the first bend
bask_measr.jpgbask_clamp.jpg
Wearing heavy work gloves I bent down the metal and guessed at the angle
then reset for each bend after using the same measurement.
It only appears to be a nice round shape but is rather a series of bends
bask_illus.jpg
Once the ends were bolted together I layed it on the floor and
used a little friendly persuasion to conform into shape:wink:
 
OK...Now I'm feelin farkin a bit slow. I didnt even think about just burnin da fark out of my drum to get the paint off. I lined up a guy to sand blast it for me. My wife says slowness brings out the brokeness in me!!

Thanks for the pics brother!! :eusa_clap
 
Great Minds

OK...Now I'm feelin farkin a bit slow. I didnt even think about just burnin da fark out of my drum to get the paint off. I lined up a guy to sand blast it for me. My wife says slowness brings out the brokeness in me!!

Thanks for the pics brother!! :eusa_clap
There had been near drought conditions here for the last month and a half.
The ground was dust dry and I was concerned about the burn out. So we called for prices of sandblasting my drums, I had gotten three drums and thought to do it all at the same time. Guy on phone says $125.00 an hour, two hours to do the job and I politely thanked him for his time and hung up!!!! Rained the next week for three days...I was in the yard that weekend firing it up!!!!
 
Pretty tiddy looking fire basket you got there.

Where did you buy the grate on the bottom of the basket and your main cook grill? Are there generic grates at places like Walmart etc, or are folks using replacement parts from specialty shops like BBQs Galore? Seems like there might be a vast price difference...

N8's $60 build price has become a target for my new obsession.
 
Your Mileage May Vary

Pretty tiddy looking fire basket you got there.

Where did you buy the grate on the bottom of the basket and your main cook grill? Are there generic grates at places like Walmart etc, or are folks using replacement parts from specialty shops like BBQs Galore? Seems like there might be a vast price difference...

N8's $60 build price has become a target for my new obsession.
I'm using my Weber charcoal grate in the basket right now. I think at
Home Depot the charcoal grate runs about $16.00 and the 22.5" cooking grate around $18.00. I've rechecked the numbers and total cost for the build is closer to $80.00....I'm sorry but when I posted the $60.00 amount I forgot to include the 2" exhaust pipe and elbow fitting and a few more stainless bolts, nuts and washers.....my mistake:sad:
 
Pretty tiddy looking fire basket you got there.

Where did you buy the grate on the bottom of the basket and your main cook grill? Are there generic grates at places like Walmart etc, or are folks using replacement parts from specialty shops like BBQs Galore? Seems like there might be a vast price difference...

N8's $60 build price has become a target for my new obsession.

I saw a 22 1/2 inch grill (grate? The thing you put the food on) that would fit a Weber (or a drum) for about $6 at Menards. It was enamel-coated and not very heavy-duty. But for $6 you use it, abuse it, and replace it. A heavy-duty Weber replacement is closer to $16 or so.
 
Thanks N8Man, so in essence the other 2 pipe nipples are "just in case" and that the air intake pipe is more than enough air?

The add on to my barrel worked great, I now have a Weber cover (immitation), Since you know how to get the cover off, on that attachemt I made you can add another cooking grate, and get a total of 3 racks on this..."MO POWER"
 
My daddy took a look at it and asked what kind
of fancy corn squeezin' I was fixin' to make?

Back when I lived in Fayetteville, I sampled some fine product from your part of the state. I never knew who made it, and I don't want to:lol: :wink: :cool:

Nice work on the cooker!
 
i must have one of those! great job with the template on the computer
 
Thank you very much... This drum is an opened lid variety with a removable top.
In the picture of the build with the layout lines the drum is actually upside down. View attachment 8282I layed out the geometry on my computer for even placement of all the holes that I needed or thought I may need. I printed out the file and trimmed the paper to fit the bottom of the barrel. From there I made sure it was level and using a string with a weight attached I aligned the string to match the layout lines.View attachment 8283 I measured and marked upon the string the location of the hole to be drilled and transfered that to the drum itself.
Then, move string to next alignment, mark drum, etc.

That is a spiffy layout. The template would be idiot proof. At work we figure arc length on the outside diameter. Knowing that 8 holes evenly spaced in a circle will fall at 45° to each other, and working (for example) with a 24" diameter circle, each degree will equal .209". 45° will equal 9.42" measured on the outside diameter. Starting anywhere, we layout 7 locations at 9.42" apart. Then we snap a line from the center point of the circle to each of the 8 marks on the outside diameter. I like your idea better.

The engineers I work with have that information on the computer, it just never makes it into a template. The bad part is the young guys on the shop floor don't know there are 360 degrees in a circle and don't know what those little lines on a tape measure are.
 
The bad part is the young guys on the shop floor don't know there are 360 degrees in a circle and don't know what those little lines on a tape measure are.

The little quality marks in between the numbers? Duh... The more marks, the higher quality the ruler. The steel ones with lotsa marks = highest quality. Kindergraden wood ones with fewer marks = low quality.

I also heard the wooden kind have fewer quality marks so they'll leave cleaner welts when the nuns hit'cha.

Lotsa marks = higest quality .....:confused: Right .... Let's just say they don't know who Laroy S. Starrett is and don't give a chit.

I can vouch for the popularity of wooden rulers with nun's. The first few whacks were on an open palm. When they moved to the knuckles, look out brother.
 
Let's just say they don't know who Laroy S. Starrett is and don't give a chit.

He the guy who makes those little adjustable hammers with the liquid filled hour-glasses in'em? Those things sure break easy. Can't drive a nail worth a damn, neither.
 
Can't Breathe

Thanks N8Man, so in essence the other 2 pipe nipples are "just in case" and that the air intake pipe is more than enough air?

With the one vertical pipe opened and choked it levels out around 225-250, if I want to blast off the gunk on the grill surface I just open them all up...
I did just that about thirty minutes ago when I was finished smoking a pork butt and a brisket flat(pron pictures coming soon, gotta nap now)....smoked up the entire hollar....heee heee....bet the neighbors looked at their crappy suppers and pushed away from the table:twisted:
 
Starrett? aint he the guy who makes them C Clamps too... I HATE THOSE THINGS, fellow has to crank on those screws for hours and they dont hold nuthin together.
 
Back
Top