• working on DNS.. links may break temporarily.

Project "HUMPTY" — Kamado/BGE Restoration, Vancouver, Canada

M

MayDay

Guest
A huge Thank You to all the experts on here, you've all inspired me big time!!!

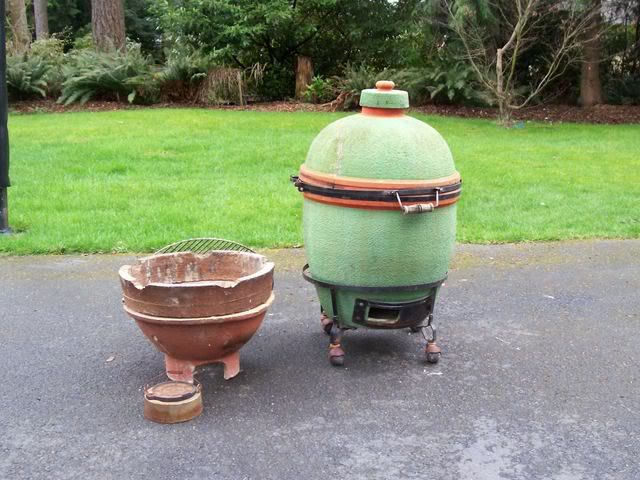
OK, here's the scoop.... Got myself a BGE/Kamado from CraigsList up here in Vancouver, Canada. It's at least 30 years old, according to the original owner. This is my first ceramic cooker. Any Kamado / BGE enthusiasts in the Vancouver area?

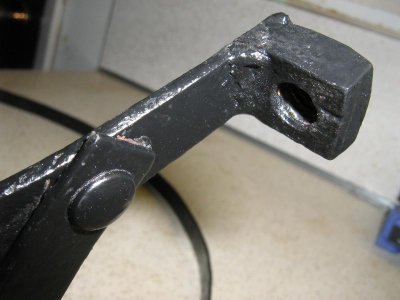
For starters, can someone confirm if this is a Kamado or a BGE? The info on the early ceramic cookers is confusing. :confused: Exactly what model is it? Dimensions are 18.75" round x 27" high (without the lid). Weighs about 86 lbs without the metal dolly. There are no Japanese characters or other ID marks. However, the metal BBQ Smoker Top is stamped Taiwan at the bottom of the wheel.

i6BE56A0E-6FA9-424A-B78A-7FC3206157DC.jpg


After reading and re-reading Swamprb's very informative "**Imperial Kamado** CL Score/Restoration Project thread several times, I finally took the plunge to restore my little green monster.

De-sooted and cleaned the inside, took everything apart and scrubbed a ton of rust off. Whew, what a dirty filthy job! Skinned a few knuckles too and breathed in a lot of rust and soot. I really wish I had access to a bead-cleaner for the rusted metal parts. (See Swamprb's bead blasted and rust-free parts.)

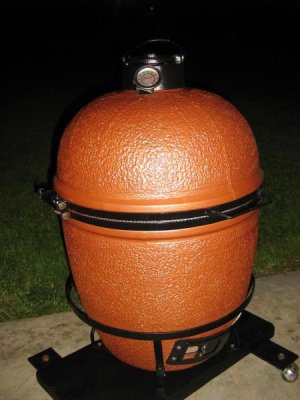
Got a big 5 oz pack of JB Industro Cold Weld from Lordco and JB'd most of the cracks. Then painted the outside with 4 coats of hi-temp Copper (wish I'd used Gold instead or Red). The color on the cover of the spray paint can is misleading (end result is totally different). I had visions of a big shiny copper egg, but the color is more like a used penny (dark brown). :shock: :!:

I was going to reassemble everything last weekend, but noticed a few hairline cracks that were not JB'd. As the outside has already been painted, perhaps I'll apply JB on the inside only for these new cracks.

So, I've got a few questions I'd like to ask the experts before going further:

  1. In hindsight, I guess I should have JB'd the cracks 2x before painting. Since the outside is already painted, will a second layer of JB over the inside surface of the first welds be useful or not? I've been told that a second coat of JB will not help structurally, as the epoxy is only being applied to the surface (not the crack interface itself).
  2. Should I also apply Furnace Cement over the cured JB welds? Will it give added strength or will it just flake off onto the food?
  3. Finally found a 5/8" Stove Gasket Kit, Imperial Products # GA0186 (Canadian Tire, $14). However, it is fiberglass ROPE, not flat braid. As per the Naked Whiz's Rutland Gasket Replacement instructions, I plan to apply it to the rim of the base. Would using 5/8" fiberglass ROPE (thick and round) create problems with sealing, heat loss, etc.?
  4. Is it necessary to seal the upper edge of the firebox to the inside wall with furnace cement? That stuff cracked long ago and I chipped the rest away to repair the firebox. My preference is not to mortar anything permanently to the base.
  5. Up here in Canada, the selection of BBQ parts is poor and pricey. :shock:
    • Any suggestions on where to locate a cheap dome temperature gauge? e.g. Bayou Classic Cooking SS Thermometer, $6.50, Ace Hardware, USA). The local pricing is $30-$40 for a Weber or Primo gauge!!!
    • Looking also for a 12" charcoal grill, 16.5" cooking grill, 7" charcoal grate and coal basket.
    • Right now, am keeping my eyes open for freebie BBQs on CL that I can salvage for the temperature gauge and other parts....
i53E7355F-A098-4631-BC3D-78A3A41CADB5.jpg


If interested, here are links to a SLIDESHOW and PHOTO ALBUM for the repairs done to date. Have also attached a few photos below.

Will be applying the gasket and doing a bakeout this weekend. Any and all suggestions would be welcome, especially on how NOT to crack Humpty any further now that he has been put back together. Educate me please. Thanks very much everyone.

* * *

Ok, here are some more pictures....

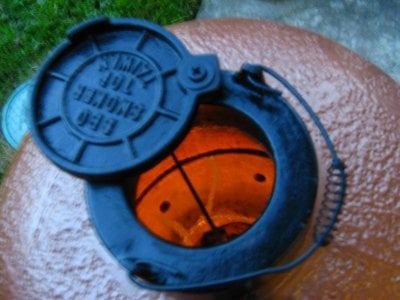
Top is cracked through. Held together with wire.
iE36F3DF9-F045-4C0A-9FFD-4DD26F3FA4A8.jpg


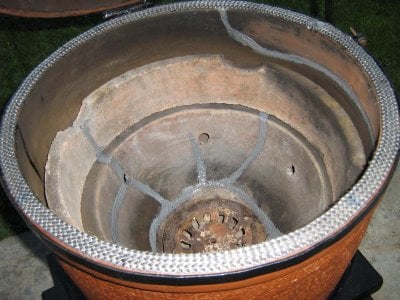
Base is broken along upper edge and cracked down to the bottom.
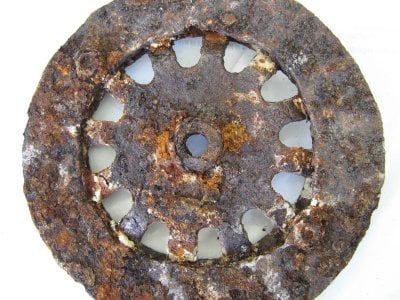
i3C40309D-1F3B-41A9-B4B0-97FD1C53D88B.jpg


Cracked firebox.
i6CB3E48E-444F-4087-9995-81D7E75AEE88.jpg


Top came apart in several pieces.
i58FDEC1C-B874-4703-A145-C771F40AEB59.jpg


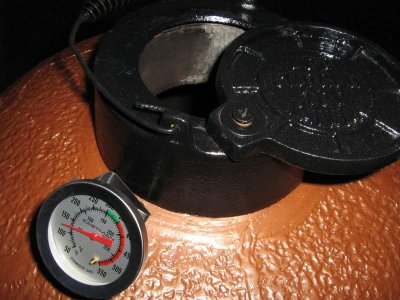
After JB'ing the top, put the band hinge back on to hold everything together.
iA7BD2C0E-D8A3-49ED-9ECB-031650548698.jpg


JB'd everything inside and out. Good thing I bought the 5 oz size.
i05F938CF-83CA-42F5-9C69-DE9D6F20BD98.jpg


Humpty is now sporting 4 coats of Hi-Temp Copper paint. The metal bands, smoker lid, damper, grate tool and dolly will all get Hi-Temp Black.
i54843C48-8BB6-474E-995A-29D479AD2851.jpg


To be continued.... Click to view SLIDESHOW and/or PHOTO ALBUM.


May
Vancouver, BC, Canada
------------
Kamado / Big Green Egg (2008 Jan)
Cobb Barbeque (2006 Jul)
 
Last edited by a moderator:
I like the copper color. Are you going to keep it that color?

That hinge and cap look like old-school BGE. I'm not the expert here but I'd say its the predesessor to a BGE. I'm sure Brian will chime in soon.

Good work!!
 
Good work. Im getting eggcited as well I'm hoping to pick up a restore project end of August after my wedding and bring it back home and put it to use. It has the table and everything. keep us posted
 
That is definitely not a ceramic pot. It is clay and will require lower temperature cooks below the 550 degree range to prevent cracking again. You will also need to start with a small fire to warm the pot before building a large fire for cooking. This is a great pot for low & slow cooks. Also keep it out of the weather because a wet clay pot will crack when it gets hot. Last consideration is the outside temp when firing up the pot. I believe freezing temps will prevent use due to cracking although I wouldn't know about those being here in Sunny California!:biggrin::biggrin::biggrin:
Nice job on the fix and paint.:eusa_clap
The old clay pots were painted and the new ceramic pots have a baked glaze finish that does not come of and stays shiny and new. BGE is stamp in the dome just under the hole for the thrmometer in the ceramic pots. I am not sure of the appearance of the older BGEs.
Swamprb will be your best source of info on your pot since he is our resident expert.
 
Nice work May! It looks strikingly similar to a couple I've had.

This one I got in Seattle a couple years ago, the band hinge was completely rusted off, I replaced it with the hinge from my Ceramic Big Green Egg, notice the length of the bolts.

Kamado1JPG.jpg


Kamado2.jpg


The people I got it from bought it from Pachinko Palace in Seattle and it came with the cookbook/manual the same copy as the Naked Whiz has for downloading.

100_2571.jpg


It also resembles this one that I recently refurbished and just sold.

100_2315.jpg


I have seen ash grates and damper tops like the one with yours as well as the ceramic ones.

100_2316.jpg


100_2318.jpg


The trolley cart looks the same, looks like they removed the casters and bolted it to a beefier frame.

The slide tops marked with Taiwan on them is a clue that they are Chinese made Kamados and not Japanese made Imperial Kamados, here is a link from IK describing "Imitation Products" in the third paragraph, so it possibly is an early Big Green Egg.

http://imperialkamado.com/i_imitation.htm

This page describes the difference in sizes of the Traditional Kamados due to the fact they were made by 3 different factories using different molds.

http://imperialkamado.com/i_japaneseKamadoHibachi.htm

I'm not sure if there is a Uwajimayas in Vancouver, but they used to sell a lot of Kamados here too, you might want to snoop around the Chinese markets and see if there are any old ones.

Hook up with Brian Misko, he cooks on Primos in Vancouver, he might have a line on supplies.
http://www.houseofq.com/index.htm

Here are a few other BC BBQ teams that are in your area that may be some help.
http://www.pnwba.com/


Keep us posted on the work in progress!
 
Last edited:
Humpty, the COPPER COOKER

Mark, the copper color is growing on me. I was really looking forward to having a nice bright copper egg (think brand new SHINY "newly minted" penny). In reality, I was a bit dismayed when Humpty started looking more like a penny that's been around the block a few too many times. I'm reserving judgement until I get Humpty out into the sunlight. He may turn out to be quite a good looking cooker once he's outfitted with black trim.... :wink:
____________________________________________​

Just to clarify, Humpty is now starting life as a COPPER COOKER, not to be confused with a COPPER CLAPPER (re: Copper Clapper Caper, Johnny Carson, 1968). Sorry, couldn't resist... :mrgreen::mrgreen::mrgreen:
____________________________________________​

Good point Captain about not subjecting the cooker to temperature extremes. The original owner cracked the Kamado on his first cookout many many years ago. I didn't know there was a difference in T-rating between a ceramic cooker versus a clay cooker. Some of the posters on the BGE forums talk about searing steak at 600-700F, but that must be closer to the coals than at the dome where the T-gauge is usually mounted.

Regarding the original green finish, I was a bit surprised by how chalky it was in prepping the surface for painting. I expected more from a "fired" glaze, but it makes sense if the finish is actually paint.

Brian, thanks for all the links and tips. My cooker looks a lot like your Pachinko unit, which is probably not a coincidence, as Seattle is about a 2-hour drive from Vancouver. The original owner probably bought it there. When I saw your first picture, I thought I was hallucinating... and that my cooker had morphed and someohow changed its trolley cart. Well, all I can say is that my cooker has identical siblings.

About the gasket — the 5/8" rope stove gasket kit I got has me worried - it really is quite thick. I'll be checking out Vaglio's Fireplace for flat fibreglass braid. Anyways, I think I'll mount the gasket on the dome as mentioned by vr6Cop in your previous post.

GA0192-300.jpg


Regardng the trolley cart, the original owner custom-made it himself. Glad to know you approve. It's now painted with high-temperature Black, as well as the metal smoker top.

According to the Imperial Kamado links you gave, it looks like I've got myself a traditional style Taiwan-made Kamado #4 (if the 16" grill is the deciding factor), or early BGE. TBD.

* * *
Well, here are the plans for this weekend. The gasket is going to go on, followed by a long and slow bake out, plus a test cook. Hope to post new pictures of the Copper Cooker soon.

Cheers everyone!

May
Project Humpty: SLIDESHOW, PHOTO ALBUM
____________
Kamado/BGE
Cobb Barbeque
 
Last edited by a moderator:
Update & Overnight Bakeout

Well, the best laid plans of mice and .... On reassembly, one of the bent tabs for the bolts on the band hinge broke. My sweetie came to the rescue and brass soldered a square nut to the band. Then the new SS nuts and bolts galled and one snapped. Crap! Going back to using the rusty steel nuts and bolts.

Yay! Found 5/8" flat fiberglass braid at Vaglio's Fireplace locally. Changed my mind and installed the gasket on the bottom, as per Naked Whiz.

Finally started a slow bakeout Sunday evening: 2 hours at 150F. Then dumped in more coal and got up to 500F very quickly (uh oh!). :icon_shock1: Choked damper and top down. Nice! Response is instant. Got to 400F at midnight. 340F 1:00 am, 3:10 1:30 am. 280F 1:45 am. Still 280F at 2:00 am.

Going to bed now and letting Humpty bake overnight. Will check on Humpty occassionally as I wake during the night. Wish I had a wireless remote T-indicator. Hope Humpty will still be whole in the morning.

I LOVE IT!!! The cooker is very responsive to how much the air draft and smoker top are open....

First cookout is tomorrow - Pork Shoulder Roast & Chicken Thighs. Can't wait to actually cook on my brand new Copper Cooker. :p

Some questions about bakeout observations....

HOT SURFACE TEMP - During bakeout, the dome surface is hot to touch (can't leave hands on) and the hi-temp paint feels tacky. Is this normal? Base surface is also hot, but not as hot as dome.

SMOKER TOP - The black hi-Temp paint on the metal smoker top is sticking a bit and quite HOT! Maybe I shouldn't have painted it?

* * *
How do you insert text between pictures?

May
Project Humpty: SLIDESHOW, PHOTO ALBUM
_____
Kamado/BGE, Cobb
 

Attachments

  • IMG_2657.jpg
    IMG_2657.jpg
    82.7 KB · Views: 1,184
  • IMG_2666.jpg
    IMG_2666.jpg
    57.6 KB · Views: 1,171
  • IMG_2670.jpg
    IMG_2670.jpg
    79.2 KB · Views: 1,167
  • IMG_2675.jpg
    IMG_2675.jpg
    41.5 KB · Views: 1,167
Last edited by a moderator:
Square Nut Fix for Band Hinge

Brass-soldering a square nut on the end of the broken band hinge worked so well that I've got 7 more square nuts saved away, for the next big overhaul of the Copper Cooker. Much beefier and stronger than before. Also, the tab resists bending when tightening the band. (Thanks to my sweetie-pie for coming to the rescue).

May
Project Humpty: SLIDESHOW, PHOTO ALBUM
_____
Kamado/BGE, Cobb
 

Attachments

  • IMG_2652.jpg
    IMG_2652.jpg
    44.1 KB · Views: 1,165
  • IMG_2654.jpg
    IMG_2654.jpg
    45.8 KB · Views: 1,164
Last edited by a moderator:
That looketh verily nice say I!:eusa_clap
Good effort in restoring what otherwise probably would've ended up on the scrapheap:-D
 
Wow - I too would have said that cooker was past help.

Very impressive restoration job! Hope she holds together for ya.
 
1st Cook in the Copper Cooker

Hmmm... not sure why the previous pictures are not showing up.... Will use both methods for uploading pictues.

Late Sunday night, the Copper Cooker had it's first firing. Maximum temperature was 500F, which was choked down to bake out overnight.
i2AB3EC0B-3A35-4741-9662-C7F086D1E8F4.jpg


I'm happy to report that the Copper Cooker survived the bakeout; it was still "whole" in the morning.
iD1FFD0F3-1E87-4220-BC79-7DAD9CE0EB38.jpg


Of course, a test cook was next. First on was roast pork, marinated with garlic, rosemary, paprika, chile, soy sauce, salt, pepper and rye whiskey (Canadian Rye, of course). :wink:

Low and slow, 4.5 hours total (350F for 1/2 h to sear, 250F 1 h, 200F 1 h, 175F 1 h). Turns out I didn't put enough coal in. The meat just squeaked up to 153F before I ran out of fuel. :cry:
iAD3AD9D9-CDEA-4596-970F-DF1B67285A7C.jpg


Turned out very moist. But it's not "pulled pork."
iE8FD7D64-50CC-4233-8054-3ED074258525.jpg


Added more coals (but still not enough). Only managed to squeeze 225-180F out of the coals with the damper and smoker top wide open. Chicken thighs took 50 minutes, but at least they are cooked.
iFEA47746-C5BB-45E0-955E-9BCD232391DB.jpg


Here's last night's dinner.
i421EF53C-078A-42FC-9EF5-680B50219680.jpg


Lesson: Need to add WAY MORE COAL!!! Not nice to run out of fuel half way through or not get hot enough. Both the pork and chicken could have used a higher cooking temperature. :cry:

May
Project Humpty: SLIDESHOW, PHOTO ALBUM
____________
Kamado/BGE
Cobb Barbeque
 

Attachments

  • IMG_2696.jpg
    IMG_2696.jpg
    75.7 KB · Views: 1,082
  • IMG_2686.jpg
    IMG_2686.jpg
    118.5 KB · Views: 1,094
  • IMG_2678p.jpg
    IMG_2678p.jpg
    69.8 KB · Views: 1,099
  • IMG_2675p.jpg
    IMG_2675p.jpg
    41.5 KB · Views: 1,109
  • IMG_2694.jpg
    IMG_2694.jpg
    105.4 KB · Views: 1,084
  • 033 dinner time IMG_2690.jpg
    033 dinner time IMG_2690.jpg
    53.7 KB · Views: 1,079
Last edited by a moderator:
Looks good. Add coal all the way up to the fire ring.
 
Fuel Load & Ash Suffocation Issues

The reason I didn't load very much coal for the cook was I was afraid to overheat the Kamado and crack it again.

For yesterday's first cook, the cooker was loaded with about 1 gallon of Hard Coals Lump for the pork. Then, an extra 2 quarts lump added for the chicken. Wasn't enough for either cook.

Another problem is ash buildup. The ash suffocates the coals and chokes off air flow before the coal burns out. I think the ash is not able to fall through my rusty coal grate as easily and cleanly as it would with a smooth grate or one with different configuration (?).
i35BB87A1-EF64-4985-8873-3A88F972477F.jpg


Am keeping my eyes open for something I could use as a new grate, but have not been able to find anything up here. Thought about buying a commercial drain cover, but they are costly up here at ~$60. Needs to be 7" diameter.

Here's a picture of the ash pattern and unburnt lump from the overnight bakeout. Only used about a gallon of lump and choked down to ~280F. Damper open ~1/2" and smoker top ~1/4" for the night. Quite a bit of unburnt coal left.
i789B7586-1E8E-4F68-BDC4-89E0CF94EA5C.jpg


Will try Nam-Char next time (higher quality, low ash). Have a small stash left, but the local shops have not been able to bring it in lately.

If I load the firebox up to the fire ring, how do I manage the ash issue so that the coals don't suffocate?

Suggestions?

May
 

Attachments

  • IMG_2676.jpg
    IMG_2676.jpg
    86.2 KB · Views: 397
  • IMG_2507.jpg
    IMG_2507.jpg
    109.3 KB · Views: 395
Last edited by a moderator:
I like the color of your cooker. It looks like the great pumpkin,charlie brown.
I think that you need a wiggle stick for the ash. It is a small wire with a L
bent into the end. You insert in thru the ash door and up into the ash grate and wiggle. I need to make myself one for my next cook. It seems that you can make them from a used bbq fork. Remove one side and bend.
jon
 
Wiggle Stick for "The Great Pumpkin"

Thanks Jonboy. Will definitely make myself a wiggle stick. My Kamado didn't come with an ash tool, so I'll also find something suitable for sorting and cleaning the ash.

Yah, I really like the copper color too! Looks totally different under different lighting. Very cool!
i14ACFE7C-209A-4B28-AE9F-F536D958239F.jpg


Thanks to you, "The Great Pumpkin" of Charlie Brown fame has now been added to the Copper Cooker's pedigree (in addition to Humpty). :biggrin:

As for a new charcoal grate, my sweetie may be able to weld something up for me. :-D


May
Project Humpty: SLIDESHOW, PHOTO ALBUM
____________
Kamado/BGE
Cobb Barbeque
 
Great job on the refurb, May. I really enjoyed your photos and the updates throughout the process.

Thanks for adding much to the community. Great to have you aboard.

What's that fish in your avatar?
 
Back
Top