Porcine Perfection
is One Chatty Farker
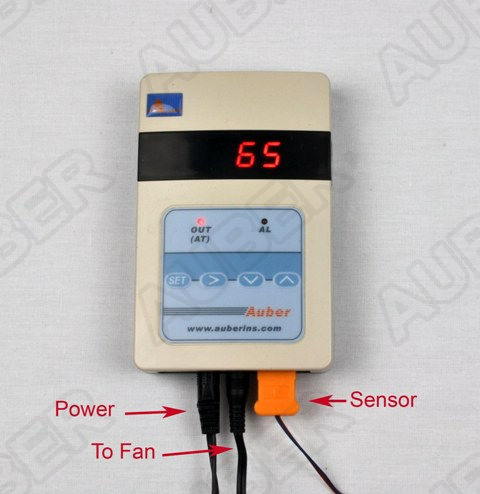
This is my initial review of the Auber PID temperature controller for my 18.5” WSM (model SYL-1614SYS-W).
Before I do a performance review, I am going to mention my experience with their customer support and order processing. I found a topic regarding this unit here on the Brethren website, but there wasn’t a whole lot of information on it. I had some questions and I sent them an e-mail on a Saturday night and had an e-mail with my questions answered by 10AM Sunday. I ordered this the following Wednesday morning and it was in my mailbox (from Atlanta to Kansas City) Friday afternoon, and this was using the cheapest shipping available! I was also looking at the Golden Tiger from Woodpelletsmoker in China. I am sure they have a quality product and are genuine, but for me the customer service made me choose this company. There would be no language barrier. If I had to return it, it would be easy and cheap to return. I also knew it would arrive in a timely manner (although I didn’t expect it this quickly).
The main complaint I had heard of this unit was the probe was an alligator clip that was often in the way. I communicated this concern to them and they gave me a couple of options that would work better at no additional cost. I ended up using the TC-K3MM probe pictured below.

The manual was a little bit technical but I have a degree in electronics so it was easy for me to understand. There are two basic ways to control the temperature with the controller. The easiest is to just use the front up and down arrows. You can also enter a programming mode where you set the temperatures and two alarms. You can also program fan speed and other variables, but most people think the factory settings are adequate. The buttons are firm and responsive. It took me about 10 minutes to read the manual and program it the first time. The 6.5 CFM fan is small and looks rather cheap but in my tests documented below it got the job done.
Installing this took about 30 minutes total because I drilled a 5/16” hole in the middle section to mount the TC-K3MM probe. It took only 10 minutes to install the fan (it is spring loaded) and use the provided heat shield tape to cover the two other holes in that air damper. They offer a foam gasket to place between the fan and the damper since it is rounded. I asked them if this was needed and was told it was not absolutely necessary but some people like to use. I did not get this and the fan is fairly flush with opening. It is suggested to close the other two bottom dampers and leave the top damper closed or 1/4 open. Connections to the controller are labeled and straight forward. The controller runs on 12V DC and includes an adapter.
One debate on this unit is if you should go with the 6.5 CFM fan or pay an extra $16 and get the more powerful 20 CFM fan. I decided to do some chicken at 300 degrees to test this out. Using the Minion Method it took 30 minutes to reach the target temperature. The PID controller pulsed on and off at different speeds to prevent it from overshooting. After my chicken was done (it took a little over an hour) I kicked it up to 350 degrees. It took 25 minutes to climb there. I then took it back down to 300 degrees and it took 18 minutes to cool down. The unit never went more than five degrees above or below the target temperature. I did not try to go higher than 350 degrees and the manufacture recommends using the larger fan for anything over 300 degrees. A nice compromise would be to make the standard fan at 10 CFM. After the cook all you have to do is pull the fan out to disassemble. I will keep the probe attached but it is secured with a wing nut when I need travel with it.
The cost of this unit was $127.26 as they are having a 10% off sale until Labor Day. Shipping from Atlanta, GA to Kansas City was $10.94.
The quality, price, plus excellent customer service makes this an excellent choice for a simple controller that is PID.
Before I do a performance review, I am going to mention my experience with their customer support and order processing. I found a topic regarding this unit here on the Brethren website, but there wasn’t a whole lot of information on it. I had some questions and I sent them an e-mail on a Saturday night and had an e-mail with my questions answered by 10AM Sunday. I ordered this the following Wednesday morning and it was in my mailbox (from Atlanta to Kansas City) Friday afternoon, and this was using the cheapest shipping available! I was also looking at the Golden Tiger from Woodpelletsmoker in China. I am sure they have a quality product and are genuine, but for me the customer service made me choose this company. There would be no language barrier. If I had to return it, it would be easy and cheap to return. I also knew it would arrive in a timely manner (although I didn’t expect it this quickly).
The main complaint I had heard of this unit was the probe was an alligator clip that was often in the way. I communicated this concern to them and they gave me a couple of options that would work better at no additional cost. I ended up using the TC-K3MM probe pictured below.
The manual was a little bit technical but I have a degree in electronics so it was easy for me to understand. There are two basic ways to control the temperature with the controller. The easiest is to just use the front up and down arrows. You can also enter a programming mode where you set the temperatures and two alarms. You can also program fan speed and other variables, but most people think the factory settings are adequate. The buttons are firm and responsive. It took me about 10 minutes to read the manual and program it the first time. The 6.5 CFM fan is small and looks rather cheap but in my tests documented below it got the job done.
Installing this took about 30 minutes total because I drilled a 5/16” hole in the middle section to mount the TC-K3MM probe. It took only 10 minutes to install the fan (it is spring loaded) and use the provided heat shield tape to cover the two other holes in that air damper. They offer a foam gasket to place between the fan and the damper since it is rounded. I asked them if this was needed and was told it was not absolutely necessary but some people like to use. I did not get this and the fan is fairly flush with opening. It is suggested to close the other two bottom dampers and leave the top damper closed or 1/4 open. Connections to the controller are labeled and straight forward. The controller runs on 12V DC and includes an adapter.
One debate on this unit is if you should go with the 6.5 CFM fan or pay an extra $16 and get the more powerful 20 CFM fan. I decided to do some chicken at 300 degrees to test this out. Using the Minion Method it took 30 minutes to reach the target temperature. The PID controller pulsed on and off at different speeds to prevent it from overshooting. After my chicken was done (it took a little over an hour) I kicked it up to 350 degrees. It took 25 minutes to climb there. I then took it back down to 300 degrees and it took 18 minutes to cool down. The unit never went more than five degrees above or below the target temperature. I did not try to go higher than 350 degrees and the manufacture recommends using the larger fan for anything over 300 degrees. A nice compromise would be to make the standard fan at 10 CFM. After the cook all you have to do is pull the fan out to disassemble. I will keep the probe attached but it is secured with a wing nut when I need travel with it.
The cost of this unit was $127.26 as they are having a 10% off sale until Labor Day. Shipping from Atlanta, GA to Kansas City was $10.94.
The quality, price, plus excellent customer service makes this an excellent choice for a simple controller that is PID.
