• working on DNS.. links may break temporarily.
Thanks for the feedback.

I went ahead and made a damper like yours and put it on. Might as well have the adjustability, I suppose.

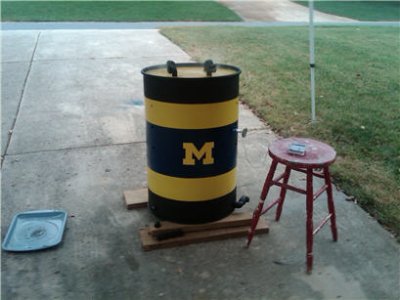
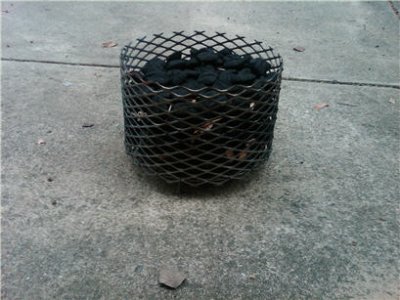
Base coat of paint is on. The logo goes on next weekend along with building the coal basket and I'll be done. I won't have any thermometers in it until I deliver it to my buddy. He needs to decide if he is doing a digital thermometer or not and then what analog dial he wants based on that.
 
What are your opinions on a single 4" exhaust? No adjustment, just a capped/uncapped sort of situation.

Actually, let me rephrase that. I took the vent out of the lid I have for this UDS (it was a 22.5" Charbroil dome). I made a hole out of it and put in a 4" 90* ducting because that is what fit. I can make some little adjustments to the opening inside the lid to shrink it down if necessary, but there are no plans to make it adjustable on the fly.

The intake is 3 3/4" pipe nipples with removable caps and 1 3/4" pipe nipple with a ball valve on it. Will the intake adjustment be enough to tame a 4" opening or do I need to plan on making the exhaust a little smaller?


For the record, the ducting is galvanized. I've read all I can on the subject and feel confident that it will be just fine after hitting it with the weed burner.

I just finished up an experiment this weekend with one of my new UDS builds. I actually went with the 8 holes in the lid instead of using the existing 2 inch hole and noticed that the variance in temperature across the grill was greatly reduced.

With the single 2 inch exhaust I was seeing a 30 degree difference between the side of the barrel where my thermometer was and the center of the grill. I also saw another 20 degree difference higher where the exhaust was.

With the 8 exhaust holes I saw about a 15 degree difference between the side of the barrel and the center of the grill and the hot spot was gone altogether.

Based on that I would say the eight holes helps to distribute the heat across your grill compared to using a single exhaust.
 
UDS Intake

Here is the intake I have been using for the past few builds I have completed. I didn't come up with this design, I found someone on here that used it too. It's some scrap aluminum approx 1/16". I has 4 1" holes which has the surface area of Pi (3.1416). There is no trouble controlling air flow. A buddy of mine cooked 60-70lbs of pork butts on it at one time and had zero problems maintaing heat.

Just thought I would share it with everyone.
 
First few cooks on my UDS;
Ribs - Delicious, but overdone. Fell apart, but tasted GREAT.
Moinks - Delicious and seemingly impossible to screw up.
Butt - Absolutely delicious
Brisket flat - Never done one of these before... a tiny tiny bit overdone (fell apart too much) and a bit on the peppery side, but all in all delicious, especially for my first brisket.
 

Attachments

  • IMAG0095.jpg
    IMAG0095.jpg
    42.5 KB · Views: 636
  • IMAG0117.jpg
    IMAG0117.jpg
    43.2 KB · Views: 632
  • IMAG0116.jpg
    IMAG0116.jpg
    31 KB · Views: 632
  • IMAG0112.jpg
    IMAG0112.jpg
    43.6 KB · Views: 633
  • IMAG0102.jpg
    IMAG0102.jpg
    62.5 KB · Views: 633
  • IMAG0100.jpg
    IMAG0100.jpg
    46.5 KB · Views: 632
  • IMAG0098.jpg
    IMAG0098.jpg
    30.9 KB · Views: 632
  • IMAG0097.jpg
    IMAG0097.jpg
    56.1 KB · Views: 634
Goldenfinger

Where did you get those "They are breathers designed for hydraulic tanks. [3/4" NPT]"?
I want to look into those for my UDS. Thanks
 
Goldenfinger

Where did you get those "They are breathers designed for hydraulic tanks. [3/4" NPT]"?
I want to look into those for my UDS. Thanks

I work with this stuff everyday so really I just called my local distributor...

The "actual" product I used was...
MP Filtri #SA-075-G5-L40-A

Be warned... they aren't the cheapest solution out there, but they do work great. ($29.77 each CDN) :biggrin1:

Any hydraulic parts distributor would have access to this or a comparable product you could use... and I'm pretty sure they sell these in the US for a fraction of what they cost here in Canada.

Interesting note...
Lid for Weber Performer bought from Weber in US = $42.00
Lid for Weber Performer bought from "O.M." (Weber) in Canada = $85.00 :twitch:

I literally could have purchased a 22.5" WSM by the time I finished-up, but then again... I would have missed out on all the fun of the build and neighbours gawking while I smoke on the front walk (for now...) from a drum...

These things are great..! :hail:
 
I just finished up an experiment this weekend with one of my new UDS builds. I actually went with the 8 holes in the lid instead of using the existing 2 inch hole and noticed that the variance in temperature across the grill was greatly reduced.

With the single 2 inch exhaust I was seeing a 30 degree difference between the side of the barrel where my thermometer was and the center of the grill. I also saw another 20 degree difference higher where the exhaust was.

With the 8 exhaust holes I saw about a 15 degree difference between the side of the barrel and the center of the grill and the hot spot was gone altogether.

Based on that I would say the eight holes helps to distribute the heat across your grill compared to using a single exhaust.

Thanks for the feedback. I remember you talking about trying that. Good to see that it has a positive effect. What size or the holes? Pipe nipples with a cap or what?

I wonder what the temp differences will be on this first UDS. It has a domed lid with a large single intake that is only just off-center at the top of the dome. It is almost closer to the handle, I think, than the exhaust on a typical Weber kettle is (this one is a Charbroil copy). That might have a positive impact on the temp spread.
 
My build is basically done. I still have to paint some lettering on the lid.
My first cook was a 14lb turkey. It turned out fantastic.
Some interesting notes from the cook:
> I used a water pan under the turkey.
> My target temp was intially 275. The temperature climbed a lot slower than I expected. Eventually I propped the lid about 5/8" on one side. That made the temp climb faster. When it got close to 300 (my revised target, based on when we wanted to eat), I put the lid back down. The temp plateaued, and started dropping slowly. When I propped the lid about 1/4", the temp stabilized around 290.

Does anyone have any thoughts on this? I have two 3/4" inlets, a 3/4" ball valve inlet, and four 1" exhaust 90 deg fittings in the lid. Four 1" openings have the same area as one 2" port. Should I consider adding more exhaust? Is the temp behavior due mostly to my use of a water pan?

> Also, I used the well-known method of loading the charcoal basket and putting apple wood, in at all levels, spread around. I noticed that the UDS smoked visibly for some time. The visible smoke stopped at about the mid-point. When I emptied the basket the next day to separate the still-good coals from the ashes, there was still chunks of wood. Was the wood still producing the kind of smoke that can't be seen, or did the wood stop smoking somehow?

Thanks.
 

Attachments

  • 130921-6 inaugural uds cook - turkey - small.jpg
    130921-6 inaugural uds cook - turkey - small.jpg
    25.7 KB · Views: 701
  • 130921-1 inaugural uds cook - turkey - small.jpg
    130921-1 inaugural uds cook - turkey - small.jpg
    30.9 KB · Views: 700
  • 130921-7 inaugural uds cook - turkey - small.jpg
    130921-7 inaugural uds cook - turkey - small.jpg
    23.9 KB · Views: 702
My build is basically done. I still have to paint some lettering on the lid.
> I used a water pan under the turkey.
.


Using a water pan will make it slower and harder to reach the higher temperature.
 
my first post and I goofed, started posting after misreading someone's post ooops. edited it but don't know how to delete it
 
Last edited:
For future reference, here is how to figure out the math to come up with the surface area for a given hole:

A = π × r2
1 inch circle
A = 3.14 x 1 x 1
A= 3.14

2 inch circle
A = 3.14 x 2 x 2
A= 12.56
 
Last edited:
I'll post some pictures of my UDS build later but did my second cook this weekend. Was a bit windy and noticed a lot of smoke escaping from between my weber lid and the aluminum strip mod.

Was thinking how I could attach nomex gasket to make it seal better, and came across this.

[ame="http://www.amazon.com/gp/aw/d/B000MIPB6S/ref=pd_aw_sbs_2?pi=SY115"]Rutland Inc Gasket Kit Tape 7'x5/8" 95-6:Amazon:Home & Kitchen[/ame]

Any thoughts?
 
I didn't make it through all 764 (currently) pages of this thread, but I have skimmed MANY of them! Thank you to everyone for all the great advice, inspiration and ideas! Never had a smoker, and mostly used just gas grills previously, but I'll be putting together a UDS next week! I've got a drum on the way, and I cheated and ordered a kit from Big Poppa Smokers for my first build! I know it's not the cheapest route, but having everything necessary there and ready to put together was enticing. Can't wait for everything to show up and start building! Between all the steps of burning, wire brush/cleaning, drilling, painting, assembling, seasoning, etc...and fitting that all in to the work schedule, I hope to do my first real Q'n next weekend! Planning to go with a nice pork butt for the first go! Can't wait!
 
I'll post some pictures of my UDS build later but did my second cook this weekend. Was a bit windy and noticed a lot of smoke escaping from between my weber lid and the aluminum strip mod. Was thinking how I could attach nomex gasket to make it seal better, and came across this. Rutland Inc Gasket Kit Tape 7'x5/8" 95-6:Amazon:Home & Kitchen
Any thoughts?
You could try using 2 inch wide strips of aluminum foil on the drum edge and let the lid seal. Cheap easy test and fix, If you notice, there are quite a few guys who use the foil on the edge to seal up their lids. Big plus is once it's all greasy you can put new on if needed, the nomex, not so much.
 
After borrowing the uds from work two weeks ago for a family outing and having great success. I built my own last week and used it Sunday. These things are amazingly simple to use. :-D
 
I guess I should add a bit about my build that May help others. I was in Wally World and found their backyard grill dome grill for $44.00 with tax. The dome lid fit with a little massaging, the lid has hinges and a snap down latch. I used the cooking grate and the wheels. It came together great. I will be making smoke again this weekend.
 
Back
Top