DaytonaBBQ
Found some matches.
I have started working on my UDS build, but due to alimony and child support, it is going to take me a while to get everything I need to complete it.
I have chosen to use the Jacksonville Jaguars 1st helmet design as the inspiration for the theme.


After reading the UDS monster thread (and yes, I did read the entire thread), I have decided to keep it pretty simple. But being the tinkerer that I am, it will have a few simple mods. I am going with 4 x 3/4" intakes and 8 x 1/2" exhaust holes in the flat lid until I can find a donor Weber. Since I live within 500 feet of the ocean, I am using brass and stainless as much as possible.
This months parts purchases:

(not shown, but also purchased, is the 3/4" full-port ball valve)
I had planned on using 3 brass close nipples with the garden hose caps and one with a 3/4" ball-valve as suggested on the UDS thread, but when I went to HD to get the parts, the plumbing guy suggested using these instead:
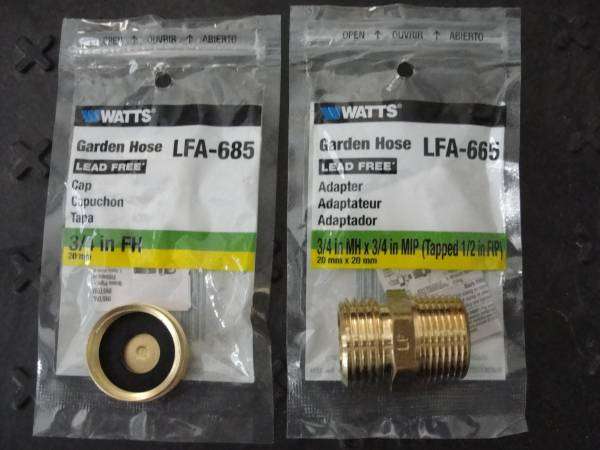
The garden hose adapter (LFA-665) is threaded standard garden hose on one end and 3/4" pipe thread on the other. The price of the adapter is within 20 cents of the close nipples, and the caps can be used to create a snug fit.
Thinking about the discussions relating to hot spots and way of trying to even them out, I decided to try an experiment. I purchased 4 3/4" 90 degree street elbows, which are straight on one end and flared on the other, to fit into the inside of the UDS to hopefully create a circular vortex and even out the temperature from center to edge. Since the elbows will not fit either the nipples or adapters, I chucked parts up in my lathe end fixed the problem.


As you can see in the photo above, the elbows internal dimension is actually larger than the inside of a standard close nipple, so I do not have to worry about air flow restriction.
When I finished the first adapter, I noticed that the inside diameter was considerably smaller on the hose fitting end, so I but them back in the lathe to fix the problem.

(pipe thread end, on left after turning, on right before)

(hose thread end, on left after turning, on right before)
Here is the way I plan on placing the intake assemblies in order to attempt to create the vortex,

since I believe it should have a counter-clockwise rotation due to the Coriolis effect in the northern hemisphere.
The fitting for the fryer thermo is a 3/8"x1/2" stainless bolt. Chucked it up in to lathe and center drilled it.

Then through drilled it with a 7/32" drill.

I did notice, when looking at the ball-valves, that the HD ones marked as full-port did not seem to really be 3/4" through. Since I was going up to a plumbing supply store for a home repair, I thought I would check them out there. Not only were they larger through, but they were $4.00 cheaper. (I am putting together a price comparison of the two stores, but did not bring my receipts to work with me, and will post it this evening.)
Well, that is all for this month's spending money. Next month I will be getting the expanded metal to make the fire basket as well as the other assorted nuts and bolts needed for this project. I hope you all enjoy.
I have chosen to use the Jacksonville Jaguars 1st helmet design as the inspiration for the theme.
After reading the UDS monster thread (and yes, I did read the entire thread), I have decided to keep it pretty simple. But being the tinkerer that I am, it will have a few simple mods. I am going with 4 x 3/4" intakes and 8 x 1/2" exhaust holes in the flat lid until I can find a donor Weber. Since I live within 500 feet of the ocean, I am using brass and stainless as much as possible.
This months parts purchases:
(not shown, but also purchased, is the 3/4" full-port ball valve)
I had planned on using 3 brass close nipples with the garden hose caps and one with a 3/4" ball-valve as suggested on the UDS thread, but when I went to HD to get the parts, the plumbing guy suggested using these instead:
The garden hose adapter (LFA-665) is threaded standard garden hose on one end and 3/4" pipe thread on the other. The price of the adapter is within 20 cents of the close nipples, and the caps can be used to create a snug fit.
Thinking about the discussions relating to hot spots and way of trying to even them out, I decided to try an experiment. I purchased 4 3/4" 90 degree street elbows, which are straight on one end and flared on the other, to fit into the inside of the UDS to hopefully create a circular vortex and even out the temperature from center to edge. Since the elbows will not fit either the nipples or adapters, I chucked parts up in my lathe end fixed the problem.
As you can see in the photo above, the elbows internal dimension is actually larger than the inside of a standard close nipple, so I do not have to worry about air flow restriction.
When I finished the first adapter, I noticed that the inside diameter was considerably smaller on the hose fitting end, so I but them back in the lathe to fix the problem.
(pipe thread end, on left after turning, on right before)
(hose thread end, on left after turning, on right before)
Here is the way I plan on placing the intake assemblies in order to attempt to create the vortex,
since I believe it should have a counter-clockwise rotation due to the Coriolis effect in the northern hemisphere.
The fitting for the fryer thermo is a 3/8"x1/2" stainless bolt. Chucked it up in to lathe and center drilled it.
Then through drilled it with a 7/32" drill.
I did notice, when looking at the ball-valves, that the HD ones marked as full-port did not seem to really be 3/4" through. Since I was going up to a plumbing supply store for a home repair, I thought I would check them out there. Not only were they larger through, but they were $4.00 cheaper. (I am putting together a price comparison of the two stores, but did not bring my receipts to work with me, and will post it this evening.)
Well, that is all for this month's spending money. Next month I will be getting the expanded metal to make the fire basket as well as the other assorted nuts and bolts needed for this project. I hope you all enjoy.
Last edited:
 op2:
op2:


