Is you basket sitting on the bottom of the drum?
Maybe I on the wrong post...
I agree, they are all a bit different.

Weiser


Now Weiser take it easy on little Timmy.
My latest drum likes to sit about 250 to 260 with two vents 1/2 open. It does not like having only one vent open, mind of its own there. So I will just make my cooks a little shorter. And like SFBBQguy said catch the temp on the way up.
 
it is raised about two inches. maybe i can make the sides solid or change charcoal from the lump? any thoughts about the lump?
 
Finding a barrel is harder than I thought !! When I was a kid they were all over now everthing comes in plastic
 
This might be a good thread to ask. I currently have a GOSM, but will soon have my own UDS built (after a friend build his). He is EXTREMELY happy at the temp control. I have not cooked on it yet. How would you compare the food coming off the UDS compared to a GOSM?
 
UDS finally complete

Well it took a lot of reading to get to this point but I made it.

Got the barrel from a reconditioning co. in Woburn, MA $30.

Gave it a burn out, even though they send all of theirs through an incinerator
at some crazy temp. Here is a pre-burn out interior shot. No Liner for me

.
PICT0037-1.jpg


The charcoal basket. 12" tall expando attached to a Weber grate with an aluminum handle all bolted to a freebie cover to a 30 Gal drum.

PICT0030.jpg


Drum all painted and patiently waiting to be assembled

PICT0004-8.jpg


All assembled and experiencing some smelly briquettes for it's seasoning run, I much prefer lump for cooking. The beer sitting on top is from a local MA brewer. It is called Green Monsta, for the wall at Fenway Park. Today is Opening Day at Fenway! Spring is here at last!!

PICT0010-5.jpg


Thanks everyone for all your contributions and help on this thread. Never would have tried this without you!

Right now it's running at 252* with 1 cap off and the ball valve at 1/4 open, it was up to 300* with 1 cap off and the ball valve full open. Closed it down to 1/4 about a half hour ago, down went the temps. Fabulous. Again thanks for the fun.
 
Nice!

With those temps ya can tell that you can follow instructions!
That is somewhat refreshing nowadays.
I like the basket too. It should be good for 18-20 hours.
Nice job Smokin!

You may want to consider a handle on the lid. :mrgreen:

Weiser


Well it took a lot of reading to get to this point but I made it.

Got the barrel from a reconditioning co. in Woburn, MA $30.

Gave it a burn out, even though they send all of theirs through an incinerator
at some crazy temp. Here is a pre-burn out interior shot. No Liner for me

.
PICT0037-1.jpg


The charcoal basket. 12" tall expando attached to a Weber grate with an aluminum handle all bolted to a freebie cover to a 30 Gal drum.

PICT0030.jpg


Drum all painted and patiently waiting to be assembled

PICT0004-8.jpg


All assembled and experiencing some smelly briquettes for it's seasoning run, I much prefer lump for cooking. The beer sitting on top is from a local MA brewer. It is called Green Monsta, for the wall at Fenway Park. Today is Opening Day at Fenway! Spring is here at last!!

PICT0010-5.jpg


Thanks everyone for all your contributions and help on this thread. Never would have tried this without you!

Right now it's running at 252* with 1 cap off and the ball valve at 1/4 open, it was up to 300* with 1 cap off and the ball valve full open. Closed it down to 1/4 about a half hour ago, down went the temps. Fabulous. Again thanks for the fun.
 
Thank You Weiser. Somehow the handle and the hanging hook got forgotten in all the excitement. But you are right, the top needs a handle.
 
Well, started a season/test burn yesterday afternoon at 4 PM with 10 lbs of briquettes. It is now 8:30 in the AM and it is still going. This thing is amazing! It held temps between 215-250* with just the occasional kick/shake or minor tweek of the ball valve. Fell asleep and untouched for six hours the temps held constant. Fabulous! 18 hours on ten lbs. In the off-set that would take about 35 lbs. First cook will be this weekend. Thank you to everyone who has contributed to the journey!
 
is the aluminum handle on the basket a good idea? thought aluminum was a no no...


Well it took a lot of reading to get to this point but I made it.

Got the barrel from a reconditioning co. in Woburn, MA $30.

Gave it a burn out, even though they send all of theirs through an incinerator
at some crazy temp. Here is a pre-burn out interior shot. No Liner for me

.
PICT0037-1.jpg


The charcoal basket. 12" tall expando attached to a Weber grate with an aluminum handle all bolted to a freebie cover to a 30 Gal drum.

PICT0030.jpg


Drum all painted and patiently waiting to be assembled

PICT0004-8.jpg


All assembled and experiencing some smelly briquettes for it's seasoning run, I much prefer lump for cooking. The beer sitting on top is from a local MA brewer. It is called Green Monsta, for the wall at Fenway Park. Today is Opening Day at Fenway! Spring is here at last!!

PICT0010-5.jpg


Thanks everyone for all your contributions and help on this thread. Never would have tried this without you!

Right now it's running at 252* with 1 cap off and the ball valve at 1/4 open, it was up to 300* with 1 cap off and the ball valve full open. Closed it down to 1/4 about a half hour ago, down went the temps. Fabulous. Again thanks for the fun.
 
I had a lot of issues with low temps. I tried various things - changing the intakes from pipe bushings to pipe nipples, changing the ash pan from the tabletop bbq to a commercial pizza pan. Then I found the answer (for my problem anyway - humidity.

First burn I used a partial bag of charcoal - it had been open for a while. Second burn I used a full bag, but it had been in the garage (near the dryer vent) for 6 months. Third burn I bought a new bag from the store. First two burns had trouble maintaining 225 with 2 nipples and a valve open. Third had no problems with 2/3 valve and -0- nipples open.

Humidity in the charcoal must just eat btus as it evaporates, plus it probably slows combustion as well.

Last week I ran a hot burn. I ignited lots of the remaining coals from the 3rd burn with a weed burner then ran with 1 valve and 2 nipples open - no probably maintaining 350. We have had several rains, so I expect my charcoal was humid again. Perhaps if you get it hot enough then you can dry out the charcoal - not sure.
 
is the aluminum handle on the basket a good idea? thought aluminum was a no no...


Well we all use those disposable aluminum pans, and aluminum foil on ribs, butts and brisket, well most of us anyway. So I figure the handle isn't in direct contact with any food and is folded off to the side when the cook is on. How bad can it be? Don't really know. Anyone?
 
Aluminum is perfectly safe for cooking. Alot of the cheaper cookware out there is Al and have seen several bare Al dutch ovens. Pretty sure Weber is using Al for some of their ash catchers.

Just dont make cool-aid in it and you will be fine.
 
comp cooking with a uds

i like my uds so much now that i have the temp issue out of the way. i want to do a comp rib cook with it this summer. just wondering if any one has used theres and any advice on comp cooking ( this will be my first) :roll:
 
I came to a conclusion after a couple of smokes on the uds, that the gauge on the outside wall is useless. So, I made a mod to the thermometer.(tossed it out:p
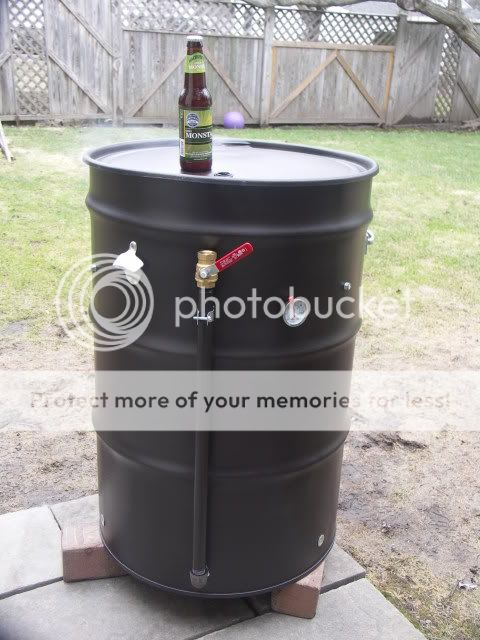
) Not sure if this was in this thread before, but thought I would share this with you guy's. I took a 5/16 threaded brass rod and drilled a .156 hole through the middle leaving about .002 to .003 clearence ( per side) for the 12 inch thermometer probe($3 at Meijers)to slide in and out as needed.This way I don't need a digital thermometer for the grate, only the meat. And since I haven't made a cart for it yet I added a couple of handles to bring it in and out easier. I made a couple for my buddies and had them pc a copper vien the picture isn't that good I will have to get a better one later. I also did my first butt today on the uds, it's resting right now so no pulled pics yet, but the burnt end was awesome!!
View attachment 25946

View attachment 25947

View attachment 25948

View attachment 25949

View attachment 25950
View attachment 25952

I found another way that doesn't involve any machining or drilling. Get a 1/2NPT to 1/4" tube compression fitting and one 1/4" ferrule. Take about 1" of 1/4" copper tube and slip the ferrule over it, slip it inside the fitting and tighten down the nut gently. This gives you a nice 1/2NPT to 1/4" hole, inside which many thermos with 1/4" stems will slide, all nonrusting. The NPT side can be secured into a hole with an electrical nut just like a close nipple ..

seattlepitboss
 
3/1/1 method.....smoke,wrap in foil....baste..4th place...iowa, 3rd place nebraska, 17th American Royale..
Andyll
 
Back
Top