OK, stickburners... let's see those small and hot fires.

BBQ Bandit

Babbling Farker
Joined
Feb 15, 2008
Messages
4,940
Reaction score
2,588
Points
0
Location
Harrisburg, PA
Brethren and Sistren;

Have read, learned, and used many fire management techniques and procedures... thanks to the knowledge of the brethren.
Heard stickburning described as a small, hot, and fast burning technique... useful to keep the sweet blue smoke burning true.

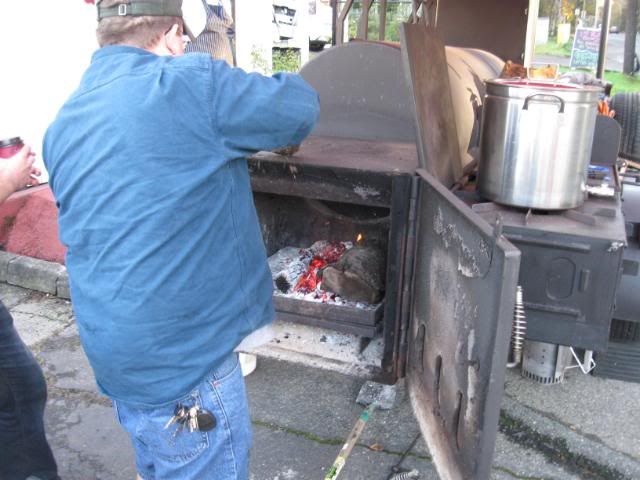
Found it necessary to add a second sheet of expanded steel laying on top of the firegrate... the large steel gaps was dropping the bed of coals too soon. The sheet was a 24" X 24" X 3/4" expanded metal... and bent/folded the sheet to fit. .. just hate to have a multitude of sharp edges from trimming. Got tired of bleeding and reaching for too many band-aids. By folding the sheet kept the edges rounded at the folds. :thumb: Now the live bed stays with the fire longer... good deal... extending the burn a bit.

IMAG0472.jpg


The pic shows what it takes to keep the Klose @ 300*... about to add another split of applewood.

That in itself showed me I haven't seen or recalled seeing any offset stickburners showing what is a small, hot, and fast burning fire.

Anyone have any pictures lying around?
 
Last edited:
This is Ty's Klose, and for some reason whenever I am around, it never gets above 250*!

IMG_3843.jpg


IMG_2927.jpg


Ty swears he gets it up to 300*, but I think he's BS'n me.
 
Funny you should ask!

This was for keeping the temp in the vertical chamber at around 135-150. I cut my splits down tiny for this one.
littlefire.jpg


Obviously a much higher temp here - was doing 100# of pork butts at around 275 or so (left side) ranging to 325 or so (firebox side).
firebox.jpg


I here ya on the coals falling through the grates & I'll try throwing another sheet of expanded in. I have noticed, however, that once I'm well into a long cook, there is a nice coal bed sitting on the ash pan below the grate. Lately I've been keeping everything kinda pushed together and concentrated and have been having good luck with that.
 
Here's my version, notice that the split on top was only on for a little bit. cooker was at around 220 when I added the split. First pic is the full shot of the cooker. Because of the size of the cooker I have to with even smaller splits. The one on there is actually a little too big.
 
Last edited:
This was on my first pit... a Pitts & Spitts 24x36 (now owned by Cue's Your Daddy / Paul)

Brought back some real good memories looking at that photo series of the pit...
 
Last edited:
damn... i gotta work on my fire management. but my fires look nothing like these. my firebox looks EXACTLY like the pic up top. (pits by jj, but they are almost identical to the klose pits)

my fires i need at least 2 splits in the firebox at all times otherwise i feel that the fire starts to go out, or is not hot enough. (this is with the vents completely open) but at the same time i feel creates more of a hot spot bc the bigger flames in the firebox that are sometimes up to the top of the firebox.

how do you keep such a small fire burning? and burning clean? how long can you leave it like this before it goes out and gives off milky smoke? i usually will go 45 minutes without checking mine.

maybe mine is also dropping the coals too early down into the tray? here is what my firebox/bottom grate looks like...

bbq_pits_11-27-2007005.jpg
 
Dirty, try using smaller splits. I've been getting mine down to this size lately. I shoot for 2" to 3" splits and cut my logs at 12" or so.
 
Last edited:
hmmm. ill try that. actually having a tree cut down this week from my front yard. so ill cut it up into about 10-12" pieces before i split em.
 
I feel the secret to a clean fire is keeping a good bed of HOT coals under the splits.
You get that going and you could throw a concrete block in there and it'll burn!
Oh yeah... pre-heat the splits before you put them in the firebox. Makes a world of difference.
 
Here's what I do... from a cold firebox:
1. Laid down a smaller mesh of expanded steel over the original firegrate... to reduce dropping of useful coals.
2. Place one full chimney in the firebox and light... to warm the pit.
3. Once the chimney is fully ablaze, remove from firebox and place 2 pre-warmed splits (oak) on the firegrate mesh.
4. Pour lit chimney over the oak splits.

Shortly a bed of coals will be available... if its too hot, wait 15 minutes. :p


*** Originally tried pouring the chimney over the larger, original firegrate... and saw some of the charcoal fall thru the grate... hence the smaller mesh (3/4").
 
sometimes i feel that my fires go out bc the splits go flat against the bottom grate and the fire doesnt have space. so i cant see how u can lay 2 splits and pour the coals OVER them. i usually pour the coals and then put 3 splits over the coals. ill try your method next time. does your bottom grate have 2 metal pieces sticking up to lift the splits?
 
My grate is sized to keep lit charcoal in. I've been starting with a lit bed of coal and laying splits on top. I really like the idea Bandit, of laying down two splits then lit coals. Your base would be perfect then moving forward once the splits turn to coals.
 
The change that I've made recently is using much smaller splits. Maybe 3 inch diameter and 10-12" long. That has made a huge difference in the quality of my fire.
 
I can get my Stick burner up to 425 with a decent fire. She breathes really well with double hooters! :thumb:

Here are 2 fires built for the 250-300 range.
150d5f37.jpg


3afbfa04.jpg


Cheers
 
Phrasty, looks like fairly small splits. What are you aiming for size wise? Also, Which cooker is that?
 
Hey Glenn, I supplement my burns with coal sometimes, I think that second shot was just after the fire was lit with a bunch of lump. I have all sizes of splits but usually I cut them 12" x 3-4"
This is some lychee:
deffb56e.jpg


And those were on this pit:
9defba4f.jpg


:thumb:
 
Back
Top