
|
|
|||||||
| Q-talk *ON TOPIC ONLY* QUALITY ON TOPIC discussion of Backyard BBQ, grilling, equipment and outdoor cookin' . ** Other cooking techniques are welcomed for when your cookin' in the kitchen. Post your hints, tips, tricks & techniques, success, failures, but stay on topic and watch for that hijacking. |
 |
|
|
Thread Tools |
 10-30-2012, 11:39 PM
|
#1 |
|
Babbling Farker
Join Date: 12-03-08
Location: Pearl River LA
|
I have been wanting to do this for some time now. I am sick of paying for injectors that either break or don't work quite the way I want them to so today after work I went to Home Depot to build myself an injector.
After an hour or so of testing fittings and some employees looking at me funny, I finally figured out everything I needed and brought it all home to be assembled. Here is the cast. 1/2 Gallon Garden Sprayer $6.97  20" Faucet Supply Line. 3/8" female compression with rubber seal on one end, and regular 3/8" compression fitting on the other. $6.57  Brass Adapter Fitting. 3/8" compression on one side and 3/8" female flare thread on the other. Make sure you get the one with the FLARE threads and not the regular PIPE threads. They look almost the same but the pipe threads will not work. $4.40  OO 1/2" beveled faucet washers. You only need one, but they come in a 10 pack.$1.67  And finally you will need an injector needle. I tried both of these types and they both worked fine.  I already had these so they were free. OK time to build! First unscrew the nozzle from the pump sprayer. Note the white plastic piece inside the nozzle. We will call this part the nozzle seat. You will need to remove this and keep it. The sprayer will not be able to build pressure without it. The cone shaped part in the sprayer seats against the hole until you press the spray button.   To get it out unscrew the tip of the nozzle and remove the clear plastic piece inside like so.   Then use your needle or something else that will fit and push the nozzle seat out from the other side.   Now take the brass adapter fitting apart like so.  And put the nozzle seat into the female side EXACTLY the same way it was in the nozzle.  Now screw the brass fitting onto the sprayer where the nozzle was. It should be snug, but not super tight. The male threads are plastic, and might strip if you go too tight.  Now take the female end of the faucet hose and screw it onto the male end of the brass fitting. Hand tight should be good enough but hold a backup on the brass fitting so that you aren't tightening against the plastic threads. 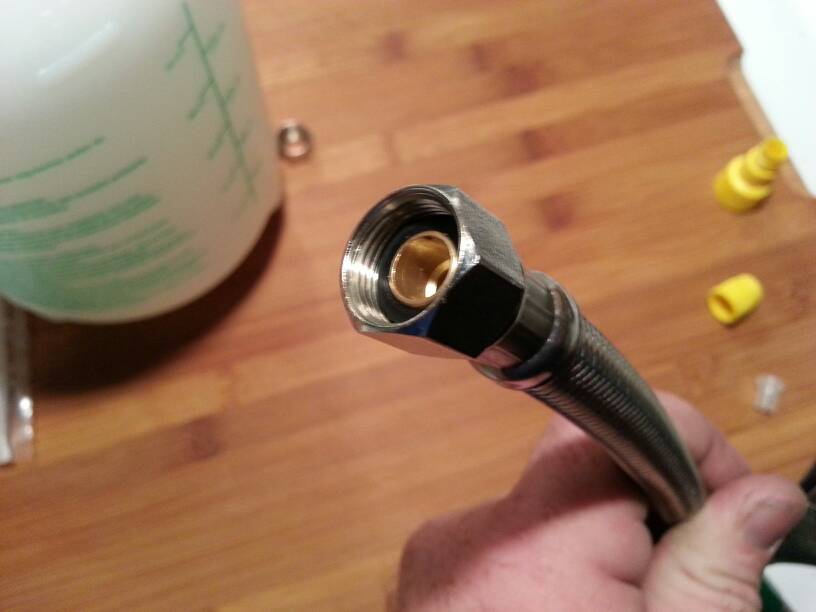  Remove the compression nut and ferrule from the other end of the hose.  Now for the hardest part. Getting the needle ready to be installed. Take the needle of your choice and one faucet washer, and push the washer onto the hub end of the needle. This is a very tight fit, but I found that using a clothespin as pictured below to push it downward helped. And obviously try not to stick yourself.     Now that you have the washer in place on the needle hub, all thats left is to take the compression nut from the faucet hose and use it to secure the needle onto the hose.     And now you have a fully assembled ready to use injector pump!  So now for the obvious question. Does it work? Well I haven't used it on a hunk of meat yet, but it looks like it will work fine. Yeah I probably could have bought one for not that much more than what I spent, but it was an easy fun project, that will hopefully end my injector searching.  I have taken so much info from this site, that I like to contribute what I can, when I can. This may not be much, but hopefully someone will find it useful. Thanks for lookin! |

|

1 members found this post helpful. |
| Thanks from: ---> | 10-8, AustinKnight, Babyboomerboy, BBQ Bandit, Bigr314, Bludawg, Blue Smoke BBQ, bluetang, Boshizzle, Branded BBQ, Bratylten, briananderson02, cfrazier77, colonel00, djqualls, Drunk Monkey, Foxdog01, gtr, Happy Hapgood, IamMadMan, Igotgas, Jason TQ, JGENTRY426, joelyrock1, Johnny Ca$h, JS-TX, K-Train, Lowki, m-fine, milehigh, Moose, NorthwestBBQ, Ol'Joe, Oldyote, PatAttack, posey's_pork_pit, pwa, Robert Downer, Slamdunkpro, smoke ninja, Smokedawg86, Stingerhook, TheDeuce, tnjimbob, TwilightChrome, yakdung |
|
10-30-2012, 11:46 PM
|
#2 |
|
Quintessential Chatty Farker
  Join Date: 07-08-10
Location: Boyertown, PA
|
Wow, great post Q, thanks for the info!
__________________
[COLOR=Navy][COLOR=Black][I] Jason [/I] "I can get a good look at a T-bone by sticking my head up a bull's a$$, but I'd rather take a butcher's word for it". - [I]Tommy Callahan III[/I][/COLOR][/COLOR] [B][SIZE=2][COLOR=DarkGreen][SIZE=3][SIZE=2][COLOR=Black] [/COLOR][/SIZE] [SIZE=2][COLOR=Black]Backwoods Ext. Party,[/COLOR][/SIZE][/SIZE][/COLOR][/SIZE][COLOR=DarkGreen] [COLOR=Black]Vision Kamado,[/COLOR][/COLOR][/B][B][COLOR=DarkGreen][COLOR=DarkGreen][B][COLOR=Black] 22" WSM[/COLOR][/B],[/COLOR] 22.5 Weber OTS, [/COLOR][/B][COLOR=DarkGreen][B]Mini WSM, [/B][COLOR=Red][B] UDS "No.8"[/B][/COLOR][/COLOR] [COLOR=Teal] [COLOR=Black][B][COLOR=DarkSlateGray]Napkin Killers BBQ[/COLOR] [/B][/COLOR][/COLOR] |
|
|
|
| Thanks from: ---> |
|
10-30-2012, 11:56 PM
|
#3 |
|
is one Smokin' Farker
Join Date: 05-27-12
Location: Glenburn, ND
Name/Nickname : Marty Owens
|
This is a great thread with an awesome tutorial, thanks for posting!
__________________
Owens BBQ is proud to be a sponsor of BBQ Brethren forum and prize packages for Throwdowns. Visit our website [url]www.OwensBBQ.com[/url] Like us on Facebook [url]www.facebook.com/OwensBBQ[/url] |
|
|
|
|
10-31-2012, 12:56 AM
|
#4 |
|
is One Chatty Farker
Join Date: 08-23-10
Location: Austin Texas
Name/Nickname : D
|
Thx brotha useful build info, you'll get hung for not using food grade materials but what they don't know won't hurt.
Sent from my SGH-T999 using Tapatalk 2
__________________
Pitmaker Magnum Snipper * UDS* Copper Kettle |
|
|
|
|
10-31-2012, 02:58 AM
|
#5 |
|
somebody shut me the fark up.
Join Date: 06-28-09
Location: Everett, WA
|
Thanks for posting!
|
|
|
|
|
10-31-2012, 05:42 AM
|
#6 |
|
somebody shut me the fark up.
Join Date: 04-24-09
Location: Utrecht,TheNetherPharkinglands
|
Awesome tutorial!
__________________
-TG -WGA (3) -UDS (S,M,L) All fueled by [COLOR=lime]Ecobrasa[/COLOR] Coco Briquettes *[URL="http://lowlandsmokers.blogspot.com/2011/06/lowland-smokers-workshop-hei-en-boeicop.html"]Lowland Smokers[/URL] Dutch BBQ Champion 2011 - 2012* *[URL="http://lowlandsmokers.blogspot.com/2011/06/lowland-smokers-workshop-hei-en-boeicop.html"]Lowland Smokers[/URL] Dutch BBQ Champion 2013 Low 'n Slow *WGA Ambassador |
|
|
|
|
10-31-2012, 05:46 AM
|
#7 |
|
On the road to being a farker
Join Date: 09-20-10
Location: Exeter, Pa
|
Great post, and great write-up! !
Sent from my DROID RAZR |
|
|
|
|
10-31-2012, 05:58 AM
|
#8 |
|
is One Chatty Farker
Join Date: 07-07-09
Location: Newark, OH
|
Looks like a great whole hog injector! Thanks for sharing.
__________________
- [B]Kevin[/B] Team: [B]Smitty's Real Pit BBQ[/B] KCBS CBJ [B]Superior SS-3[/B] - Courtesy of Gainesville Jaycees and Superior Smokers Custom Built Reverse Flow Stickburner [B]Weber[/B] 22.5" WSM [B]Weber[/B] 26.75" OTG [B]Weber[/B] Blue 2000 Stainless Performer [B]Weber[/B] Red 1998 Stainless Performer |
|
|
|
|
10-31-2012, 07:32 AM
|
#9 |
|
somebody shut me the fark up.

Join Date: 08-13-03
Location: Clearwater, FL
|
Very nice. Thank you for sharing that project!
__________________
Dave Southern Brethren BBQ Competition Team "It's all about getting paid!" - Myron Mixon "I love being hated in my hometown!" - David Hair KingFisher Gator Rotisserie cooker (RIP), WSM (RIP), Stainless 5 burner with IR gas grill (RIP), Turkey Fryer, Weber JD Commemorative grill (RIP), Masterbuilt 40" insulated ELECTRIC smoker (new heating element), Pit Boss Tailgater pellet pooper. |
|
|
|
|
10-31-2012, 07:38 AM
|
#10 |
|
is one Smokin' Farker
Join Date: 06-28-12
Location: Lantana, TX
Name/Nickname : Drunk Monkey
|
great project.
__________________
Weber 26 , Q100, Mini UDS, Bayou Classis Stick Burner, Blaze Built in, Fornetto Basso |
|
|
|
|
10-31-2012, 07:39 AM
|
#11 |
|
Babbling Farker
Join Date: 04-03-10
Location: Cypress TX
|
Great idea! Are toilet lines food grade?

__________________
J Crunch |
|
|
|
|
10-31-2012, 07:45 AM
|
#12 |
|
Quintessential Chatty Farker
Join Date: 06-03-10
Location: Shawnee, KS
|
Very cool. Thanks for sharing. Very interested to see how it performs in action. I would be curious as to how easy it will be to operate with both hands as I assume you need to hold the needle in the meat with one and operate the trigger with the other.
__________________
Brad [URL="https://www.instagram.com/bradsimmons00/"]Some of my photos on Instagram [/URL] [SIZE=1][I][COLOR=red]Proud owner of the PentaZero[/COLOR][/I][/SIZE] :whoo: [B][COLOR=red]WWWWFBBQADD[/COLOR][/B] [B]0 out of 1 members found this post helpful[/B] :thumb: I dream of a better tomorrow, where chickens can cross the road and not be questioned about their motives. ― Ralph Waldo Emerson |
|
|
|
|
10-31-2012, 10:02 AM
|
#13 | |
|
Babbling Farker
Join Date: 12-03-08
Location: Pearl River LA
|
Quote:
|
|
|
|
|
|
10-31-2012, 10:06 AM
|
#14 | |
|
Babbling Farker
Join Date: 12-03-08
Location: Pearl River LA
|
Quote:
|
|
|
|
|
|
10-31-2012, 10:27 AM
|
#15 |
|
Full Fledged Farker

Join Date: 02-02-12
Location: Nashville, Tn
Name/Nickname : Jim H.
|
That looks like it should work well. thanks for the tutorial and pics.
__________________
BWS Extended Party, 18" WSM, Green SS Performer, 22" OTG, KCBS CBJ |
|
|
|
|
|
|


