
|
|
|||||||
| Q-talk *ON TOPIC ONLY* QUALITY ON TOPIC discussion of Backyard BBQ, grilling, equipment and outdoor cookin' . ** Other cooking techniques are welcomed for when your cookin' in the kitchen. Post your hints, tips, tricks & techniques, success, failures, but stay on topic and watch for that hijacking. |
 |
|
|
Thread Tools |
 07-08-2008, 03:41 PM
|
#61 |
|
Full Fledged Farker

Join Date: 06-11-08
Location: Vancouver, BC, Canada
|
Thanks Brian. I'll have a chat with the neighbour and show him the Naked Whiz's report on Avoiding Fires by Using the Proper Base for BGEs.
Those pictures are pretty sobering!  Last edited by MayDay; 07-08-2008 at 03:59 PM.. |

|

|
|
07-08-2008, 04:04 PM
|
#62 |
|
Full Fledged Farker
Join Date: 06-11-08
Location: Vancouver, BC, Canada
|
Just identified my freebie egg nest as a PRIMO CRADLE. Can't quite figure out how it's supposed to also fit both Kamado-style (round) and oval Primo's too. Was on the Primo website checking what their side tables look like so I can build my own.
 The neighbour said that the cooker sat on the cradle on top of 4 ceramic wedges (at the dog legs). Maybe I'll have to go and look at a Primo in the store to see what he means. Anyone Primo owners out there who know what these ceramic wedges are for? Levelling the cooker? Protecting the paint finish on the cradle? TIA. ________________ MayDay Kamado/BGE, Cobb |
|
|
|
|
07-15-2008, 04:00 AM
|
#63 |
|
Full Fledged Farker
Join Date: 06-11-08
Location: Vancouver, BC, Canada
|
After one-week of air-drying the 9 lbs of furnace cement, Humpty got put back together for Bakeout #2 on the weekend.
Both Swamprb (BGE Rescue) and Jim Beam reported the furnace cement bubbled with heat on their repairs, so I decided to keep the bakeout LOW and SLOW. For Bakeout #2, Humpty got cured for about 8 hours total (2h at 220F, 1.5h 250F, 1.5h 300F, 1h 330F, 1h 250F 1h, 200F, etc.) till the coals died. Darn it all, the furnace cement still bubbled!!! Which means I was still too agressive with the heat. Even after air-drying for a week, the furnace cement still had residual water. When heated too fast, the water gets trapped as steam in the cement, causing it to bubble. Most of the bubbles showed up in the firebox.    Thank goodness - no bubbling of the cement in the Dome. But one big bubble inside the base right under the charcoal grate. An interesting FYI... Before the bakeout, I used a heat gun to dry a small patch of cement on the base. Lo and behold, a bubble formed, but it was quickly squished flat with the thumb while still hot. Don't even try this with charcoal!!! Well, Humpty the Copper Cooker seems to be intact again. Will do some low temperature cooks and and see if the furnace cement bubbles some more or if new cracks appear. Keeping my fingers crossed for now! ______________ MayDay Project Humpty: SLIDESHOW, PHOTO ALBUM Last edited by MayDay; 07-15-2008 at 04:39 AM.. |
|
|
|
|
07-15-2008, 05:25 AM
|
#64 |
|
somebody shut me the fark up.

Join Date: 10-27-06
Location: Bothell WA
|
I never had any bubbling issues with either of my Imperial Kamado fireboxes, and the BGE firebox seems very solid, I broke up a lot ot the large bubbles and I'm thinking I may use the Rutand gasket cement to coat the firebox.
The Hercules Furnace cement did ruin a Harbor Freight step drill bit that I used to clean out the vent holes on the firebox, so it is pretty strong stuff.
__________________
Brian - Left Hand Smoke BBQ PNWBA 2010 Team of the Year BGE's/WSM's/Pellet Pro WSM/BWS Gater/BDS Clones/Cookshack 008/Weber Performer w EZ-Que/Cajun Bandit/Rib-O-Lator Test Pilot/La Caja China/BBQ Guru/Weber 1000 RK Drum Coffee Roaster Follow Left Hand Smoke on Facebook!http://www.facebook.com/pages/Left-H...462391?sk=wall KCBS CBJ/PNWBA CBJ www.pnwba.com |
|
|
|
|
07-15-2008, 09:04 AM
|
#65 |
|
On the road to being a farker
Join Date: 07-09-08
Location: Torrance, CA
|
I'm half tempted to plop mine in our large (48") gas oven and set the temp to something around 150 and leave it there for a while.. I did have my firebox in our #7 Kamado for a little while running around 150 until the piddly amount of koal I had died. I didn't notice any bubbles for the hour or so it was in there but will double-check this morning
|
|
|
|
|
07-17-2008, 09:54 PM
|
#66 |
|
Full Fledged Farker
Join Date: 06-11-08
Location: Vancouver, BC, Canada
|
Swamprb's idea of using Gasket Cement is interesting. The "Imperial" brand I used dried up harder and stiffer than their furnace cement. So, it might be less prone to bubbling.
However, I think the main thing is to drive off ALL the moisture from the furnace cement (or gasket cement) before it cures permanently. That way it shouldn't be able to bubble anymore. If I were to do it again, I would prefer to do cure the firebox in the oven because the temperature is easy to control but I'd still have to cure the cement on the cooker. However, my sweetie absolutely said the oven was off limits for this. So, in hindsight, I ramped up too quickly too fast. To begin with, my starting temperature was too high (too close to the boiling point of water, 212F). Steam was created and got trapped, bubbling the uncured cement. Need to start lower and hold it there longer to drive off most of the trapped water before going higher. OSX's idea to start at 150F would be a lot safer. Next time, I'd probably stay at 150F for at least 4-6 hours. Then bring the temperature up slowly. The key word is SLOWLY!!! Say 2 hours each at 175F and 200F, 4 hours at 225-250F, 3 hours at 275F, 3 hours at 300F, etc. Probably do this twice before going to higher temperatures. For my next firing, I'll still keep my temperatures low because I'm pretty sure the cement hasn't fully cured (didn't go above 330F). Will still be careful to ramp up slowly though. I can live with cement bubbles in the firebox, but would prefer not to have any more in the Kamado itself (especially, big ones).  ______________ MayDay Project Humpty: SLIDESHOW, PHOTO ALBUM |
|
|
|
|
07-18-2008, 03:34 AM
|
#67 |
|
somebody shut me the fark up.
Join Date: 10-27-06
Location: Bothell WA
|
I'm tending to agree with you on the bubbles, the way I'm looking at it now is its just going to be one of those things I'll have to keep an eye on and perform maintenance when needed.
__________________
Brian - Left Hand Smoke BBQ PNWBA 2010 Team of the Year BGE's/WSM's/Pellet Pro WSM/BWS Gater/BDS Clones/Cookshack 008/Weber Performer w EZ-Que/Cajun Bandit/Rib-O-Lator Test Pilot/La Caja China/BBQ Guru/Weber 1000 RK Drum Coffee Roaster Follow Left Hand Smoke on Facebook!http://www.facebook.com/pages/Left-H...462391?sk=wall KCBS CBJ/PNWBA CBJ www.pnwba.com |
|
|
|
|
07-18-2008, 10:53 AM
|
#68 |
|
On the road to being a farker
Join Date: 07-09-08
Location: Torrance, CA
|
Just to let you know.. I was able to partly cure (haven't finished yet) my re-done firebox (using Rutlands Furnace Cement) in my large 48" oven for 3-4 hours -- at least 100 minutes at 150 one day and some more time a few days later. I've also had it up at 200 for a few hours.. So far so good.. I've got no bubbles but never got above 200 -- I've been side tracked with a REALLY bad case of kitchen ants that have been keeping me REALLY busy cleaning and trying to track them buggers down.. PM me if anyone reading this wants an easy recipe to get rid of the ants in ~8 hours.. It was too easy -- we've been fighting these damned critters for >2 weeks now.. I was able to go from literally thousands of them to "1" in <8 hours.. Sorry for being a little OT -- I've got to get my clay pot back up and running. I may have to jury rig the draft door after I whack it into submission until I can buy a new one. I'll be trying my hand at electrolysis on the grill if I can find a large enough container for the electrolyte solution+grill.. I'll post some more pics when I'm done.. (or further)
|
|
|
|
|
07-18-2008, 12:31 PM
|
#69 |
|
is one Smokin' Farker
 
Join Date: 11-02-07
Location: Carthage, TN
|
Do you have a link handy on how the electrolysis works?
__________________
Large BGE 22.5 WSM 14.5 WSM Old Country BBQ Pits Smokehouse 36" Blackstone Griddle 1 U.T. Orange Thermapen |
|
|
|
|
07-18-2008, 05:09 PM
|
#70 | |
|
Full Fledged Farker
Join Date: 06-11-08
Location: Vancouver, BC, Canada
|
Quote:
 Last edited by MayDay; 07-18-2008 at 05:42 PM.. |
|
|
|
|
|
07-18-2008, 05:43 PM
|
#71 | |
|
Full Fledged Farker
Join Date: 06-11-08
Location: Vancouver, BC, Canada
|
Quote:
My grill is pretty rusty too and I haven't been able to find a 16.5" round grill anywhere, so I give up on finding a new one. I'll also try home electrolysis for de-rusting the grill. As for a non-conductive container, I'm thinking a large plastic garbage can would work. A kiddie wading pool too if you have one. If my garbage can isn't large enough, I will rig up something shallow and line it with thick plastic. If you electrolyze your grill before me, please post pics as the shiny clean metal will be sure to spur me to action on mine! ____________ MayDay Project Humpty: SLIDESHOW, PHOTO ALBUM |
|
|
|
|
|
07-18-2008, 07:09 PM
|
#72 |
|
On the road to being a farker
Join Date: 07-09-08
Location: Torrance, CA
|
Mayday..
I haven't derusted the draft door yet but did leave it alone with some Naval Jelly but that didn't really do a whole lot.. Anyway, I did learn something.. For whatever reason, I can't get the electrolysis working on the metal top damper.. It worked for a while on the springy handle but not the main part.. It's not bubbling or anything.. Anyway, I may need to do that by hand or perhaps my sacrificial rebar rod is needing to be cleaned (its pretty gunky at this point) or replaced. Anyway, I need to still clean the hinge mechanism, the grill and draftdoor.. Once that is done I can try firing it up.. I still need to paint it though but thats easy.. I'll post some more before/after pics of the metal items so you can see the electrolysis work.. |
|
|
|
|
07-18-2008, 08:22 PM
|
#73 |
|
somebody shut me the fark up.
Join Date: 10-27-06
Location: Bothell WA
|
The grills on my Medium Hibachi Pot and Imperial Kamado are 16" dia. This one from a Brinkmann is 15.5" dia. and may be the best bet for a replacement.
http://www.hawgeyesbbq.com/000rndgrillg.jpg
__________________
Brian - Left Hand Smoke BBQ PNWBA 2010 Team of the Year BGE's/WSM's/Pellet Pro WSM/BWS Gater/BDS Clones/Cookshack 008/Weber Performer w EZ-Que/Cajun Bandit/Rib-O-Lator Test Pilot/La Caja China/BBQ Guru/Weber 1000 RK Drum Coffee Roaster Follow Left Hand Smoke on Facebook!http://www.facebook.com/pages/Left-H...462391?sk=wall KCBS CBJ/PNWBA CBJ www.pnwba.com |
|
|
|
|
07-19-2008, 03:57 PM
|
#74 |
|
somebody shut me the fark up.
Join Date: 12-28-07
Location: annville ky
|
I hear music!!!!!!
|
|
|
|
|
07-19-2008, 04:09 PM
|
#75 |
|
On the road to being a farker
Join Date: 07-09-08
Location: Torrance, CA
|
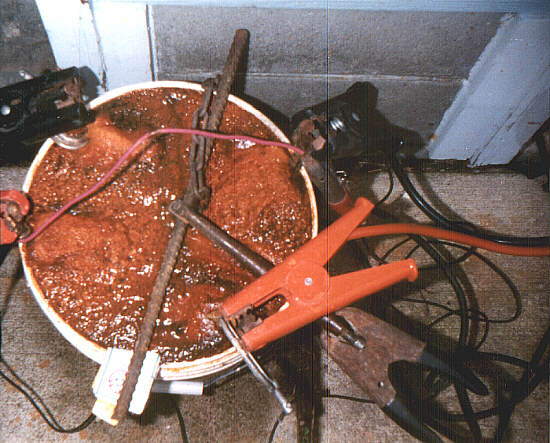
I think BGE either had a 15 or 15.5" replacement grill.. Mine is currently looking really gross in the trashcan based electrolysis bath.. Anyway, the can size is almost too small (I've only got a 1.5" gap between the grill edge and rebar rod) -- as long as the kids don't bump it, it will be fine..
|
|
|
|
|
| Tags |
| bge, claypot, copper, Kamado, mortar, refurbish, repair, restoration, Vancouver |
 Similar Threads
|
||||
| Thread | Thread Starter | Forum | Replies | Last Post |
| The long-awaited Imperial Kamado restoration project :) | W_2004 | Q-talk | 26 | 06-16-2014 04:52 PM |
| Kamado Restoration Project | Midnight Smoke | Q-talk | 65 | 11-14-2011 10:31 AM |
| **Imperial Kamado** CL Score/Restoration Project | swamprb | Q-talk | 83 | 05-15-2011 08:45 AM |
| ** Oh No! Not another Kamado Restoration Project? ** | swamprb | Q-talk | 17 | 07-26-2008 08:09 AM |
| Thread Tools | |
|
|


