Yoder Cheyenne Review

Boisblancboy

Got Wood.
Joined
Dec 14, 2017
Messages
47
Reaction score
27
Points
0
Location
Bois Blanc Island
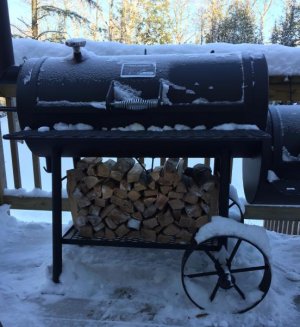
Well I’d like to do a review of my brand new Yoder Cheyenne for future buyers. This review will be in a few parts as I continue my learning process with this smoker.

Today was the first time I had ever used a stick burner and this run was to practice and to burn off all the oils.

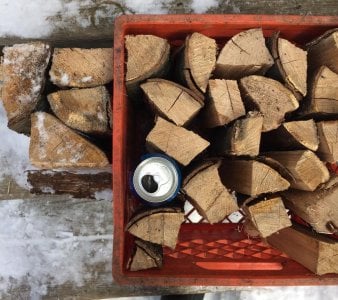
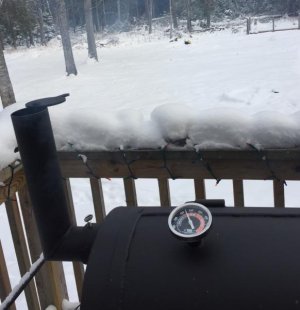
Weather outside was 10F with no wind. I’m waiting for the heat management plate to show up so that wasn’t included in this burn. Used Kingsford charcoal to get my initial coal base and all Red Oak splits from there.

The quality of the unit is top notch. Can’t complain about anything in this area.

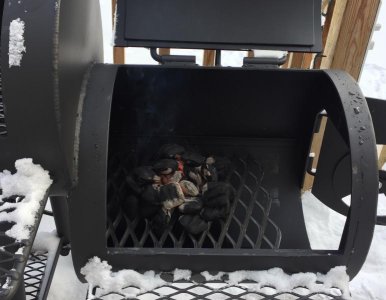
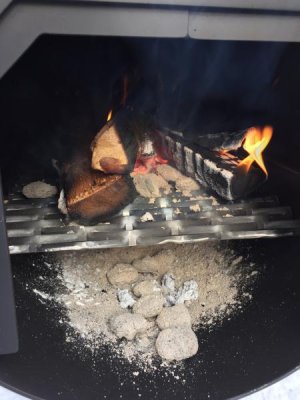
Once I got a nice hot bed of coals I threw 2 splits of the oak on and it only took 10-15 seconds to get burning which I thought was pretty well seasoned. Come to find out, it wasn’t. The center still wanted to sizzle for a bit, which complicated things a little, but eventually dried out. The smaller of the splits I had burned fine.

On the initial start up I added too much wood and she got pretty hot which is ok this time since I needed to do the cleaning burn. I set up my thermometers on the cooking grates on the firebox side and stack side. Firebox side got as high as 550f and the exhaust side maxed at 350. Other than when the temp spiked, without the heat management plate the temp difference was about 100-125f different.

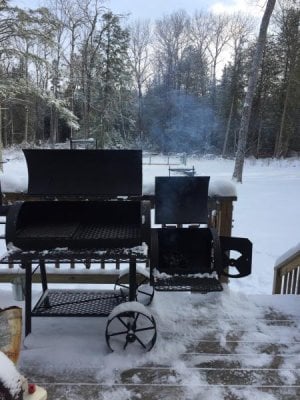
Also during start up I had heavy white smoke but this was due to wet wood for sure. It was billowing out of every crack, hole and vent. But as the unit came up to temp and the white smoked cleared to TBS things really stabilized out. I had to leave th firebox door open while the wood was sizzling. After it dried or I used small dry splits I could shut the door and use the damper to control it. Although being so cold outside I never did shut the damper at all.

Now when I had things at its hottest I did notice that while moving the latch for the firebox door the paint was almost smearing. Not a big deal cause it’s going to wear off anyway in time.

Overall I feel the unit preformed as well as it could considering the fuel I fed it and how I operated it. I do feel I should have used a larger amount of charcoal to start things off with. Also I think I may add another smaller sized grate over the charcoal grate to retain more coals from falling down to the bottom of the firebox.

Any questions, opinions or tips are welcomed! More to come after I clean the heat management plate and first cook. I’d like to keep adding to this as much as I can.

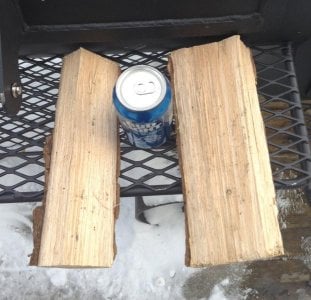
Also please do not yell at me for the unopened beer!
 

Attachments

  • 899D8E66-E8DE-412E-BE8C-F693123867A6.jpg
    899D8E66-E8DE-412E-BE8C-F693123867A6.jpg
    56.3 KB · Views: 618
  • 65A757B0-0D6F-45E2-98EB-BE8DAAD2283C.jpg
    65A757B0-0D6F-45E2-98EB-BE8DAAD2283C.jpg
    50.7 KB · Views: 603
  • CA66851F-F803-45FE-93D0-D4B0688F6CE4.jpg
    CA66851F-F803-45FE-93D0-D4B0688F6CE4.jpg
    40.1 KB · Views: 597
  • 9E656FAD-480E-4135-8148-F267EBD18107.jpg
    9E656FAD-480E-4135-8148-F267EBD18107.jpg
    21.9 KB · Views: 601
  • 1D04614D-AEE2-4E60-9A79-5BA196F505B8.jpg
    1D04614D-AEE2-4E60-9A79-5BA196F505B8.jpg
    37.8 KB · Views: 600
  • 00405ABD-52C1-4390-9F88-DB14E06185D3.jpg
    00405ABD-52C1-4390-9F88-DB14E06185D3.jpg
    58.5 KB · Views: 599
  • AC225682-D3C6-4CD8-9314-B060535CD540.jpg
    AC225682-D3C6-4CD8-9314-B060535CD540.jpg
    58.2 KB · Views: 601
Not much to add.

Invest in a charcoal chimney and some expanded metal (can get at Home Depot) for the firebox grate. Dont control with dampers. Leave them both wide open and control with the fire size. you will get a cleaner burn. Put some splits in the cook chamber near the firebox side to preheat them. I dont use any tuning plates, baffles, heat managment plates in my offset. Its not a must. Try both and see what you like.
 
Next time I run to the store I’ll be getting a charcoal chimney. Also I have a bunch of different size of expanded metal, just need to go dig it out from under the snow. I may also fabricate my own “pot warmer” to preheat my splits on also. I know my luck I’d have my split catch on fire in the firebox.
 
Glad to hear the new Cheyenne is drafting better than the old version. As Rockinar stated you'll want to control the temperature of the smoker with the size of the fire, rather than with the dampers. I had really good success with cutting my wood splits down to a smaller size as this will give you that hot and small fire you want. The smaller splits will also catch on fire faster since you said they were still a bit green. In my experience oak doesn't make a great coal bed as it burns down, so keeping a small and hot fire going at all times will make it easy to keep on adding wood as necessary.

Note: In my personal opinion I prefer my wood to be closer to the 20% moisture content which is still a little bit green. More moisture in the wood gives off more wood flavor when it smokes, so having the wood be a bit more green is a good thing as long as you've got a good bed of coals.

Also, personal preference but I prefer lump charcoal to briquettes because they burn hotter and are much more energetic, so they work better as the initial bed of coals. A full chimney of lump will be a solid base to get your fire going and as long as you keep the fire burning you should be good to go.
 
Thanks for the tips Smooth. I just used kingsford because I already had an open bag of it laying around. I did pick up a bag of lump already and plan on using that in the future.

Just based on they way my fire and temps reacted today my plan already was to split some of my larger pieces down smaller.

My experience with Oak goes only as far as what I burn for heat in my wood stove and it does leave TONS of coals behind. The only other option I have around hear is maple and when I burn that in my stove the coal bed left behind is slightly less that what the oak produces.

Sounds good buddy. Oak in my area tends to decay as it burns and become soft without leaving much of a coal bed. I have much better results with pecan and hickory which leave a massive coal bed. So if I'm using oak I'll do a 50/50 oak / pecan mix to keep a good coal bed and still get those flavors. I do recall that the same breed of trees growing in different regions will taste, smell, and burn differently so that makes sense. Keep us posted on your future cooks as I'm very glad to hear your cooker is drafting properly.
 
So after my first burn I noticed my wood, red oak, was wetter than I thought it was. Also the splits were a little larger than i think they needed to be. So I tired to split them down to around 1.5”x1.5”x 12”. Some a little bigger and smaller. Also I used my moisture meter to test the inside of the splits and found 25-28%. Now if I tested away from the core of the split the moisture dropped dramatically. The picture with the milk crate shows the pieces in the crate split smaller and the pieces outside the crate are what size they were previously.

I really wanted to split them smaller anyway for better temp control and fire management. I’m not worried if I burn a little more wood or have to tend the fire more often. I’m used to sitting next to smoker the entire cook anyway, I enjoy tinkering and sipping some beers during the process.
 

Attachments

  • CC887F78-3A7E-4BDA-8B21-DE2ED1398CD1.jpg
    CC887F78-3A7E-4BDA-8B21-DE2ED1398CD1.jpg
    54.6 KB · Views: 482
  • 72585637-81B8-4B0B-957A-390357055067.jpg
    72585637-81B8-4B0B-957A-390357055067.jpg
    81.7 KB · Views: 477
Another small update. Just received my heat management plate and did a cleaning burn. Durning the cleaning burn I noticed that once the smoker was up to temp and stabilized I had a 60F difference from firebox side of the cook chamber to the exhaust side. Which is a pretty decent improvement. I also believe I can improve that more by sealing up some of the gaps on the sides of the HMP and cook chamber walls. My fix will be to just lay some small pieces of steel on the HMP and slide them over tight to the cook chamber wall. This should force all of the hot air coming from the firebox under the HMP and be evenly distributed. Once I do this I’ll add a picture.

Now to be realistic, there is no way that the temps will be completely even across the Cook chamber since your pulling hot air from one side and exhausting it on the other. But having one side hotter than the other can be beneficial is cooking 2 different types of meat at the same time.

More updates to come. Hope this is helping someone out.
 
Nice post you have going. I haven't tried closing the gaps on the sides of the HMP, but I may look into that as well. Let us know if it makes a difference when you try it.
If you're able to get good, clean smoke, try closing your smokestack halfway and your temperature differences should get down to around 30 degrees. I haven't had any issues closing mine down to where it affects the fire.


Thank you. I will try closing down the stack after I close those gaps in the HMP. After all the reading I’ve don’t I’m not entirely sure what a good number would be for the difference in temp from side to side would be, but I feel if I get it under 50F that is more than acceptable.

My next burn is going to a cook with some baby back ribs on it so it should give me plenty of time to see how things are reacting.
 
Hats off to you for going "manual". My first serious purchase was a Yoder Wichita. I just got to the point in life with kids, work, etc that I couldn't dedicate the time like that. I slowly drifted into the Yoder pellet and a Gateway drum. I soon found myself missing the management of a good clean fire. Well, after a few years it was only late this summer that I realized that. I fired up the offset one last time before the cold sunk in. The brisket was so dang good.

So, hats off period. Especially, since you're doing it in 10 degree weather! As I type this I am cooking 10 racks of ribs and two pork butts (not all at the same time) for the boys' high school basketball dinner tomorrow. So, I will say... it's nice not maintain'n...

Good luck and keep us updated. If you need any Yoder pointers, let me know. I'm a proud owner since 2007.
 
Ordered my Cheyenne last week. Looking forward to seeing what you come up with.
 
Ordered my Cheyenne last week. Looking forward to seeing what you come up with.

I presume the Yoder comes with guidance on the seasoning process but if it doesn't, keep your temps below 250º for six hours or so. The paint isn't cured from the factory and it can't handle higher temps initially. In fact, it will take a few cooks at those lower temps before the paint is cured. Some people don't care about their paint and that's fine but if you want to keep it looking as nice as possible, try spraying the inside of the firebox with cooking oil before and after each cook (once you've cleaned out the ashes). This will keep it from rusting. Start with a modest size coal bed and a couple very small splits in an effort to bring the temps up slowly and guard against overheating. The Cheyenne is well made but on the small side so it won't take much fuel to bring it to 225º or so. Congrats and enjoy the process!
 
Hey, Boisblancboy - I don't know why I didn't see your review ages ago, but I'm going to chime in any way.

I've basically found the same things with my Loaded Wichita that I got in December.

It also prefers to burn smaller splits and I too found a 50 - 75-degree variance from side to side when I started using it in cold weather. Now that I've had a chance to use it around 30 degrees (I know, warm weather, right?) That variance has gone down to 25 degrees or less.

Congrats on getting a great, quality smoker!
 
Congrat's on your new smoker -- I'm sure you'll love it!

I totally agree with the above comments about controlling the temp by controlling the fire size. That's the ideal way to do it. Some folks even keep the firebox door open (although I don't for fire safety reasons).

If your fire nonetheless gets too hot -- and sometimes it will -- you can drop temp by using the inlet damper. But IMHO you should never close the chimney outlet at all -- doing so risks choking back the fire so you get incomplete combustion and a bunch of nasty sooty stuff deposited on your food. So my advice would be to leave the chimney damper wide open at all times when cooking, and close it only after you're done to keep rain and critters out.

In my personal opinion I would not warm splits in the food chamber -- I would worry about catching one on fire in there and, even if not, you'll then be opening the food chamber and letting out all the heat and smoke every time you want to add another split to the fire. I've always found it sufficient to warm them on top of the firebox. When I've smoked in cold, rain, sleet, or snow, then I try to build the fire at one end of the firebox and warm the splits at the other end.

Like Rockinar, I never use heat management plates, baffles, etc. Smoking with a stickburner usually doesn't achieve a precise level temp over time -- if you hit +-50 deg then you're doing well. For the same reason, +- 50 or so from end-to-end isn't a big deal. If you're fillin her up, then you'll know which cuts can handle the hotter end and which will do better at the cooler end. If not, then the only temp that matters is the one where your meat is sittin.

Regarding charcoal, I actually prefer briquettes to lump for laying down a coal bed. I always found lump tends to burn really quickly, whereas briquette coals will stick around long enough for some wood to burn down into coals and join them, thereby maintaining a good consistent coal bed till I'm runnin totally on wood. Hey, to each his own!

Good luck, and remember, it's not rocket science and few things you'll smoke will require that level of precision!!
 
Back
Top