Drum Smoker from pressure tank build

Debmar

Knows what a fatty is.
Joined
Nov 14, 2018
Messages
68
Reaction score
79
Points
18
Location
Winnipeg, Manitoba
I am in the trial phase of a type of UDS but not built from a drum but rather from an old water pressure tank that was rusting away behind my shop. It started out as this.
32389198318_f0287a6c54_c.jpg

wasn't sure what I would find when I cut into it and it ended up being basically a drum with a partial drum added on top with plastic liner on bottom section with a rubber baffle.
45348434555_1dcd6fcefa_c.jpg

initially I thought I would just use the top as the lid and flip middle section over as the curved part would allow the lid to seal nicely.
45537403624_d87e1c40f0_c.jpg

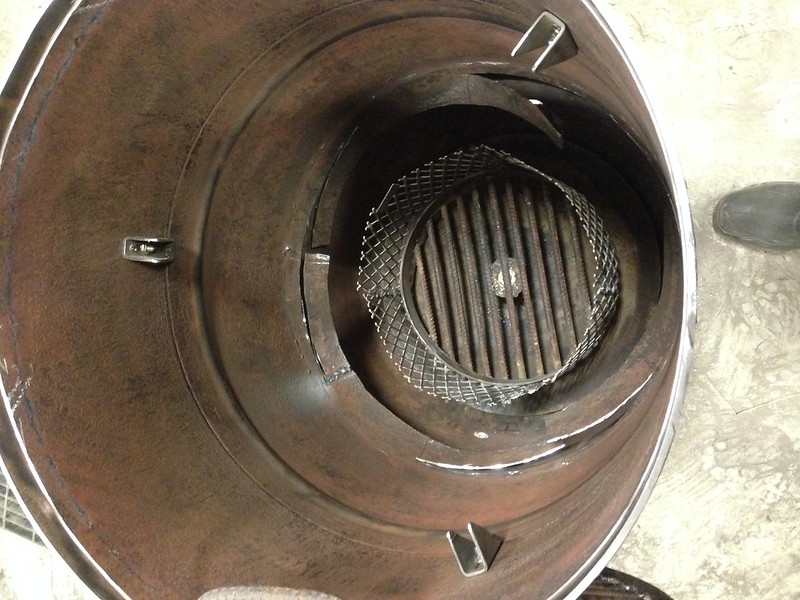
but after some thought I was sure regardless of the great seal condensation would end up building up in that area and run down drum when opened up. so welded the top section onto the bottom and cut top of mid to become the lid. this pic is of it sitting upright after I had added a 2" chimney out of an old piece of pipe. I am just using the old base as the rounded bottom sits nicely into it.
45536846244_48f67c7a71_c.jpg

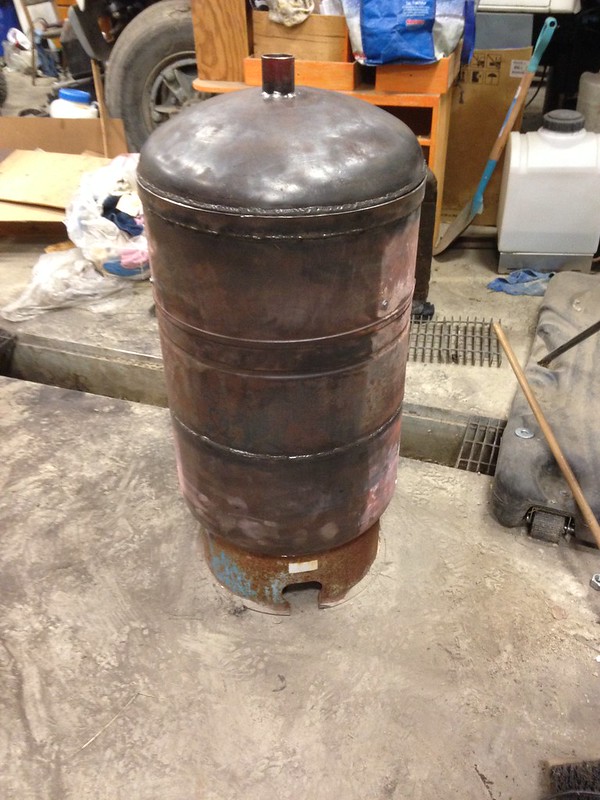
I bent and welded a length of flat bar onto the mid section top prior to cutting new lid out leaving about 3/4 of an inch of drum below the top. that kept the drum fairly ridged and gave me a guide to cut along. after cutting it out using zip disc on angle grinder I removed about 1/2 " of the drum inside that flat bar to allow an area of the lid to sit in. this project was good practice for welding for me. I only have a stick welder and always struggle with blowing holes in thinner material. looked for some tips online and ended up using 3/32 6013's dc electrode negative. that helped a lot to limit that problem.
32389072528_f5759697b3_c.jpg
 
inside components

should have mentioned I decided that I would make this project out of material I had laying around and not buy anything. this may well be the heaviest grill ever made. the ring was an old split rim from a truck and rebar
46261072171_72283b90d2_c.jpg

tried making the coal basket out of some lighter stuff but it just wasn't working so used some flat bar and more rebar. found an old broken discer disc and made the ash pan of that. it fit nicely into the drum.
44443930330_78ec47b79e_c.jpg

to make it easier to get rid of ash I welded a bolt onto the disc and nut to the coal grate. easily removable.
46209953192_fa089c1297_c.jpg

found a couple small pieces of expanded metal to built the basket from. yea, I am the worlds worst welder but its at least holding...so far anyway
31321530947_4a356525f5_c.jpg

sitting in the drum
31321615097_079b2cfbf5_c.jpg
 
other components

wanted to be able to have 2 grills but usually will be using only one so made the lower grill supports adjustable by about 3 inches. just some square tubing cut on an angle and drilled out 2 spots and zip disc cut between for the slots
32388750498_c3d6a71211_c.jpg

with the angle of the support even If I bump them when pulling the coal basket they don't catch and come out no problem. to adjust I just have to loosen the bolt holding them and adjust up or down. the grill on them
44443504240_ac18ffbe70_c.jpg

wasn't sure about thermometer ports and such but in reading through the mother of all uds thread I got some ideas. I have 3 ports for below grill thermometers so I can have a thermos under the grill regardless of position. just plug the unused ones with a nail. they are just a bolt with a small hole drilled through. I had to break my build rule here and bought a turkey fryer thermos that would reach drum centre (12")
46260752701_64a97eb6d5_c.jpg

the access hole for a thermos cable on left is just a nut welded to the inside that I can plug with a bolt or remove to allow cable through.
45348007545_6509af6297_c.jpg
 
air inlets and finishing up

don't have great pics of the air inlet build but just found some old water pipe and elbows. was going to go simple with just holes and magnets but was worried about snow drifting in on winter cooks so went with raised ones. pipes are 1 1/2" ID but holes in drum only 1 1/8 biggest step bit I had. the ball valves were actually old water line ones that froze and were slightly cracked. no good for water pressure but still seal fine for just air (no idea why they had not been thrown away but glad I had them for this) found one close nipple that fit and cut it in half and welded that to the drum. rest is threaded or welded together. flow rate for 2 of this size is slightly more than three 3/4" which seems to be the suggested so I think should be fine.

46210206572_15131e708f_c.jpg


after wire brushing everything down and cleaning up time for some paint. I was thinking about using a clear paint as I like the look of the metal and welds but thought my wife might not want that beside the house so went with black. just normal rust paint, not high heat. we will see if that was good idea. had to break my rule again and buy the paint.
45537084754_8196009659_c.jpg


still want to put some wheels on and hinge the lid but thought I should try it out first in case something needs changing . first seasoning smoke and burger trial just to cook something on it. to cap exhaust I am just using a magnetic parts tray. it is sitting on the inlet to the right. it looks good on it so might just keep using it plus when my cable inlet port is being used the magnet holds the bolt.
44443804720_ef2550cfc1_c.jpg


reading up on these here on the forum was a huge help as I knew nothing about them at all so thought I would post this build info in case it helps anyone else. it was not the easiest build compared to an actual drum but it was good practice and I enjoyed it and think so far it turned out ok. seemed to hold temp of 225 really well and went out right away upon closing all up. amazed me how little fuel it used as I had it going for 7 hours.

thanks
 
accesory build

once I had everything ready to go I realized I had no charcoal chimney so I threw one together with some scrap. it is real ugly but it works. just an old oil filter I cut the guts out of and piece of wooden stake
31321812937_63abf609b9_c.jpg

I had a small scrap of the expanded metal left over so just made some cuts in the side of the filter so it could slide in and bent it so it can't slide out. drilled a few holes in the sides and angle grinder cut some slashes in the bottom and good to go

31321846607_37e6b26d1f_c.jpg


31321834027_12d12cf266_c.jpg
 
Very nice!:thumb:
Over time I found I use more thermos. Up to six at times depending on how many different meats or racks I'm using.
 
That is excellent. One point of doubt though, the rebar grate may be a bad idea. The rebar is going to hold on to everything it can, the smoother the grate surface the better I would think.

Really nice job though, that thing will last forever (or near to it).
 
Very cool. I like the fact that you repurposed the stuff that you had laying around. Did you build some sort of handle to put the basket in and out?
 
bschoen

yea, the rebar grate might be a challenge but its all I had around that I thought would work. one thing I did do was position each piece of rebar in such a way that there was a flat line on top so using something like a spatula would slide easy on the surface. probably round smooth steel would be better choice.
 
Pig Farmer

i did not yet do that regarding handle for basket. i might but as it is now i can easily reach in and pull it out. wouldn't want to do that when its hot but i don't think that would be the normal. will see, this whole smoking thing is completely new to me so i have lots to learn and i am sure the design will evolve.

I really enjoy building something useful out of crap that is just going to be scrapped otherwise.
 
Last edited:
Pig Farmer

i did not yet do that regarding handle for basket. i might but as it is now i can easily reach in and pull it out. wouldn't want to do that when its hot but i don't think that would be the normal. will see, this whole smoking thing is completely new to me so i have lots to learn and i am sure the design will evolve.

I really enjoy building something useful out of crap that is just going to be scrapped otherwise.

All you need is a piece of rebar slightly longer than the diameter of the basket. Slide one end in to the expanded metal on one side, push it through a bit, then slide it through the opposite side. Voila, removable handle. Take it out when cooking so it doesn't get covered w/ stuff (I keep forgetting to take mine out....).
 
Back
Top