
|
|
|||||||
| Q-talk *ON TOPIC ONLY* QUALITY ON TOPIC discussion of Backyard BBQ, grilling, equipment and outdoor cookin' . ** Other cooking techniques are welcomed for when your cookin' in the kitchen. Post your hints, tips, tricks & techniques, success, failures, but stay on topic and watch for that hijacking. |
 |
|
|
Thread Tools |
 04-01-2009, 04:09 PM
|
#1 |
|
Guest
|
For a long time now grilling and smoking has dominated my cooking. Well, at least for 3 seasons out of the year, winter sucks here in Michigan. The last few seasons we have been smoking pork A$$, brisket, sausage and a few other things on a Weber kettle. We have tweaked a setup in the kettle that turns out some pretty good que’. But it is most definitely a pain in the A$$. Constant temperature fluctuations… always reloading wood chunks and coal… Severe size limitations… I kept thinking I needed something bigger and better.
So for about the last 2 years me, my dad, and a couple of my buddies have been talking about how fun it would be to “build” our own smoker. Nothing fancy, but just something we could call our own and get the job done a little better. I started to do some research on the net. I had no idea where to start. Then my dad said he had (3) 55 gallon drums at his machine shop that he wasn’t using anymore. And that’s how it all started. I kind of started with The Big Baby in mind. But I wanted to make it a little more portable and make a few other mods. So with that in mind here we go… These pictures are a result of our first brainstorm. The focus was just on the “cart” as a solid base.  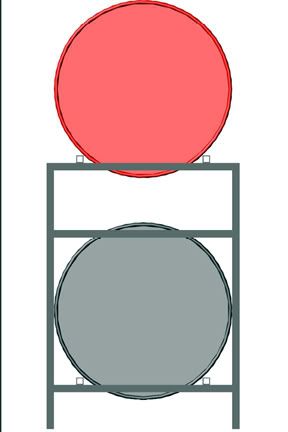  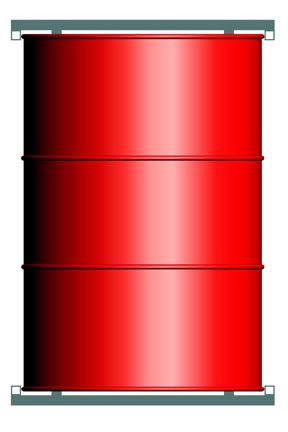 Then I bought some heavy duty casters from Great Lakes Caster for more mobility. They have a 300 lb per caster capacity. 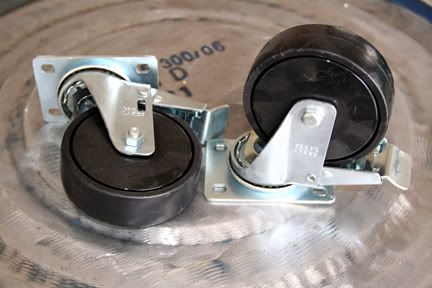 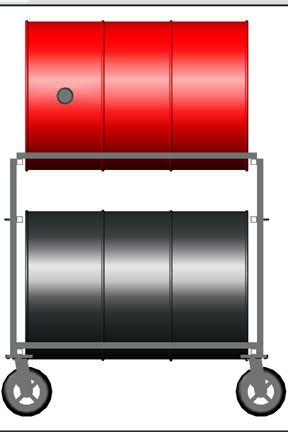 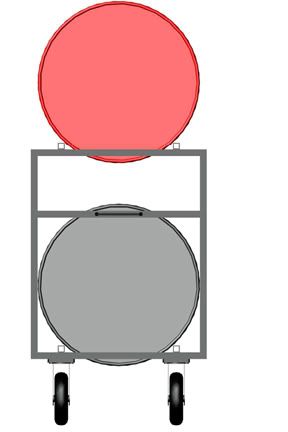  We decided the casters would bolt on for easy removal later on, so we added some more support. 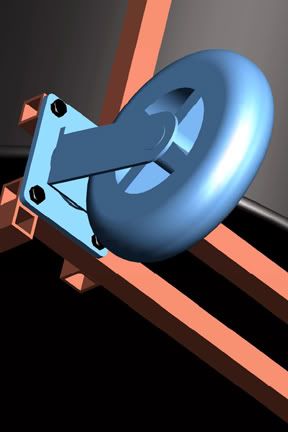  A few 3D models, just for fun. 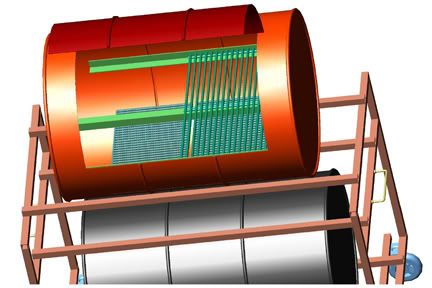 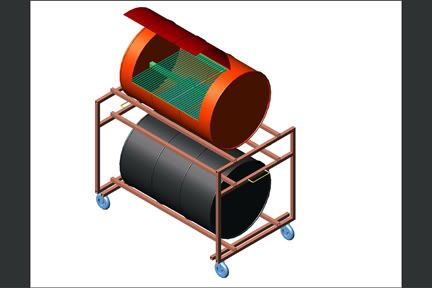 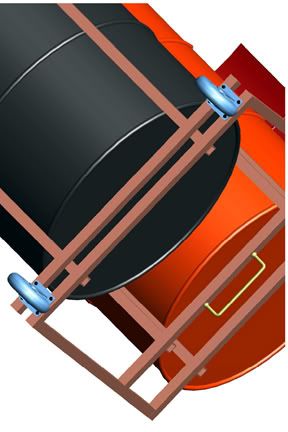 The proposed dimensions. 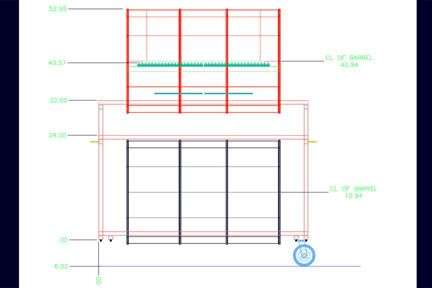 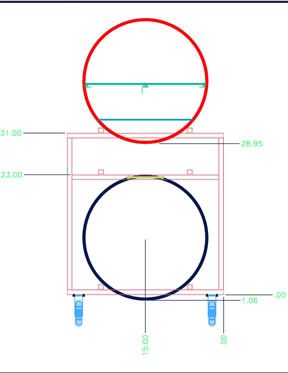 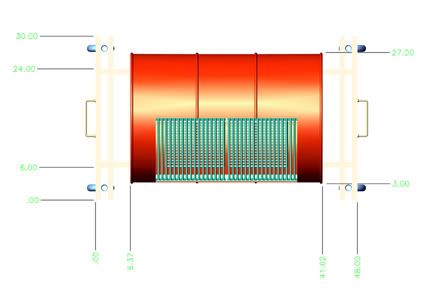  So I bought 5 pieces of 1” square steel tube 12 feet in length with 1/8” wall thickness. I know its overkill; we got it at a pretty good price. Just this past week I cleaned it up and cut it to length with my angle grinder.  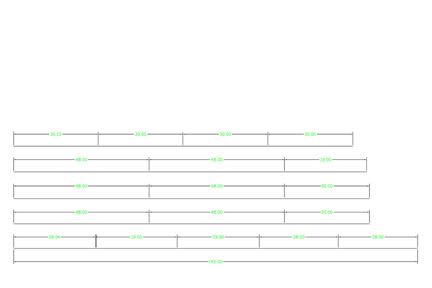 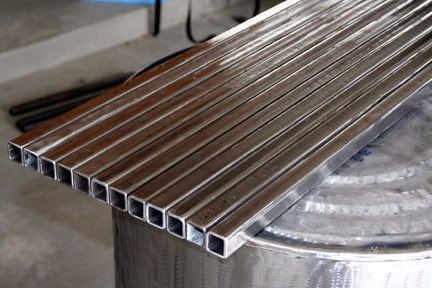 As far as the drums… When I got them they had a pretty serious coat of blue paint. So we started by rough sanding as much of the old paint off as we could. Then I went at them with the angle grinder to remove the rest and to prep the surface for the high temp paint. The first picture shows some of the original paint. The second picture is a drum after sanding, and the third is a drum after grinding. The last picture shows all three stages. 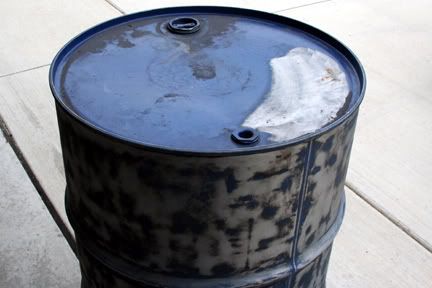 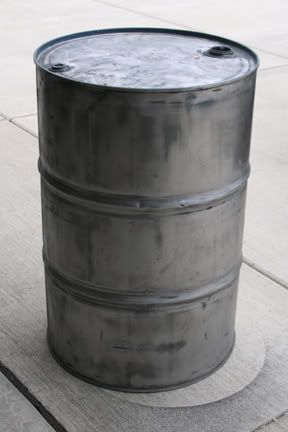 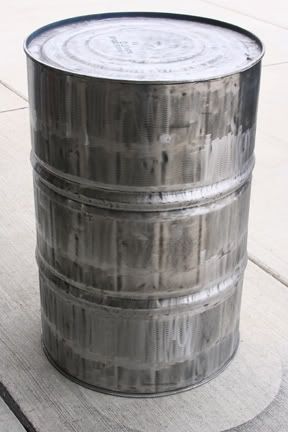  I have also ordered a fire door and a couple of dampers from Vogelzang. 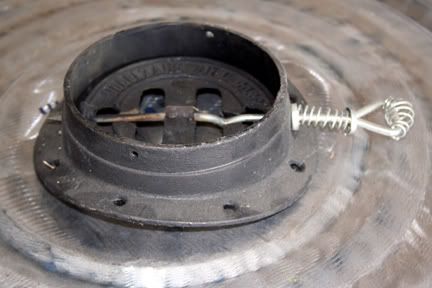 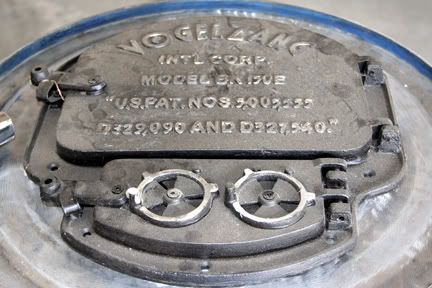 So this is where we stand today. The steel for the cart is prepped and ready to be welded, which I will probably do on Saturday. I plan on dropping the top 2 supports so that the top is flush. Also I am going to wrap the whole cart in sheet metal, possibly stainless. We do have quite a few more ideas going forward, but any input is always appreciated. If nothing else but to entertain myself I will post updates through the end of the project which I hope will be within a week or two. Last edited by CAustin919; 04-01-2009 at 04:30 PM.. |

|
|
04-01-2009, 04:15 PM
|
#2 |
|
Guest
|
All of my pictures are hosted at photobucket so I don't use space on this site. Here is a link to the album.
http://s233.photobucket.com/albums/e...ethren%20Link/ The album password is: smokin Last edited by CAustin919; 04-01-2009 at 04:50 PM.. Reason: Added a password to album |
|
|
|
04-01-2009, 07:13 PM
|
#4 |
|
somebody shut me the fark up.

Join Date: 06-28-07
Location: Duvall, WA
|
Cool...lookin' forward to the finished product. Great plans...thanks for sharing!
__________________
"The team formerly known as "Wine Country "Q"... PNWBA "Team of the Year" 2011, 2012, 2013, 2014, 2016, 2017... We cook on MAK Grills and Bullets... |

|
|
|
04-01-2009, 09:58 PM
|
#5 |
|
Full Fledged Farker

Join Date: 03-09-09
Location: cumberland md.
|
man that is over the top... cool plans... I wish I had the tech to do all that... mine will be sad if it was sat next to yours... heck I just used 4 garden post along the ends to hold mine togeather and up
|
|
|
|
|
04-01-2009, 10:23 PM
|
#6 |
|
is one Smokin' Farker
Join Date: 10-25-08
Location: Drippin' Springs, TX
|
Looks great, nice plans with one exception.
You have the barrels positioned horizontally, they should be stationed Vertically! You'll use much less wood and they will be much easier to control. Just my two cents worth, and you got it for free. Weiser
__________________
[COLOR=Red][I]"There is a Fine Line between a Hobby and a Mental Disorder." [/I][SIZE=1][COLOR=Black] [/COLOR][/SIZE][/COLOR][COLOR=Red][SIZE=1][COLOR=Black] [/COLOR][/SIZE][/COLOR] |
|
|
|
|
04-02-2009, 08:36 AM
|
#7 | |
|
Guest
|
Quote:
|
|
|
|
|
04-02-2009, 11:51 AM
|
#8 |
|
is One Chatty Farker
Join Date: 07-06-08
Location: Caldwell, Idaho
|
Seems like it would be a pita to keep the door on the bottom barrel open.
__________________
Gateway drum smoker, OK Joe Longhorn Dual, OC Smokehouse, OK Joe Judge. |
|
|
|
|
04-02-2009, 12:15 PM
|
#9 |
|
is One Chatty Farker
 
Join Date: 11-07-07
Location: Middletown California
|
good job cleaning the outside of the drums, but what type of coating is on the inside?
__________________
Cheers, Jerry aka Barbarian Drumhead - UDS x 2 & UDG Thermopen Keep on Smokin' KC native missin' KC IMBAS Certified MOINK Baller 2009 I also support PETA - People Eating Tasty Animals |
|
|
|
|
04-02-2009, 01:28 PM
|
#10 | |
|
Guest
|
Quote:
No coating. Just a little bit of rust, which I am not too worried about. I mounted the Vogelzang fire door on the bottom barrel today. I will post pictures later... |
|
|
|
|
04-02-2009, 09:19 PM
|
#11 |
|
Guest
|
I apologize if you all have seen this before, but I am having fun with the build and feel like sharing.
So I made a little progress today. I managed to get the Vogelzang fire door mounted on the bottom barrel. Marked up and ready to cut. 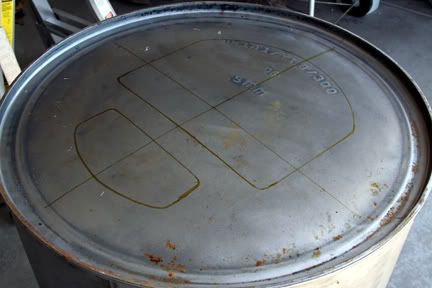 I made all the straight cuts with a .045 cutting wheel on the angle grinder and the curves with a 20 tooth per inch blade on the jigsaw.  When drilling the holes for the bolts I realized that it would be easier to drill a pilot hole first and then open the hole up to the finished size. This keeps the bigger drill bit from walking all over the place. 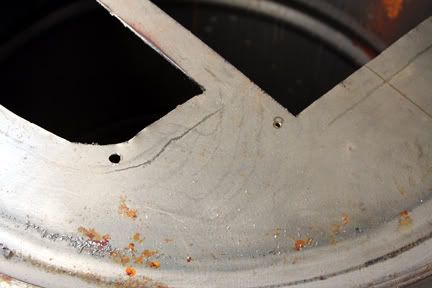  I dropped in the door and ran the drill through the holes again to ensure a smooth fit for the bolts. Then dropped in the bolts. 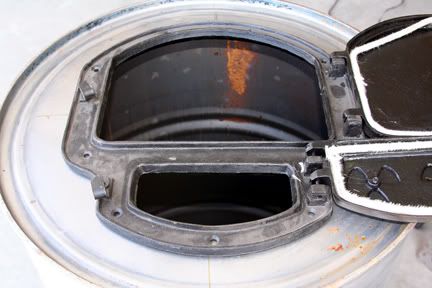 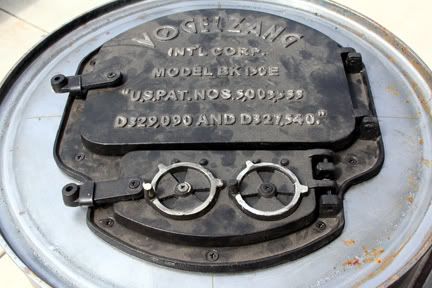 Tomorrow I think I will try to cut the top barrel and cut out the door from the third barrel. Just tryin to knock a little bit out every day. |
|
|
|
04-03-2009, 02:24 PM
|
#12 |
|
is One Chatty Farker
  
Join Date: 07-16-06
Location: West Palm Beach,Fl.
|
Excellent detailing. This is real easy to follow for those us us that are less talented and mechanically minded. Thanks
__________________
Les Backwoods Party w/upgrades & Guru Lg. Big Green Egg born 6/23/08 w/custom Walnut handle from Marty Leach,Weber Gasser Weber OTG Walnut handle from Marty Leach KCBS #20486,FBA certified Master judge,IMBAS (MOINK BALL) Certified Like what you do. Do what you like. |
|
|
|
|
04-03-2009, 05:29 PM
|
#13 |
|
Full Fledged Farker
Join Date: 01-16-06
Location: Warren Mi.
|
When I first got the Q bug I was going to build one of those.
Looking forward to the rest of the build. 
__________________
[FONT=Arial]Chargriller Pro /with side firebox[/FONT] [FONT=Arial]2 WSMs & 1 Pro Q Stacker[/FONT] [FONT=Arial]Weber 18 1/2 kettle[/FONT] [FONT=Arial]Weber 22 in. kettle (rescued from eradication)[/FONT] [FONT=Arial]Weber Smokey Joe Platinum.[/FONT] [FONT=Arial]1 Ugly Drum Smoker[/FONT] [FONT=Arial]Weber Silver gasser..:icon_blush:[/FONT] [FONT=Arial][B]Member GLBBQA[/B] :cool:[/FONT] |
|
|
|
|
04-06-2009, 11:14 PM
|
#14 |
|
Guest
|
Been trying to run down a full sheet of expanded steel in Metro Detroit here the last couple of business days. An order as small as mine isn't a high priority I guess.
Anyway I did get my cooking grates designed so that when the steel does get here I will be ready to cut, clean, and weld... The cooking surface will be 2 grates so that they will still be easily removable. I did want to fabricate something though to maximize the cooking area. The pre-made grates that I had didn't reach to all four corners. With this I can squeeze out a few extra square inches... 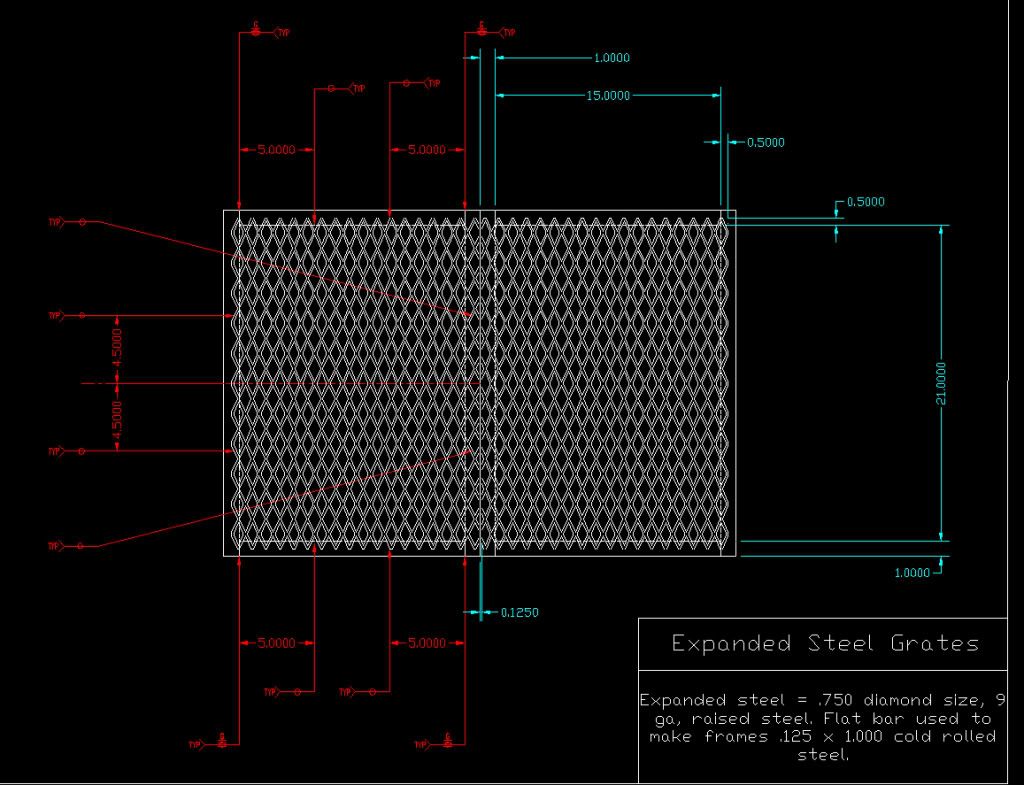 |
|
|
|
04-06-2009, 11:20 PM
|
#15 |
|
somebody shut me the fark up.

Join Date: 07-18-07
Location: Oklahoma
Name/Nickname : jeanie
|
Looking great so far!
__________________
jeanie Lifetime member of the Society for the Preservation of Authentic Royal Magical Rare Kaskaskian Peppers (Thanks Ash :)) RIP Ash, you are missed http://cowgirlscountry.blogspot.com/ |
|
|
|
|
| Tags |
| 55 gallon, barrel, build, double, drumm, smoker |
 Similar Threads
|
||||
| Thread | Thread Starter | Forum | Replies | Last Post |
| Building a "sheilded" UDS... | Southern Home Boy | Q-talk | 15 | 08-25-2010 10:01 AM |
| Pit Building on TLC's "American Chopper" | Bogus Chezz Hawg | Q-talk | 23 | 01-30-2010 04:57 PM |
| I finished building my Gas grill "island" ... | G$ | Q-talk | 0 | 07-06-2008 05:30 PM |
| Pit building WIP: "Suzie Q" | Don Marco | Q-talk | 40 | 10-05-2007 03:15 PM |
| Doing a little "Drum building" today!!!!!!!!!! | Napper | Q-talk | 2 | 03-17-2007 11:24 PM |
|
|


