• working on DNS.. links may break temporarily.
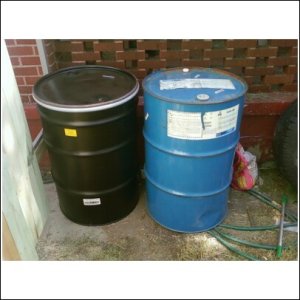
Well, I just picked up my actually cooking drum. It is the black one. I got it from Dayton Industrial Drum. They take drums and recondition them by media blasting them.

The other is a closed top..I have two of the blue ones that I will be using as donors for version 2.0 once I make redesign changes.

So here they are in all their glory

oh yeah..got an aditional drum lid for 10 bucks.
 

Attachments

  • UDS.jpg
    UDS.jpg
    66.3 KB · Views: 1,315
Cool Stay Down. Can't wait to see your build.

I see in your sig your UDS got stolen. That sucks. I would be bummed. Seriously bummed.

Good luck on the new one though.
 
Sharing Knowlege

I have gotten some PM's in the past where people have made incorrect or want to change the size hole they made in a drum. If you have ever tried to drill a large hole in thin metal you know that it does not make a clean round hole. It is even worse on a curved surface like a drum. You can get a bigger unibit which are either expensive or don't work very well or last. If you use a tool called a "Chassis punch or Knockout punch" it makes life very easy. A industrial quality punch will cost @$40 apiece but Harbor Freight sell a set that will work on drums for <$20. Here is a link and a link to a You Tube demo. The pilot hole does not have to be only slightly bigger as described. That is how they are designed but you can go bigger if you pay attention to centering and make sure it is shearing the metal as you tighten.

http://www.harborfreight.com/cpi/ctaf/displayitem.taf?Itemnumber=91201


http://www.youtube.com/watch?v=zJpc5CeiAtQ&feature=related
 
Cool Stay Down. Can't wait to see your build.

I see in your sig your UDS got stolen. That sucks. I would be bummed. Seriously bummed.

Good luck on the new one though.


Yup and never got to cook on it either. So here we go..this weekend I will be building yet another one.
 
Quick question that I forgot to write down when looking through the entire thread...how far off the base of the drum should the ash pan set? I was gonna make it 1 inch and then put my charcoal grate 2 inches above that...giving me a total of 3.125" off the bottom.
 
Here are a few pics as I build the ash pan and charcoal box.

The first is me setting up to cut out the ash pan in the water jet, then it cutting. The ash pan finished and pulled out of the jet. Rolling the expanded metal for the charcoal ring and the finished ring awaiting the stand offs to get it to the right height above the ash pan.

Now I just have to weld a bottom on to the basket and put a ring around the ash pan.
 

Attachments

  • UDS1.jpg
    UDS1.jpg
    51.7 KB · Views: 1,265
  • UDs2.jpg
    UDs2.jpg
    51 KB · Views: 1,269
  • UDS3.jpg
    UDS3.jpg
    58.2 KB · Views: 1,265
  • UDS4.jpg
    UDS4.jpg
    69 KB · Views: 1,268
  • UDS5.jpg
    UDS5.jpg
    67.1 KB · Views: 1,271
Man with equipment like that i would start on a Lang, Spicewine, Klose, or Stumps clone while the UDS chugs away.

Or a locking mechanism so you can keep this one longer.:roll:
 
Man with equipment like that i would start on a Lang, Spicewine, Klose, or Stumps clone while the UDS chugs away.

Or a locking mechanism so you can keep this one longer.:roll:


Yeah..this is all at work obviously. If this was in my garage I would be a happy man.

And yes...I do want to work on a Stumps clone I think...or maybe a spicewine but I know nothing about them and even at the prairie site I did not find any good dimensions to use or a viable blueprint.


And the locking mechanism on this one will be my Shotgun wired to the gate in my backyard! :wink:


I will be soon replacing that in my sig if all goes well.
 
Oh to have a set up like that!!!!!!


You have not seen anything yet. We have 3 ProtoTrak mills..one of which is a 3 axis. We have to Anilams and one is one a full blown CNC machine.

We also have a Haas TL-1 and a couple other manual lathes..plus all the woodworking and sheetmetal equiptment as well as the welding room which has a Bluco fixture table with a Miller synchrowave 250 and a miller mig
 
Not as good as i thought, this is my first ubs and i thought it looked cool but i do need to cut it down. Trial and error!
 
HotandCold,

The eats are looking good on the drum there. That has got to be the tallest riser I have ever seen for an intake. How does it work for you.

Not as good as i thought, this is my first ubs and i thought it looked cool but i do need to cut it down. Trial and error! As you can see smoke is coming out of the riser and i dont think it is supposed to do that cause no air is going in to it.

DSCN0297.jpg
 
And yes the eats was very good my family was impressed. i will be fixing and painting, maybe some casters. this one was might give to my brother, he is a bbqing fool too.

DSCN0300.jpg
 
Here are a few pics as I build the ash pan and charcoal box.

The first is me setting up to cut out the ash pan in the water jet, then it cutting. The ash pan finished and pulled out of the jet. Rolling the expanded metal for the charcoal ring and the finished ring awaiting the stand offs to get it to the right height above the ash pan.

Now I just have to weld a bottom on to the basket and put a ring around the ash pan.


nice work my friend...... NICE work
 
Not as good as i thought, this is my first ubs and i thought it looked cool but i do need to cut it down. Trial and error! As you can see smoke is coming out of the riser and i dont think it is supposed to do that cause no air is going in to it.
I seem to recall that some one else tried that early on in this thread... Had the same problem where it acted more like a chimney and less like an air intake...

I think Bubba was the one that came up with the extended valve handle where the valve is down low but he attached a threaded rod to move the handle so you don't have to bend over (not a pretty picture) to adjust it...

Ya did good, it's all about learning, building, modifying, and repeating...
 
Back
Top