ECB Gourmet Can do it!

Jeff Wohlt

Knows what a fatty is.
Joined
Nov 15, 2007
Messages
59
Reaction score
0
Points
0
Location
Jefferson City, Missouri
Sure I'm a dumb-A$$ but I had to pick one of these up...Lowes and missing parts so cost next to nothing.

New grate in bottom with 1" riser bolts and made an air damper with a slide for the lower air hole.

6 lbs of cheapo briq and peaked at 256 for about an hour then came to around 230 -238 for a couple hours.

7 HOURS until it went to 190.

Ribs were off in 4.5 hours and they were great. Turkey breast stayed on another 1/2 hour and done...it was large.

Air closed first 2 hours..plenty of leaking air to keep her going. Opened it up 1/4 for another 4 hours and then all the way the last hour or so.

I think if I loaded it with a ring like the WSM I may be able to hold good heat for 10 or so hours without even touching it.

What was surpsing was how little fire I had in it. I used cherry and some hickory.

This will be my choice for smaller cooks. I could have reloaded in about 10 minutes for another 7 hours.
 
Just goes to show, you can make good food on almost anything if you know what the fark your doing!!! Good job!
 
Nice work! Pictures next time please!!!

I'm using one myself, looking to upgrade though. You can definately turn out some good que on those. I find the temperatures vary a ton depending on how much meat is in there. For example, if doing 2 large butts, I have a hard time ever getting the temp hot enough and maintaining it for any length of time.
 
I have one I've never used or seen the Mods for, how about a linky or some pics on what you've done or gotten the info from. Glad to hear its working for you!
 
I'd like some details on the Mods too. I've got one of these units and I need more air - and the ability to close it off as needed.
 
Yeah! Dis was my first ecb. She was a tad bent and burnt up. Worked great till I burnt my backyard down. Rescued from the dumb ass neighbors trash.
I miss her. Could have used her for spare parts for barrel #2.

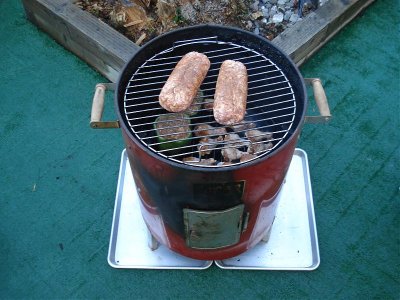
Chicken wings, fatties, stuffed bell peppers, turds, veggies(cruditities) and all the stuff you don't have room for in your offset-barrel-wsm- or whatever you use for your butts, briskets and ribs.

DSC01553.jpg
 
Heres where I got my info for ECB mods 4 years ago, even before I knew of the brethren.

http://www.randyq.addr.com/ecb/ecbmods.html


ECB Modifications
Now, before we get into this section, let me state for the record that you CAN make some very good barbecue with this unit, or any unit for that matter, fresh out of the box as it comes from the factory (but you're going to have to mess with it every 30 minutes or so). The purpose of these mods is just to minimize the hassle and "babysitting" required and hopefully give you time for what barbecue is all about, which involves a lot of relaxation, maybe some drinking of your favorite beverage, and a lot of socializing with friends and family (see the Barbecue Experience page); the food is just the EXCUSE for the gathering.
OK, enough disclaimer crap, introducing..........................
THE SUPERMODIFIED ECB!

These are the parts you'll be working with, and most of the supplies you'll need. From top (clockwise):

ECB Cooking chamber (notice the legs on backwards and on the outside)
Charcoal grid from a "Smoky Joe cooker" or something similar, about 13" across (measure your charcoal pan first)
ECB Lid (notice the pivoting vent cover, the vent holes, and the strip of paper for drilling guide)
Some drill bits (you'll need to start small and drill bigger until you reach the desired size vent hole)
Pliers, for crimping pie tin covers and tightening screws/nuts/bolts.
Pie tin, with STAINLESS STEEL nuts, bolts, washers, and threaded rods (which have been already cut).
ECB charcoal pan, with threaded-rod legs, vent holes, and pivoting vent covers.
Gloves, safety glasses, drill, kitchen shears.
Let's Review (you DID read the BBQFAQ ECB mods section, didn't you?)
* from the FAQ OF THE INTERNET BBQ LIST, version 2.0
Modification 1 - Improve accessibility to the firepan.
Modification 2 - Improve firepan airflow
Modification 3 - Improve accessibility to the water pan
Modification 4 - Improve temperature indication
...and some of my own mods:
Modification 2a: - Improve fireplan airflow even more (charcoal rails).
Modification 2b - Add vent covers.
Modification 5 - Improve cooker airflow (top vent & foil).
Modification 1 - Improve accessibility to the firepan (putting legs on it)
Parts List:
(3) 1/4" x 1' threaded rods, stainless steel* if you can find it
(6) Stainless steel* nuts that match the thread on your rods
(6) Stainless steel* washers that match the thread on your rods and nuts
* everything you use on this cooker should be STAINLESS STEEL and NOT GALVANIZED. Stainless will resist corrosion and will not emit toxic fumes when burning. Galvanized, means it's coated with Zinc, which DOES emit toxic fumes when burning. When I made my mods, the rods didn't state what they were, so I torched them well with a blowtorch to burn off whatever was around the charcoal pan.
Tools List:
Hack Saw or Bolt Cutters
Table Vice (recommended if cutting with hack saw)
Drill
Drill bits
Wrenches or pliers to tighten nuts.
Instructions:
Refer again to the picture above. We're going to have you put new legs on the charcoal pan and mount the existing legs on the outside. (I know the 1/4" rods don't look too sturdy, but they work fine, even with a whole load of charcoal and wood.) The easiest way to do this mod would be in this order:
First, before you start messing with the existing legs, put the charcoal pan in the unit and mark the pan where it hits the legs. We're going to use these marks for drilling holes.
Now, with your pan still in the cooker, get out your 1/4" threaded rods and figure out where you'll want to cut them, based on their position in the cooker. Put 'em in the vise and hacksaw them off (I took off about 2 inches)
Get out your handy-dandy drill and put a small bit in it for a pilot hole. (Safety tip: We will be drilling through porcelain-coated metal. As we drill, you will be accumulating a lot of porcelain shavings.....think GLASS SPLINTERS. Keep that in mind and wear eye and hand protection. Also, don't get any on your exposed skin or you'll get all scratched up.....I did, DOH) Use your bits to make larger and larger holes in the rim of the pan until you can snugly thread your (ahem) rod through the 1/4" hole (hehe) and apply your stainless steel nuts (giggle) and stainless steel washers to lock it in place.
Done......See, that wasn't so bad. Now to the next section:
Modification 2 - Improve firepan airflow
Back to Home Page
 
I too have a new gourmet ECB. Not used yet due to a "outdoor burning ban" here that lasted until late December and then cold weather (a brisk 25 degrees F right now) that had me turning to my old reliable kettle. Your post has gave me a new interest in firing it up. Anyway..here are two links for anyone who needs them that I found useful.

Brinkmann Gourmet Smoker Reviewed - Not a standard ECB!

Welcome to BrinkmanSmokerMods.com

Both links are excellent, full of mods, advice and specific to the Gourmet Model ECB.
 
I will get some pics of my mods. The Gourmet is certainly the one to get...nothing like the ECB with legs.

Raising the fire grate with another grill is the key but the air damper is a must. I do not see a problem with the lid and it being vented. If you figure the gap you would end up with a 3" pipe for the stack anyway and it keeps the heat from going over to one side of the cooking area.

I laughed at myself at first when I bought it....I pretty much tried to make sure nobody, especially any BBQ brothers I know see me carrry it out of the store LOL.

Also, I ran this on a 30 degree day with wind. I will be trying a butt this weekend with a full load of coal to see if I can get a good 10 hours from it. I am also considering a coal ring like the WSM.

Of course, I hear my other nice pits in the background snickering at me and telling me to give it up....No way...I am on a quest here!
 
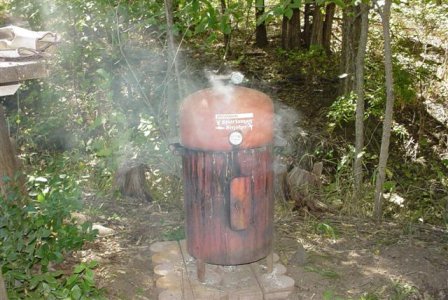
Here's my "gourmet" ECB, circa 1975.
I'll put anything that comes out of it next to yours. :mrgreen:
 

Attachments

  • Smoker & Cheese Smoker 001 (Small).jpg
    Smoker & Cheese Smoker 001 (Small).jpg
    74.5 KB · Views: 175
Looking at peculiars pic next to mine I'm thinking.........I coulda got some more use out of mine.
Great pic of it in action Mike, but wheres the food pics inside brother?

I too used the mods from randyq as my inspiration.
 
I finished all of the planned mods on my existing rigs, and needed something new to play with, so I ordered one of these:

http://www.walmart.com/catalog/product.do?product_id=3342509

It ain't much, but for $56 (what I paid at the time) and a few dollars worth of mods, I'm going to give it a go. I'm planning a charcoal box and ash pan mod, maybe line the interior with aluminum flashing, some high temp weatherstrip for the door, and a new thermometer to see what happens. When it arrives, I'll get a photo essay going for the brethren.

Congrats on the new addition to the family. Sounds like you are getting it dialed in, and as the man said, a good cook can make great que on anything.
 
Good luck, keep us posted. I'm thinking about doing the same. you could also put a firebox on the side.

For my ECB I mounted the legs on the outside as everyone else. I threw the fire-pan aside and just set my weber smokey joe under it. It already has legs, a nice vent, and is about the right size.
 
Back
Top