che22879
is one Smokin' Farker
:clap:
")
All,
Chad Grinding welded 2 - 1" angle irons together that will be welded to the grate frame that will guide the frame.

Mike
Are you reinforcing the corners of the larger grate? I see potential problems with racking of the grate that is that large. The cross-braces under the grate will not be adequate to prevent corner racking. Neither will the welds. You might want to consider traingular gussets at the vertical supports, extending a few inches along the side, this would provide some resistance to twisting of the frame.
Considering the weight of the racks, especially the larger one, a 24" or 30" diameter wheel is a better choice, your leverage will just be better.
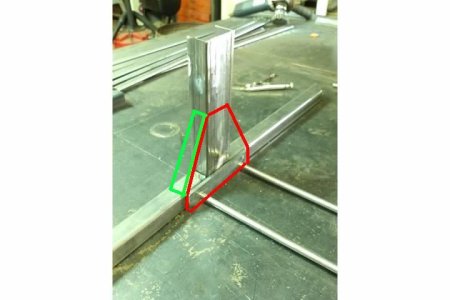
Another option to the two gussets on the vertical channel would be to replace the flat bar bridge with a 1 piece gusset (red) that acts as a doubler in that area. If you really wanted to beef it up further you could cap or box both sides in (cap shown in green).
Try this design for your corner gussett's give the corner's a little radius the hole will let any fluid that collects drip through or heat up and vaporize.. Hope it helps...
I've been wanting a Santa Maria Grill for a long time. These grills are non existant here in Louisiana and it's hard to find someone who would know how to make the wheel etc.
I'm about to opt for a cinder block cooker and fabricate a grate that can be raised and lowered with some sort of crank system. i want it big enough to double as a small pig cooker and fire pit.
BTW, very cool build. Looking forward to the finished product.
Since it is not my build, or my money, I am gonna throw this out there.
Have you considered the idea of attaching, or accomodating, a rotisserie somewhere on the unit?
Chain drive or cable drive? I know cables are easier and all, but, using motorcycle chain is a very cool and beefy look. If you go cable, please use a cable that is thicker, you can get them at Westmarine, they look better than that stupid mini-cable people always use.