TWSSB, it looks great. We need to get you some rolling stock underneath her though. You don't want to be stuck on the side of the road this summer with this rig! I am guessing you are going to be pushing 2400lbs right now. Interesting to see how the weight comes out. I wish I could have found a dual axle bunk like you scored there. Its really coming out nice!!:thumb::thumb::thumb:

Thank you. You know what, that is a legitimate concern. The frame is super tough. As long as the axles don't give out, we should be good. What exactly did you have in mind, though?

Looks great brother. I'm curious as well to see how that firebox exit performs being so high. Never seen or used a jambo so I'm in the dark on this one. Off the top of my head it seems that the top racks would end up being a lot hotter than the bottom racks. Well more so than normal I guess. Quite interested in this design. Great build so far. That firebox design is intense!!! :heh:

Cheers

Thank you, thank you. If things work out as I think they will, we should be good. You're absolutely right about the top rack. It will get waaay hotter than the main level. At first, we weren't going to add a second rack. We decided we would add the upper level for chicken or just higher heat cooking in general. Once we get far enough along, we're going to fill the entire main level with biscuits and see if we get an even golden brown all the way across.

Brought the wife out with me today...When her and my stepmother get together, they make a pretty nasty team. We had a few distractions so we didn't get as far as we wanted, but I'll always make sure we have something to feed you guys! One thing is for certain; when we are finished, you will have seen every single step along the way! Here we go:

FB door isn't finished, but I wanted to show you what we're doin' here. All we have to do is cut the vents on the door and add some handles..

Indoor-1.jpg


Made the elbow for the stack out of some leftover tread plate. It measures 9"x9" on both ends. the stack is 6" in diameter and 36" tall...stainless steel.

Stack01.jpg

Stack02.jpg

Stack03.jpg


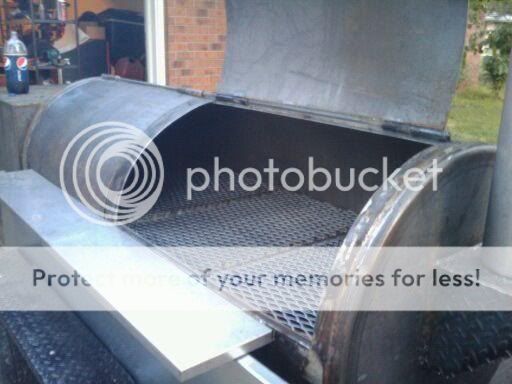
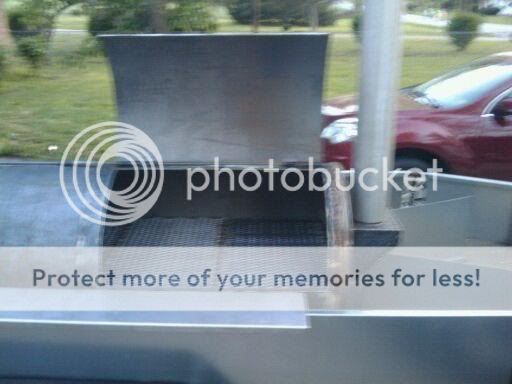
Here are a couple shots from the inside..

Instack02.jpg

Instack01.jpg


We started on the framework for the storage/utility spaces.

Wagon01.jpg

Wagon02.jpg


We scored the square pipe to get a good bend around the corner. This will make it look much better when we put the skirts on.

Ribbed.jpg


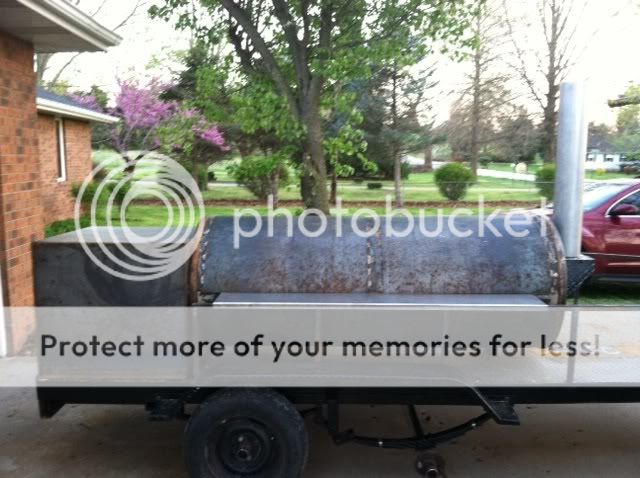
This is just a random shot...

Wagon03.jpg


Didn't get the doors done like we wanted to..I know..it's a let down.. When we cut the doors, pressure was released and the arc got wider..now we have to find a way to bend it back without jackin' it up..

Once again, I'll make sure we always have something to share. I like to keep you all updated :grin:!
 
Very impressive. You'll be cooking in it very soon. Can't wait to see it in action. I bet you're past ready to see it in action too. You're almost there.
 
Thank you. You know what, that is a legitimate concern. The frame is super tough. As long as the axles don't give out, we should be good. What exactly did you have in mind, though?

Just some fresh tires and rims my friend. Those old ones look a little tired and you seem to be missing one. I could be wrong though. :laugh:

Made the elbow for the stack out of some leftover tread plate. It measures 9"x9" on both ends. the stack is 6" in diameter and 36" tall...stainless steel.

Stack01.jpg


Wagon02.jpg

Again, I know we talked about this, but make sure you make your stack removable if you want to store this sucker inside a storage unit or garage with a normal height door. Being able to slip the stack off for towing (less drag) and not hitting the header on the garage door will keep you off youtube and your family members won't be making 5k off you on america's funniest videos or showing up on Tosh 2.0, etc.

It looks great and I really like how the firebox came out here. Having studied the Jambo's as well, I think you have it nailed. Its gonna cook great. Get yourself some cheap biscuits and start testing the temps on that sucker. Be sure to shoot some pictures at night with the firebox lit up. It will look great!!
 
I like the kerf cuts to bend that square tubing to the contour of the trailer! Are you going to fill in the cuts with JB Weld or Bondo and paint over it? I'd hate to see moisture get in there and rust it fromt he inside out after all of that hard work you're putting into this build!!!
 
Just some fresh tires and rims my friend. Those old ones look a little tired and you seem to be missing one. I could be wrong though. :laugh:

Oh..ha..Of course! The tires that were on it were shot. I bought these two used tires so we could get it home. We are definitely going to by four new wheels/tires.

Again, I know we talked about this, but make sure you make your stack removable if you want to store this sucker inside a storage unit or garage with a normal height door. Being able to slip the stack off for towing (less drag) and not hitting the header on the garage door will keep you off youtube and your family members won't be making 5k off you on america's funniest videos or showing up on Tosh 2.0, etc.

It looks great and I really like how the firebox came out here. Having studied the Jambo's as well, I think you have it nailed. Its gonna cook great. Get yourself some cheap biscuits and start testing the temps on that sucker. Be sure to shoot some pictures at night with the firebox lit up. It will look great!!

I'm with you all the way on that. We didn't weld the stack to the elbow. We'll find a way to rig it so that we can get her on and off..maybe a pipe flange on the stack itself.

When we get her fired up, I'll definitely get some biscuit shots and some night glow action posted for you guys!

I like the kerf cuts to bend that square tubing to the contour of the trailer! Are you going to fill in the cuts with JB Weld or Bondo and paint over it? I'd hate to see moisture get in there and rust it fromt he inside out after all of that hard work you're putting into this build!!!

You're absolutely right. I'm thinkin JB Weld. It's quick and easy...cheap too.
 
For the removable stack issue...could you weld a smaller diameter section of pipe to the elbow, say 6 or 8 inches long, and then slide the 3' stainless piece over it when you were ready to cook?
 
CQ is right. This is the same thing we did. We have a chunk that sticks up out of the smoker that the chrome stack slides on over. We can remove it and store it in the toolbox when we are traveling. Pics coming soon.
 
It's funny you guys mentioned that. That's basically what we did. There's a smaller piece of pipe about 3 or so inches tall welded to the elbow. I guess I was just wanting to find a way to lock it in place or bolt it down.
 
What about making a collar with slots in it and welding studs to the stainless pipe so they interlock when you twist the stack? Maybe do the slots the stainless rides in at an angle so it creates locking pressure as you twist it into place?
 
It's funny you guys mentioned that. That's basically what we did. There's a smaller piece of pipe about 3 or so inches tall welded to the elbow. I guess I was just wanting to find a way to lock it in place or bolt it down.
The only thing with dropping the stack over a stub coming up is the grease that will collect on the inside of the stack and leak out the botton. If you sliped it into a sleave the grease would go into the smoker and out the drain
 
Ours is a really snug fit. I don't even think water would run through it. It takes finesse to get the stack on. If we remove it from time to time, we can just give it a wipe down.

CQ: Great idea. A twist lock would work better than bolting it down. That would keep it in place just right.
 
looking great! where did you get the mineral wool for the fb? ive found it online for $72 for 3 24"x50" pieces is that a good price?
 
looking great! where did you get the mineral wool for the fb? ive found it online for $72 for 3 24"x50" pieces is that a good price?

Thank you, thank you. The mineral board should be a bit cheaper than that. You can find ceramic wool for close to that price (which is more heat resistant). We got ours from a local supplier here in Springfield. I'd check around your area and see what you can get. Check under insulation or insulator in the yellow pages. That might turn up some results.
 
Today we focused on doors and cooking surface. Short day but we did okay. It's looking more and more like a machine every weekend! I recently found out that we're going to be cooking 200+ lbs of meat on this bad boy in may, so we really have to knock this out as soon as possible..It won't likely be complete by then but it'll be ready to cook on for sure.

Here we go:

These first two shots are just quick looks at the walling. Stainless steel baby! Just kidding..it's just plain ole' sheet metal. They aren't fastened yet but I figured I add them so you guys could see how high the storage will be and to give you a faint idea of what it's going to look like.

Skirt02.jpg

Skirt01.jpg


This is a shot of how we've decided to do our hinges..just a long piece of round stock with some small pipe cut and slid over the round stock. I think the round stock is 1/2 and the pipe is 5/8..don't quote me on that though..

Hinges01.jpg


We got the frames made for the cooking surface. Because the chamber bowed after we cut the doors, we had a little extra work..The doors presented a much bigger problem and still need a little more finessing.

Grillframes01.jpg


The surface is made up of 4 of these pieces. About 27"x18" each.

Singlegrill.jpg


The last few shots here are just showing you what the inside looks like with the cooking surface laid down. The last pic is a bit blurry but that's okay...

Grilldone03.jpg

Grilldone01.jpg

Doors01.jpg

Grilldone02.jpg


There you have it, folks! Movin' right along!
 
With everything we are putting on it, I'd say it will be every bit of 2500lbs. We still have a lot to add and I'm sure its over 1500lbs already..That's my guess anyway..
 
Back
Top