pete10
Well-known member
I posted my intro in Cattle Call last week. Figured I'd fill it in with some info on the offset I am building. Pics will follow when I get some taken. Here are the specs:
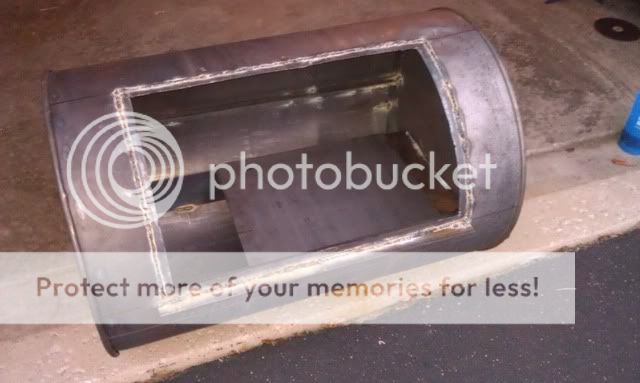
Cook chamber: black steel, unpainted, untreated 55gal drum. Second drum cut into a panel to double wall. Panel door approximately 24x18. So far, I have all the cuts done.
Firebox: 18"x24"x18" custom fab. 1/8" plate. Top load with a sliding plate for a door (the pics will show this better than I can explain it). the sliding design will allow me to open it a little to add fuel if needed, and also slide the door out and an expanded grate in if I want to use the box as a grill. Intake will be controlled by a single 4" blast gate (woodworking dust collection item). charcoal basket made of expanded steel. with a cookie pan ash collector. So far, the box is bolted together. I need to make the frame for the door from angle.
Duct System and exhaust: two 3" carbon steel car exhaust pipes ducted from the top of the firebox into the bottom of the cook chamber side by side. Initially I intend to run these to about 4 inches from the far end of the cook chamber to facilitate reverse flow. Depending on heat distribution, I may slot or drill the duct to introduce smoke/heat in the middle of the cook chamber. Exhaust is a 3" 90deg ss elbow at the grate level. Blast gate after the bend attached to the stack to control exhaust. I need to do some homework to figure out the optimal height of the stack (any suggestions are welcome)
Misc: two NPT attached thermos at grate level (haven't picked these up yet. might raid the metrology shop at work) Cook grate will be segmented expanded steel. Might install a ball valve at the low point of the cook chamber for washout. Building the support/cart from angle that I had as scrap. Should be sturdy. High heat primer and high heat flat black paint (I've done a test patch on a drum surface, it takes really well to the smooth wall.)
Concerns I have so far: Door I cut out of the drum seems a little flimsy. I might bolster it with bar stock. I need to pick up some gasket for the door. I am unsure of the duct design. I hope it works, or I am going to have to pull the thing apart and rebuild. I am going to minimize the duct between the two chambers to the minimum needed for clearance. It should be no longer than the blast gate transitions, maybe 4". I might wrap it with auto exhaust/header wrap to minimize heat loss.
Does anything stick out to you guys as a bad (or good) idea? I certainly welcome any and all suggestions?
I promise to post pics soon.
Greg