• working on DNS.. links may break temporarily.
This is the start of my forth UDS build. This one has a hinged lid. Will also install a Weber daisy wheel for the exhaust,some type of shelf and three or four casters.
129.jpg
 
Plan on finishing up paint on second UDS this weekend and then hope to get some pics posted on here, half wish I would have found this thread before I started building mine but, ehh, I like em. :cool:
 
Quick Charcoal Grate Question

Wow, a lot of information..:shock: I've been reading this for 4 days and am only at page 240.

I started my own build today and have purchased a 3/4" X 24" X 24" piece of expanded steel grate to go on top of a 18" grill top for my fire basket.

My question is this. Should I cut this into three 8" sections and have firebox that is 18' in diameter and 8" high ....or.... cut it into two 12" sections and have it be roughly 15" in diameter and 12" high on top of my 18" grill top??

Which one would provide a longer burn or would either option give me plenty of burn time?
 
Well, I finally got mine going. I'm waiting for a friend to weld me up my fire basket and I still want a Kettle lid but it's heading in the right direction.

drum3.jpg


drum1.jpg


drum2.jpg
 
Hey Hyper, I would get rid of the tabs on the tool hanger and bolt/crew it to the side if you want it. It is gonna cause an air gap that is going to screw with your temp control.
drum1.jpg


Just trying to help Swamprb out! :p
 
Wow, a lot of information..:shock: I've been reading this for 4 days and am only at page 240.

I started my own build today and have purchased a 3/4" X 24" X 24" piece of expanded steel grate to go on top of a 18" grill top for my fire basket.

My question is this. Should I cut this into three 8" sections and have firebox that is 18' in diameter and 8" high ....or.... cut it into two 12" sections and have it be roughly 15" in diameter and 12" high on top of my 18" grill top??

Which one would provide a longer burn or would either option give me plenty of burn time?

I've been using the smaller Weber charcoal grate from an 18" grill. It's about 13-1/2" in diameter, IIRC. I start with a 12" X 48" piece, roll it into a hoop, and weld the grate inside about 3" from the bottom. That way, you've already got 'legs' to keep it off the bottom of the drum. I have no problem smoking all day, 12 hours or better, and there's still charcoal in it when I shut it down. On my first drum, I cut a piece of expanded steel in a circle to make the bottom of my basket- I think it was just under 16" for a 48" circumference. Using the Weber charcoal grate is easier, though.
 
Thanks for the input. I just measured again and I have the 17" diameter weber charcoal grate. I will probably go with cutting my piece of expanded steel 12" for two pieces 24" long. If my math is correct the basket will be a little over 15" in diameter.

I'll post pics of my build soon.
 
1st uds almost done!

Hey all!
Well, after what seemed to be a day of grinding out that nasty liner, I'm finally on my way. Did 2 rip-roaring burns, 4hrs to grind all but 1% of the liner out, another big burn, wash, rinse and started assembly today. Just need my BIL's welder to finish up, and wait for the ebay temp gauge to arrive. I just can't wait to throw some butts on this bad boy! Sorry for the lack of build pics, you'll get some soon!
Oh, I did have a question to the bros(and the lady-bros): Seems like up here charcoal isn't quite as popular. I have seen Royal Oak, Nature's Grillin Hardwood Blend, of course KFBlue and the newer KF Charwood. Any ones I should go for? Avoid?
Also, oak, maple, cherry, apple are pretty abundant here, but I can't for the life of me find mesquite or hickory, except in chip form. Would that suffice? Any tricks to using chips on the UDS?
Thanks everyone!
 
Hey Hyper, I would get rid of the tabs on the tool hanger and bolt/crew it to the side if you want it. It is gonna cause an air gap that is going to screw with your temp control.
drum1.jpg


Just trying to help Swamprb out! :p

Hey Norco,

I threw the tool hanger on there to take the picture. I'm not positive that I'm going to be using that particular one yet so I haven't messed with it. If I do, I will cut the tabs and bolt it to the side. :becky:
 
where do you guys get the different color paint I've only seen black around here
 
what's with the valves on the bottom? I have 4 1"holes with the caps on them. It's either open or closed is this valve a new way of making them?

also is the 8 holes in the top still the way to make the lid?
 
what's with the valves on the bottom? I have 4 1"holes with the caps on them. It's either open or closed is this valve a new way of making them?

also is the 8 holes in the top still the way to make the lid?

If you just have holes with caps you don't have much control of your temp. With the valve you can dial in the exact temp you want to smoke at.
 
High temp engine block paint at auto parts stores (napa and the like)

Valves on the bottom? It's far from new and probably the most popular method (but not necessarily the best by any means) unless I am missing something.
 
One two inch exhaust or the equivalent area in smaller holes works well. One hole is easier to manage for choking up the barrel when you are finished smoking.

Most people are going to a single large intake controled or covered with either a sheet magnet, BGE stainless intake or a metal flap. This works better than multiple holes, easier to control and allows easier cleaning of the ashes. I use a 2" intake as this allows me to smoke at 180 or bake pizza at 550. An intake hole can be too small but not too large(within reason). It is the amount of opening that matters and there is no benefit to having the intakes spread around the barrel. Even at wide open my fire does not burn towards the intake hole but burns toward the available lump. Its the hottest lump that is going to catch- not the lump nearest the door!
 
looks like I better do some more reading before I go drilling into this barrel.. I'm going to burn it now though :clap2:
 
Got a good part of my build done yesterday, and haven't had either the FD or the cops show up from the fire or the noise, so I've got that going for me! I have all of the hardware and the racks, I just need to drill holes and assemble to put them in. Still have paint and little thaings after that! Ignore any pathetic welding you may see as this is my forst stab at it with a borrowed welder. :redface:

You all know the drill; Here's my build, about half done.
smallmyuds01.jpg

Fresh Drum

smallmyuds03.jpg

After burn, with donor Weber kettle

smallmyuds04.jpg

Inside after burn, before grinding

smallmyuds06.jpg

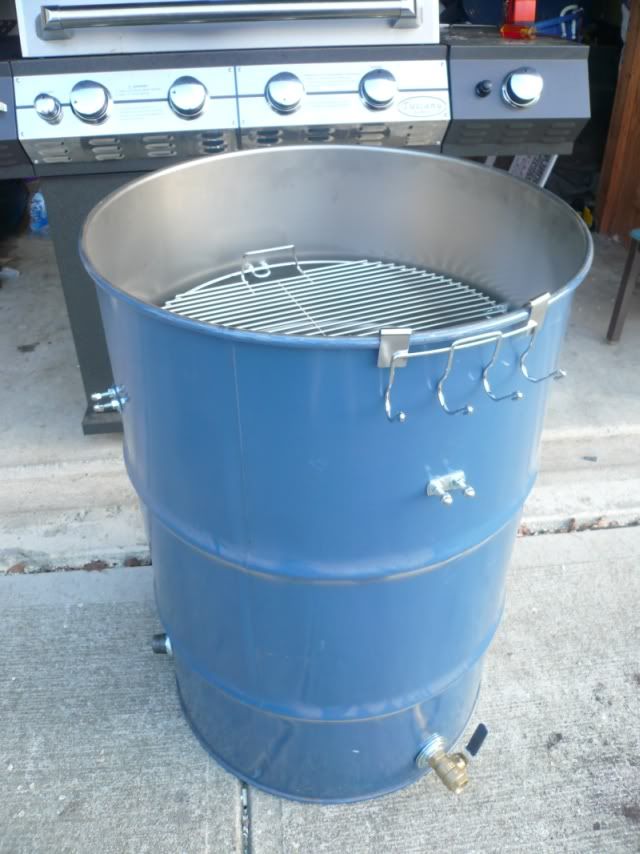
Unpainted, no racks, on seasoning run. Got to almost 400 with about 40 briquettes of KF. Used butter flavored Crisco.

smallmyuds09.jpg

Inside after seasoning, Big basket that needs a smaller ring inside for smoking. I built it big to raise it up high to double as a grill ala MushCreek's build.

Things I learned:
-Welding takes training and experience, of which I have neither.
-Outer paint washes off with a rag and water after a burn.
-Personal protective equipment is very nice to have around for the grinding! (earplugs, ear muffs, safety glasses, and a GOOD filter mask)
-My wife is very patient, with the noise and mess assiciated with this.
 
Back
Top