Double Barrel Ugly Drum Smoker! Build Pics

@Jethro608- I did use a calculator to check after winging it! LOL! My openings were all well within acceptable levels and I built tons of tuning into it so even if an opening was a bit off I more than likely could compensate in another way. But fortunatley I didn't have to. She cooks very even accept for the two hot spots right above reverse flow opening into smoke chamber. I will make a defuser for that soon enough though. Thanks again for all the kind words.:grin:
 
Well the heat has to come out some where.:) I don't think 5in is that much concidering all the cook space. Does the top shelf cook faster? I have never tried to cook up there and I loose that space.
I really think I'm gonna try that after I get my welder. I don't need one that big. But.... yea I do:D. How big of opening is that in your fire box? How thick is your rev. Flow plate? & how high off bottom for both?
I've got like 12 barrels on the way (free) & I was told I could...I mean I told her I was buying a hobart h 140 :D so I got ????..???
 
Man it don't take long to bury a thread pretty deep .
Would you mind loading a few more pics.
Like how you get air in. And your tunning . I'm just fasinated with this build.
 
So a while back when I first saw Bronc76's design, I thought it was fantastic. I'm sitting around home on medical leave without much to do, so I gleaned as much info as I could find in this thread, took some measurements of my own 55 gallon drum awaiting conversion into a UDS, did a little math with the various online smoker spreadsheets, then plugged it all into Google's free CAD software package called SketchUp, and here's what I came up with:

d027d3fa.png


I took a few liberties with Bronc's original design, but did my best to come up with an actual usable model that I could someday fabricate from, or at least use as a starting point. I checked all airflow measurements against multiple calculators online so I imagine this should be a workable design. (Feel free to speak up if you notice anything amiss!)

Let's start with the firebox. I used Bronc's original dimensions, 18" x 18" x 20".

551bf216.png


The calculators suggest 19.44 sq in of intake vents to feed the fire. I went with four 2" x 3" openings, or a max of 24 sq. in. if wide open.

d64ce0c4.png


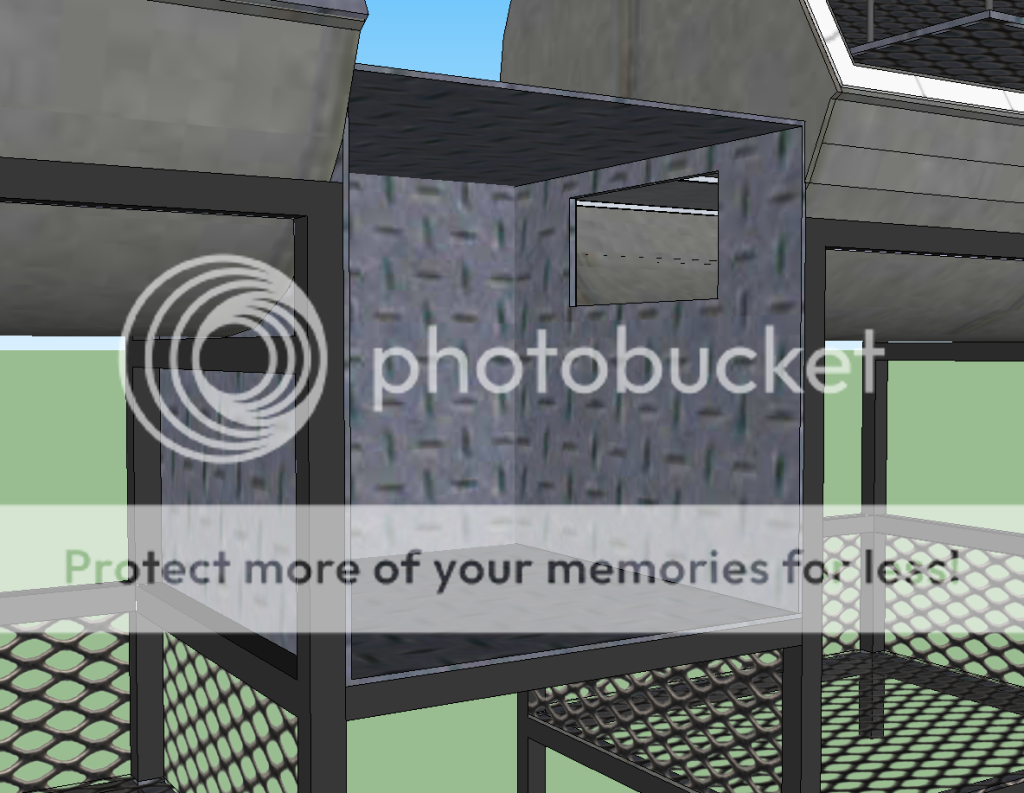
In the shot below, I removed the firebox door so it was easier to see the feed from firebox to cooking chamber. Calculators suggest 51.84 sq. in. I went with a 5" x 10.5" opening, or 52.5 sq. in. There's another just like it on the opposite side for the left hand drum.

779e1fd0.png


Looking into the right drum through the firebox opening:

5428f343.png


More on the way...
 
Last edited:
Here's the inside of one of the cooking chambers. The two racks pullout and have stoppers. To lift them out completely for cleaning, you'd have to first pull up on the right handle and side it out from under the stopper.

85b29510.png


5e9a5ea7.png


In the next couple of shots, I removed the wall of the right hand drum to better see the interior. Bronc used a reverse flow design, so hopefully you can see all the layers. On the bottom is the chamber leading heat and smoke from the firebox. The baffle plate simply stops short of the end of the drum to create the reverse flow opening. On the model, this is a 21.25" x 2.5" opening, or 53.125 sq. inches -- that's just slightly larger than the 52.5 sq. in. opening feeding from the firebox, so just about perfect. I imagine the reverse flow plate being removable for cleaning, so it's just resting on rails on the front and rear walls of the drum, but perhaps in the real world that won't be a tight enough fit.

a4801343.png


Below is a reverse shot of the same for a better view. Above the reverse flow plate is another level of rails that support free-sliding tuning plates. I show them here with thumbholes for sliding and adjusting, if needed. These are each 9" across.

abf4c075.png


Closeup of the tuning plates:

57639d8c.png


Cont...
 
Bronc said he used a 4" diameter chimney, so I did the same on the model. The calculators want it to be 25.8" long but Bronc mentioned he wished they were taller. I'm not sure how tall his are on the real deal, but I went with an even 36" -- should be more than enough draft for the rest of the flow design. I intend to put some regular turn dampers on each stack so you can shut off one tank completely if you like. I also added a small shelf which I imagine would be held in place by rebar at just the right height for digital thermometer bases.

c31d43ae.png


Bronc said he put a 1" oven gasket around the door openings so you can see that as the white band around the cook chamber openings. I didn't model any kind of latch on the cooking chamber doors but I'm sure they'd be helpful for an airtight closure. I didn't drop my chimney in as far as Bronc did, but probably couldn't hurt to for maximum flow over the cooking grates. I also worked in a 2" drainpipe and ball valve on the far end of each cooking chamber for easier cleaning and draining.

6ac30116.png


Can't forget the most important feature!

0b3a64e4.png


Huge thanks to Bronc76 for his concept! I'm going to get on building myself one of these bad boys as soon as I can!

5aaa10cb.png


Google SketchUp CAD software: http://sketchup.google.com/download/

Measurement Summary

Firebox: 18" x 18" x 20"
FB Air Intake: Four 2" x 3" rectangles = 24 sq. in.
FB to Cook Chamber opening: 5" x 10.5" = 52.5 sq. in.
Reverse Flow baffle opening: 21.25" x 2.5 = 53.125 sq. in.
Chimney: 4" diameter, 36" tall (about 5" inside cooker)
Total Length: 7 feet, 3 5/8"
Height to Cooking Grate: 2 feet, 7 5/8"
Top of Chimney: 6 feet, 5 5/8"
 
Last edited:
The mock up and the real deal look amazing!
Where does one find those exhaust dampers?
Is there a holy grail of smoker parts that I don't know a out.
Again this is fantastic!
 
The mock up and the real deal look amazing!
Where does one find those exhaust dampers?
Is there a holy grail of smoker parts that I don't know a out.
Again this is fantastic!

The stack dampers are pretty easy to make if you have a decent way to cut sheet metal. The main part is a circle about 1/4" wider in diameter than the stack pipe itself, with a little extra tab that sticks out so you can tac weld a rod to it which runs down the stack and passes through some guides. Turn the handle and the damper swings open or shut.

31e30d49.png
17dc3745.png
 
what are tuning plates for?

They're usually used in regular cross-flow smokers to spread out the heat more efficiently or help prevent hot spots. Reverse-flow design is supposed to do most of that work, but I think Bronc put them in because of the unusual two-sided design as an extra measure just in case.
 
WOW Foxfire! That is farken awesome! I can't believe you did that. You got some skills. I can tell you I have cooked on mine like 4 times now and it works awesome. I have cooked 2 briskits 2 butts and 12 racks of ribs and still had room left over. I can cook on one side or both and can control temps on either side seperatley. It is very frugal on the wood consumtion as well.
 
Looks Like I need to grab a couple more drums from work. My neighbor wants a pit, I think I'll give him mine and make one of these for myself!
 
Thank you everybody for all the kind words. The pit really does work great. As far as the tuning plates go i put them in just in case I needed to adjust them to even out pits. I havent had to move them. Leaving them open 5" on the one end has worked out perfect so far. On the cad drawing I did notice foxfire stopped the smokestack in the pit at the level of the top rack. That would make it loose too much heat. I ran my smoke stack all the way down to within 2" of my bottom rack and just have a cutout in top rack that goes around it. Here is some Pork butts I did over the weekend. In this pic the top rack is out and you can see the smoke stack in relation to the bottom rack.
 

Attachments

  • Burbank-20120927-00010.jpg
    Burbank-20120927-00010.jpg
    38.1 KB · Views: 225
These came out better than any butts Ive done so far.
 

Attachments

  • Burbank-20120927-00012.jpg
    Burbank-20120927-00012.jpg
    66.7 KB · Views: 226
I also wanted to let you guys know, a full size aluminum sheet pan fits right under the bottom rack on top of tuning plates and works as a drip pan. I have a two inch deep 9"x13" pan on top of that that i fill with water and apple juice when I smoke. Keeps it nice and moist inside.
 
Back
Top