S
Smiter Q
Guest
Hi All,
Well on Thursday morning I posted my new chicken wing recipe with photos. Seems the WINGS and how I made them were a BIG HIT to the Brethren.:thumb::becky:
This is the link to that thread:
http://www.bbq-brethren.com/forum/showthread.php?t=90702
And a photo of how the wings looked:

I made mention that I used a homemade MAYONNAISE, and that if anyone wanted the recipe to let me know. Well to my surprise, I got no less then 15 requests just for the mayo in that thread... so I decided to do a "MAYO" tutorial for those that asked. Now I am still kind of new in these parts, and I do not remember seeing any threads yet for a condiment recipe tutorial. So I hope that this thread is acceptable to post here in Q-talk, and that by posting it I am not penalized to the fearful land of the dreaded vegetarians!:tape:ray::tsk: After all, it is an integral part of the chicken wing recipe!:becky::clap2:
As in most things, nothing beats "HOMEMADE,"and this definitely holds true with mayonnaise. I enjoy the excellent photo guides here at the site myself, and that is how I am making this little presentation. I hope it is helpful, and I am glad to answer any questions.
A Note about EQUIPMENT: I use an immersion type blender, also known as a stick blender. I used to think they were for just chefs, but they are easy to use. Once you start using it you will be amazed how helpful they are. Prior to the stick blender I tried making mayo in a regular blender with limited success. 50% Of the time I just could not get it to set, or the blender speed started to cook the mayo. VERY FRUSTRATING that was, and it took the joy of attempting it away pretty fast. :mad2::mad2: Last Christmas I received the stick blender, and it was a whole new ball game! Ok.. so now on to the recipe and instructions.
The Ingredient list:

STEP ONE:
In the blender container put in all the ingredients, EXCEPT THE OIL, listed above. Just lay the ingredients gently on top of each other. Have everything lined up ready to go. If you take too much time with it, the mayo may not set. You do not have to crazy rush, just have everything laid out.. so you are not looking for stuff. Make note of where the ounces are at. In my photo, you can see I am at the three ounce mark. This is important, because you will be adding 8 ounces of oil to it. Easier to use the measurements on the container as I do, as you also do not dirty another measure cup.:becky:

STEP TWO:
Simple... just add your 8 ounces of oil.... gently. You do not want to disturb too much what is in there. Why? Not too sure... but gentler is better!:heh:

STEP THREE:
Now the fun part. Put the immersion blender into the cup. Hold cup in one hand and blender in other. Press the start button and hold the blender on the bottom for 5 seconds or so. Then start to gently lift the blender straight up an inch.. than down an inch. Do this a couple of times, than go two inches up and down. Do this a couple of times then keep repeating until you are at the top. Whole process takes less than a minute. Sometimes only 30 seconds or so. Have a small spoon ready to scrape the top of the blender off into the measure cup. If need be after all is mixed, turn blender on at top and go straight to the bottom and up a couple of times more. IMPORTANT... keep blender in mixture or it will go all over... trust me:doh::doh::doh:.

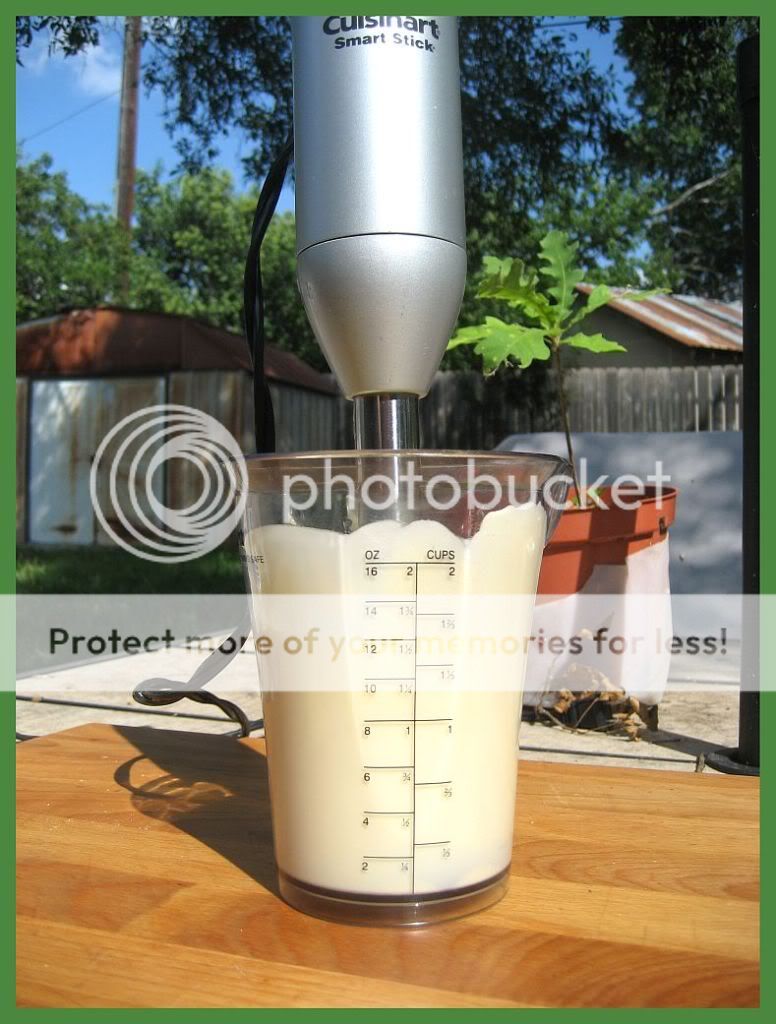
STEP FOUR:
You should now have something that resembles this photo. Pull the blender stick out slowly, take your small spoon and scrape the mayo off of the shaft.
STEP FIVE:
Have a jar ready to put your mayo in. I use a 2 cup wide mouth mason jar. I find it easier to put the mayo in, and I like the nostalgic look. Reminds me of when more canning and home prep was done in the kitchen!:thumb::becky: Folks asked me in the wing thread how long does this mayo last. Minimal a week, at the outreach... maybe two and 1/2. This part I will let you decide upon. As for me, I am not a germaphobe.. and do not give it too much thought... and definitely no fear. Just be smart. Two teaspoons of vinegar and little lemon makes this acidic and prolongs the life of the product for at least the amounts I listed.

IN CONCLUSION:
Hope this was a helpful instructional photo guide. My GF and I really like this mayo, and we will never go back to the store brought brands that have a 2 year expiration date! After you make it once or twice, you can tweak it to your own likings. You can add a little cayenne or dry mustard. I always add the onion powder, and sometimes one of the other two options. You may decide you like more salt. I do not, but my GF does. Tailor the mayo to your taste, but if you follow this guide you will be starting ahead of the pack to begin with!
A couple of folks did not seem to know what an immersion blender was. I did not either at one time. So I thought I would add a photo of what one looked like.
They are $30 at Amazon, freight paid by them. It is a great investment, and I find myself not using my other blender anymore.... except for Margaritas.:thumb::clap2::becky: When making purees or blended soups, instead of the messy transfer from pot to the blender and back.. I just put the stick in for a few seconds.. and all that I need to blend is done.

Thanks for reading!
If you make this or the wings, please let me know how it turns out for you!:thumb:
Blessings to your day!:becky::angel:
Well on Thursday morning I posted my new chicken wing recipe with photos. Seems the WINGS and how I made them were a BIG HIT to the Brethren.:thumb::becky:
This is the link to that thread:
http://www.bbq-brethren.com/forum/showthread.php?t=90702
And a photo of how the wings looked:
I made mention that I used a homemade MAYONNAISE, and that if anyone wanted the recipe to let me know. Well to my surprise, I got no less then 15 requests just for the mayo in that thread... so I decided to do a "MAYO" tutorial for those that asked. Now I am still kind of new in these parts, and I do not remember seeing any threads yet for a condiment recipe tutorial.
So I hope that this thread is acceptable to post here in Q-talk, and that by posting it I am not penalized to the fearful land of the dreaded vegetarians!:tape:ray::tsk: After all, it is an integral part of the chicken wing recipe!:becky::clap2:As in most things, nothing beats "HOMEMADE,"and this definitely holds true with mayonnaise. I enjoy the excellent photo guides here at the site myself, and that is how I am making this little presentation. I hope it is helpful, and I am glad to answer any questions.
A Note about EQUIPMENT: I use an immersion type blender, also known as a stick blender. I used to think they were for just chefs, but they are easy to use. Once you start using it you will be amazed how helpful they are. Prior to the stick blender I tried making mayo in a regular blender with limited success. 50% Of the time I just could not get it to set, or the blender speed started to cook the mayo. VERY FRUSTRATING that was, and it took the joy of attempting it away pretty fast. :mad2:
:mad2: Last Christmas I received the stick blender, and it was a whole new ball game! Ok.. so now on to the recipe and instructions.The Ingredient list:
STEP ONE:
In the blender container put in all the ingredients, EXCEPT THE OIL, listed above. Just lay the ingredients gently on top of each other. Have everything lined up ready to go. If you take too much time with it, the mayo may not set. You do not have to crazy rush, just have everything laid out.. so you are not looking for stuff. Make note of where the ounces are at. In my photo, you can see I am at the three ounce mark. This is important, because you will be adding 8 ounces of oil to it. Easier to use the measurements on the container as I do, as you also do not dirty another measure cup.:becky:
STEP TWO:
Simple... just add your 8 ounces of oil.... gently. You do not want to disturb too much what is in there. Why? Not too sure... but gentler is better!:heh:
STEP THREE:
Now the fun part. Put the immersion blender into the cup. Hold cup in one hand and blender in other. Press the start button and hold the blender on the bottom for 5 seconds or so. Then start to gently lift the blender straight up an inch.. than down an inch. Do this a couple of times, than go two inches up and down. Do this a couple of times then keep repeating until you are at the top. Whole process takes less than a minute. Sometimes only 30 seconds or so. Have a small spoon ready to scrape the top of the blender off into the measure cup. If need be after all is mixed, turn blender on at top and go straight to the bottom and up a couple of times more. IMPORTANT... keep blender in mixture or it will go all over... trust me:doh::doh::doh:.
STEP FOUR:
You should now have something that resembles this photo. Pull the blender stick out slowly, take your small spoon and scrape the mayo off of the shaft.
STEP FIVE:
Have a jar ready to put your mayo in. I use a 2 cup wide mouth mason jar. I find it easier to put the mayo in, and I like the nostalgic look. Reminds me of when more canning and home prep was done in the kitchen!
:thumb::becky: Folks asked me in the wing thread how long does this mayo last. Minimal a week, at the outreach... maybe two and 1/2. This part I will let you decide upon. As for me, I am not a germaphobe.. and do not give it too much thought... and definitely no fear. Just be smart. Two teaspoons of vinegar and little lemon makes this acidic and prolongs the life of the product for at least the amounts I listed.
IN CONCLUSION:
Hope this was a helpful instructional photo guide. My GF and I really like this mayo, and we will never go back to the store brought brands that have a 2 year expiration date! After you make it once or twice, you can tweak it to your own likings. You can add a little cayenne or dry mustard. I always add the onion powder, and sometimes one of the other two options. You may decide you like more salt. I do not, but my GF does. Tailor the mayo to your taste, but if you follow this guide you will be starting ahead of the pack to begin with!
A couple of folks did not seem to know what an immersion blender was. I did not either at one time. So I thought I would add a photo of what one looked like.
They are $30 at Amazon, freight paid by them. It is a great investment, and I find myself not using my other blender anymore.... except for Margaritas.:thumb::clap2::becky: When making purees or blended soups, instead of the messy transfer from pot to the blender and back.. I just put the stick in for a few seconds.. and all that I need to blend is done.
Thanks for reading!
If you make this or the wings, please let me know how it turns out for you!:thumb:
Blessings to your day!:becky::angel:
Last edited by a moderator:
