120 Gal Tank build thread...

Day 3

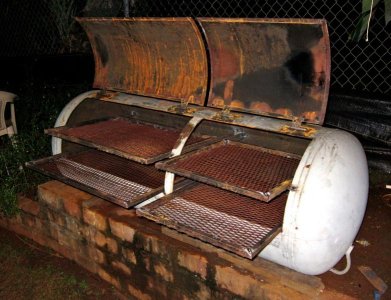
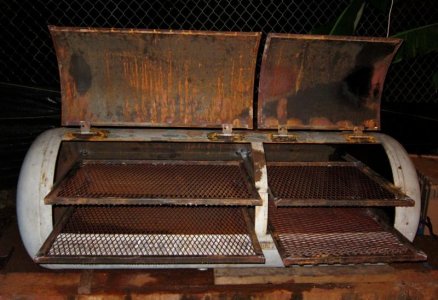
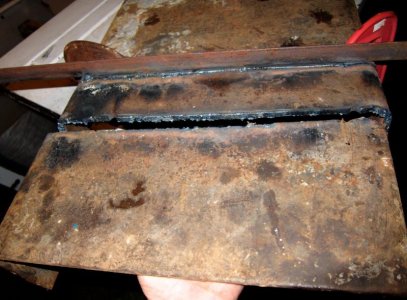
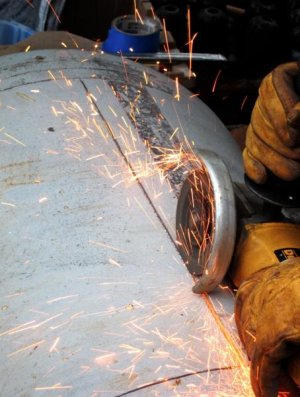
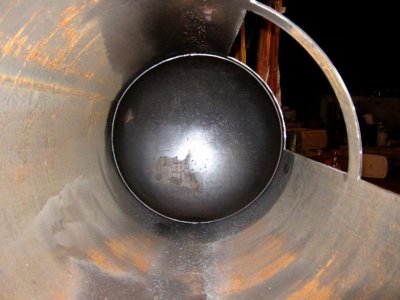
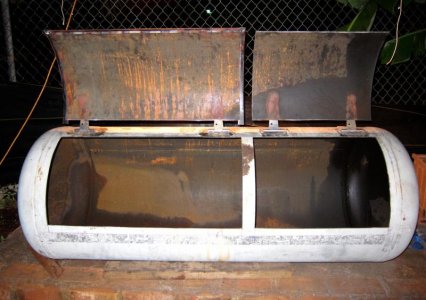
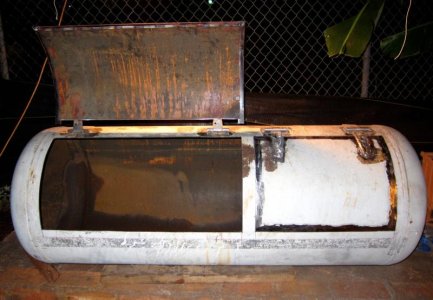
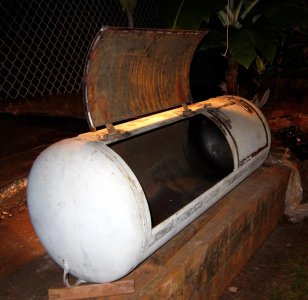
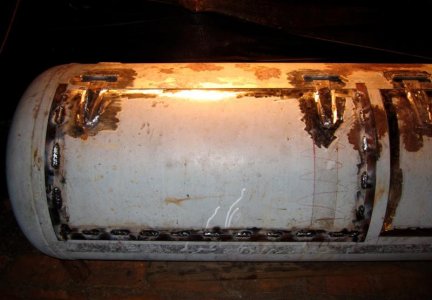
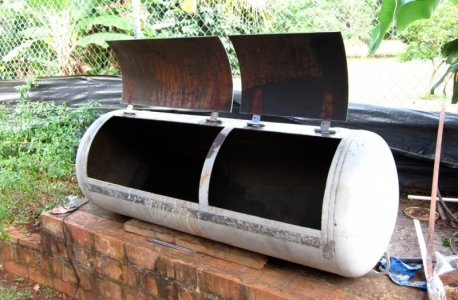
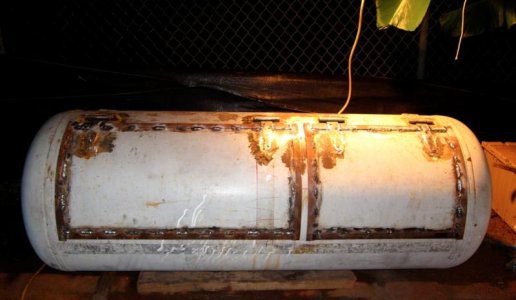
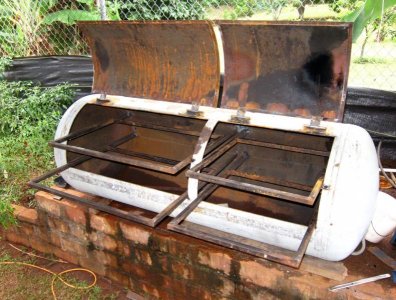
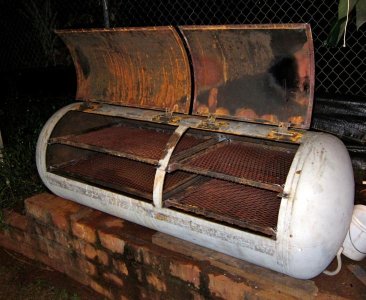
Hey everyone. Today was a good day.. started a bit late again (bout 2:00) I had a friend come over and give me a hand with the build, we got quite a bit done. First, we got the other set of hinges aligned and tacked on. Then we cut out the doors which came out pretty cool ... so far so good. :thumb: Once the doors were cut and the hinges were OK'd for alignment I finished welding them on. Had to clean the paint off the edges of the doors to weld on the door overlaps. I was planning on using 1.5" flat stock for this but I realized that I had some 1" already left over from a last build and thought "free is good right?!?!" so thats what I threw on. Left them 5/8" proud, so that should give me enough space for a decent seal by itself and hopefully should fit a high heat gasket to seal this bad puppy up. Got as far as 3 sides of the big door and called it quits for the night. Man I haven't done this in a long time... took a little while to get my welding feel back.

I want to go pickup some 3/4 square hollow section or 1" angle iron tomorrow for the trays and get those started as well as the sliding supports for them. If time allows I'll also try get the handles for the doors fabricated and mounted. The only thing holding me up is getting the 1/4" Sheet steel for the firebox. At about $325 a sheet locally, it's DEFINITELY the bulk of my budget... Steel is so expensive out here. I cant even THINK about stainless with my budget!! Pisses me the fark off. :mad:

Anyways guys I'll post another update tomorrow after another day of building.. God willing.
 

Attachments

  • screen-capture-238.jpg
    screen-capture-238.jpg
    45.9 KB · Views: 1,973
  • screen-capture-244.jpg
    screen-capture-244.jpg
    54 KB · Views: 1,963
  • screen-capture-243.jpg
    screen-capture-243.jpg
    69.1 KB · Views: 1,959
  • screen-capture-242.jpg
    screen-capture-242.jpg
    66.6 KB · Views: 1,966
  • screen-capture-241.jpg
    screen-capture-241.jpg
    48.7 KB · Views: 1,964
  • screen-capture-240.jpg
    screen-capture-240.jpg
    53.8 KB · Views: 1,964
  • screen-capture-239.jpg
    screen-capture-239.jpg
    54.1 KB · Views: 1,971
  • screen-capture-237.jpg
    screen-capture-237.jpg
    79.5 KB · Views: 1,971
I'm glad you're still here!:p Looking fwd. to your build...all these ideas that are being posted are great, i actually understand them!:crazy:
I know you won't so I will, for some of the new guys, Pharsty has "little" experience in not going "boom"... after all, he did build these!!

http://www.bbq-brethren.com/forum/showthread.php?t=36553

Haha... Thanks Keale! I know you got my back bro. I've done one or two grills since then too. I should look for those pics and throw them up here. How was the birthday man? Hope you had a good one! :dancer: :becky::thumb: lol

Cheers
 
Phrasty this is exciting stuff for me. I do have to say you have an ambitious time frame to build it!
I built mine this past winter. Was only able to work on it on the weekends, mostly Saturdays. It took me 3 months of Saturdays to finish mine. I built mine as a reverse flow type...works great. I have three thermometers on it. On average, the top rack runs about 20-25 degrees warmer than the bottom.
As far as the tires on the trailer...no worries. I have pneumatic tires on mine very close to the firebox...the sun makes them hotter than the fire.

I do have one bit of advice to pass on though... I used exactly the same hinges on my doors when I started. They are not heavy enough.. I ultimately made my own using some 5/8" round stock and pieces of metal fence post. Not only are they strong, they added to the overall appearance of a heavy smoker!

downsized_0516001732a1.jpg


Feel free to message me if I can help...
Steve
 
Haha... Thanks Keale! I know you got my back bro. I've done one or two grills since then too. I should look for those pics and throw them up here. How was the birthday man? Hope you had a good one! :dancer: :becky::thumb: lol

Cheers


Wow! I checked out the thread..... This guys an artist! :thumb::thumb::thumb:
 
Coming along great. What are the dimensions of your tank?
 
Looks like an all day rain today. Don't know if I'm going to be able to do much work. Hopefully it'll clear up.. :pray:

Cheers
 
Phrasty this is exciting stuff for me. I do have to say you have an ambitious time frame to build it!
I built mine this past winter. Was only able to work on it on the weekends, mostly Saturdays. It took me 3 months of Saturdays to finish mine. I built mine as a reverse flow type...works great. I have three thermometers on it. On average, the top rack runs about 20-25 degrees warmer than the bottom.
As far as the tires on the trailer...no worries. I have pneumatic tires on mine very close to the firebox...the sun makes them hotter than the fire.

I do have one bit of advice to pass on though... I used exactly the same hinges on my doors when I started. They are not heavy enough.. I ultimately made my own using some 5/8" round stock and pieces of metal fence post. Not only are they strong, they added to the overall appearance of a heavy smoker!

downsized_0516001732a1.jpg


Feel free to message me if I can help...
Steve


Thanks Steve. The hinges seem ok for now, But i agree with you... they could be a bit more "solid" Ill probably try to fab. some later and put them on. Ive been trying to fond out... what kind of heat do you get with your Reverse flow? How hot can you get it? Can you hold steady 300's with that thing? Let me know Bro... Thnkas

Cheers
 
I have a pit calc that works very well. I oversize fire boxes for reverse flow as well as the box to chamber hole and exhaust. It gives the option to go hotter.

Looks good so far but why go with red brick? Use fire bricks to avoid off gassing and reflect heat instead of holding heat. My last build is insulated with 2" and 1.25" fire bricks. You can pm me if you want pointers on it. My build is way more efficient and runs much cooler on the outside because of the bricks.
 
So, it's been raining on and off since friday. Didn't really get anything done on Saturday but I think yesterday and today have been pretty productive.

• Finished up the seals on the doors (have to finish up the welding on them)
• Cut and welded up the frames for the food grates out of some 3/4 square hollow section
• Welded 3/4 16ga expanded metal onto the food grates.
• Cut and mounted the slide guides for the food grates.

Had some probs with the doors closing after welding on the seals, so that took a bit of time to remedy, I have to clamp and torch the lids to get bend fit I wanted back.

But overall, I think its coming along. Starting to look like a smoker now. Should be getting some scrap metal that I can use for the firebox this week. Got it sourced through a friend so hopefully I won't have to buy a full sheet of the stuff! :thumb:

Well I guess that's about it. Please tell me what you guys think so far.


Cheers
 

Attachments

  • screen-capture-248.jpg
    screen-capture-248.jpg
    48.2 KB · Views: 1,879
  • screen-capture-253.jpg
    screen-capture-253.jpg
    95.2 KB · Views: 1,881
  • screen-capture-249.jpg
    screen-capture-249.jpg
    73.9 KB · Views: 1,882
  • screen-capture-250.jpg
    screen-capture-250.jpg
    83.8 KB · Views: 1,876
  • screen-capture-251.jpg
    screen-capture-251.jpg
    74.9 KB · Views: 1,878
I have a pit calc that works very well. I oversize fire boxes for reverse flow as well as the box to chamber hole and exhaust. It gives the option to go hotter.

Looks good so far but why go with red brick? Use fire bricks to avoid off gassing and reflect heat instead of holding heat. My last build is insulated with 2" and 1.25" fire bricks. You can pm me if you want pointers on it. My build is way more efficient and runs much cooler on the outside because of the bricks.

I wish I could get the fire brick but they are really hard to find out here and quite pricey.. that's the main reason.

Cheers
 
Thanks Steve. The hinges seem ok for now, But i agree with you... they could be a bit more "solid" Ill probably try to fab. some later and put them on. Ive been trying to fond out... what kind of heat do you get with your Reverse flow? How hot can you get it? Can you hold steady 300's with that thing? Let me know Bro... Thnkas

Cheers

300 is no problem at all. I usually cook between 225-250 with a good bed of coals and a small fire with the intake choked down to about 1/4 open.
When I start the smoker, I'll let the temp get up to 375-400 degrees to clean it out a bit, then bring it back down to my cooking temp.
Yours is looking great! :thumb:
 
i noticed you had the grates what i would call upside down, not trying to tell you how to do you build but i would put the square down and on the inside of you angel iron you could put a small pice of rod 1/2 way out to keep from pulling the grate out to much, then for removal just lift up on the back of the grate a little and you can fully remove, Thats the way I make mine just I would hate to see a grate full of food hit the dirt bc it was pulled out to much
 
Nice build, Phrasty. The point made about the safety of making sure the LPG is cleared is a great segment. There are places up here that will basically "steam clean" the interior of the tank for a small price.

Keep up the great work!
 
Hi everyone. Poured with rain all day today.. Didn't really get much done. I did get a new cutting tip for my oxy-fuel torch... was messing with it a bit to see if I could get the hang of cutting with it... Yah... not so easy. Any of you vets out there have any tips on torch cutting? Tip height? Trade secrets as to what to look for?? lol :wink:. Eh... Just practice I guess. I ended cutting some steel I had to size for the firebox baffle. Here's a pic of my cuts... Don't laugh!!! (too hard):confused:

hardy02ttu Looks good man, something to be proud of!

Thanks :thumb:

2K1TJ Coming along great. What are the dimensions of your tank?

Thanks.. The tank itself is 25" dia. & 84" long. 3/16th thick.


Phubar Dang...you're quick bro'!
Very nice work!

Thanks Phubar... Just trying to git her done, get some bigger jobs, throw some PHood on and make some PHunds :thumb:


Stevesonfire! 300 is no problem at all. I usually cook between 225-250 with a good bed of coals and a small fire with the intake choked down to about 1/4 open.
When I start the smoker, I'll let the temp get up to 375-400 degrees to clean it out a bit, then bring it back down to my cooking temp.
Yours is looking great!

Good to know. I'm thinking to make the vents a bit oversized to get the heat flowing a bit better. That be the right train of thought for higher temps, correct?


Chef Country i noticed you had the grates what i would call upside down, not trying to tell you how to do you build but i would put the square down and on the inside of you angel iron you could put a small pice of rod 1/2 way out to keep from pulling the grate out to much, then for removal just lift up on the back of the grate a little and you can fully remove, Thats the way I make mine just I would hate to see a grate full of food hit the dirt bc it was pulled out to much

Thanks for the tip... I had them "upright" initially but decided I liked the way it looked "upside-down" a bit better, so I welded the grate pretty well to the frame. I do a lot of individual sausages so the square bar would also act as a lip so they wouldn't roll off. It's all fun and games tim you lose a sausage... :doh: you know what I mean.... lol. It will be reversible tho. So I can always flip it back. As for the tray tipping I am going to attach an upper support so that when the tray is out it will be held down at the back with this tab welded on the upper section at the front of the tray slide supports....Does that make sense?? :confused::crazy:


txschutte Nice build, Phrasty. The point made about the safety of making sure the LPG is cleared is a great segment. There are places up here that will basically "steam clean" the interior of the tank for a small price.

Keep up the great work!

Thanks Bro. No such luck here... and if you do find someone to clean the tank for you it will be done at a not so small price. :shock: You have to improvise. It works. The tank is cut... I'm still here. :thumb:. In all seriousness tho. I post what I did NOT as a tutorial or advise on "How to" but rather simply... How I do it. Again I will emphasize... Cutting a gas cylinder at all is just not recommended. But if you do it... do it at your own risk. I will also add on a safety note that I cut the tank as soon as the water is emptied. If you wait too long there is a chance that the gas will start leeching out of the metal back into the tank.


deguerre I can see the Swan already. Looking good Phrasty!


Thank you! :thumb::becky:


I'm also building a grill for my neighbor. So I might throw up some pics of that build in here too rather than making another thread. When it rains it pours... 2 builds going at once.


Cheers!!
 

Attachments

  • screen-capture-254.jpg
    screen-capture-254.jpg
    77.6 KB · Views: 1,620
Great stuff Phrasty! I'm really impressed so far, and that includes everyone elses suggestions and observations. You all got me feeeling like I need to buy a welder.

And yesterday, I was driving on the freeway.. took an overpass, and there was this huge metal scrap area full of LPG Tanks of all sizes... about 100 of them.. I nearly crashed!:doh:

Cheers!
 
As for the tray tipping I am going to attach an upper support so that when the tray is out it will be held down at the back with this tab welded on the upper section at the front of the tray slide supports....Does that make sense?? :confused::crazy:

yeah that sounds like it will work well, that will keep the tray from tiping out and thats all i was worried about, I might have to remodify mine now, The grates look fine the way they are and will work good as a holding rail like that.
 
Great stuff Phrasty! I'm really impressed so far, and that includes everyone elses suggestions and observations. You all got me feeeling like I need to buy a welder.

And yesterday, I was driving on the freeway.. took an overpass, and there was this huge metal scrap area full of LPG Tanks of all sizes... about 100 of them.. I nearly crashed!:doh:

Cheers!

Thanks Bro... Knowing you made something is always a great feeling...

Cheers
 
Back
Top