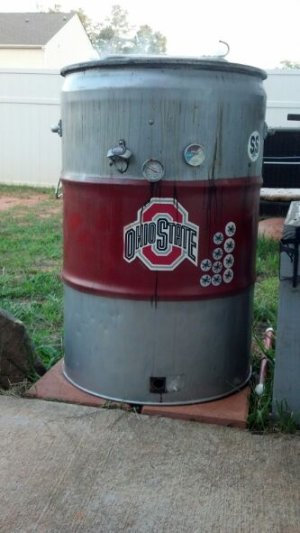
• working on DNS.. links may break temporarily.
Did you burn out the drum yet? I know when I burnt out my drum yesterday, the lid warped, and now I will need a new one. Side note; since your drum contained food product, beware the dreaded liner, as most food drums have a real PITA red or tan liner that can drive you nuts.


The first drum I burned out I warped the lids as well. The 2nd time around, I put the lid over the barrel for a few 4 or 5 minutes as soon as the paint started to turn, I took it off for 10 minutes then put the other side to the flames until the paint started to turn.

After cooled, wire brush and wire wheel easily did the rest with no warp. This is a lesson we all learn the hard way. :doh:

Take care!

Ray
 
Holy cow. I was told a few minutes and a match would at least get the glue out of the drum. Nope, and the black smoke, WTF. :shocked: I had to smother it out today and need to bring it out into the country to finish.

Question to the people who welded theirs. Can you mig it or can you tig it? If you can mig it, how did you set it up? Thanks.

I mig'd all mine. I have a couple small Lincoln's a 100 and 140.

I've used .020 and .030 wire on mine. Depends on what you're welding to the drum. Around the side boxes of the BUFORD's I've built, I spot welded the cover plates to the drum and then filled in the seams with Rutland RTV.
 
Mig here too. .023 wire, clean the paint off where your going to weld just like any project, clean the paint off for the ground and have at it. I -welded on 2-2inch pipe elbows for the inlets. I didn't take the time to make it look real nice, as I was in a hurry and who cares, it's a UDS.
g688.JPG

gqp5.jpg
 
Welcome Abscam!
I'm no help with that one. But I have to ask... why did you leave the lid on to do a burn out of the barrel?
I've seen this question more than once, I warped a lid and was able to straighten it out by clamping it to the drum with 3 pipe clamps and heating it red with a torch to stress relieve it , the lid stayed flat after cooling down.
 
  • Thanks
Reactions: RT
I have read through the first 300 and the last 100 pages and only have one question. Has anyone seen any difference between using a square or a round fire basket? I have a welder and can easily whip a square one up but if round is better then I will go that route. Thanks
 
I am new here and working on building my first UDS. In addition to Rockycoon's question I have read where people have displaced the center of their fire basket with a cylinder or pipe. Does it really make a difference? Is it worth trying?
 
I have read through the first 300 and the last 100 pages and only have one question. Has anyone seen any difference between using a square or a round fire basket? I have a welder and can easily whip a square one up but if round is better then I will go that route. Thanks

I have a square one and it works great!

20130726_175355.jpg
 
Square, round, I don't think it matters. Mine is an old milk crate, put some legs on it and some hardware cloth to keep bricks from leaking out and go to town.

Paul B
SS UDS
 
My new UDS

I'm a little late getting these posted... ok, about 3 weeks late; but here's my new UDS. A friend of mine put it together and did a great job I think. These shots were taken just after the seasoning burn.


Based on experience with his UDS, my friend made mine with a deflector shield.


The basket is large enough to hold a full 20lb back of charcoal.

 
hello this is Buck

pictures of Buck from K.I.S.S. to what he's grown into today
jpg.gif

jpg.gif

jpg.gif
 

Attachments

  • dads phone 11-11-13 5508.jpg
    dads phone 11-11-13 5508.jpg
    41.5 KB · Views: 835
  • dads phone 11-11-13 5521.jpg
    dads phone 11-11-13 5521.jpg
    36.3 KB · Views: 832
  • dads phone 11-11-13 5528.jpg
    dads phone 11-11-13 5528.jpg
    27.6 KB · Views: 825
Last edited:
Been Studying this monster thread for a few weeks now. Wow, what a compilation! Anyway, I went ahead jumped in and put together my own version. Got the Barrel for free. The inside was lined w/ the translucent brown coating. Removing that was by far the hardest part. Otherwise everything else was pretty simple. Didn't get pics of the coal basket. I'll post pics of it later. It is a store-bought basket (from Garden Ridge) mounted to a cheap disposable charcoal grill from Wally World. The basket is about 11" to 12" in diameter and about 9" to 10" tall. My first seasoning burn was good for about 7.5 hours. The first hour was just dialing in the temp and getting it stabilized. So really it was only good for about 6.5 hours. I plan to build another larger basket, for longer burns. Also plan to 'personalize' a little more....

Thanks for all of the insight, brethren.

-JEG-

20131110_090517.jpg


20131110_090528.jpg


20131110_090537.jpg


20131110_090552.jpg
 
Nice looking drum. I started on mine just have to get the expanded metal for my basket and get a rack. been looking for a weber but those are hard to find here so just going to start with a single rack and upgrade later.
 
I'm a little late getting these posted... ok, about 3 weeks late; but here's my new UDS. A friend of mine put it together and did a great job I think. These shots were taken just after the seasoning burn.


Based on experience with his UDS, my friend made mine with a deflector shield.


The basket is large enough to hold a full 20lb back of charcoal.


Great looking UDS! Question: what length of pipe did you use for the intake risers? Does it give you enough airflow during cooks?
 
I am guessing those are 18" risers like everyone else, including me, uses.

It has been said that the elbows cut the air intake by as much as 50%. I do not have any issues with mine but on windy days, mine is pretty much a no go. I thought about loosing the risers and adding more exhaust to mine.

Mr. Bludawg, I believe it was him, has posted numerous times the math involved in figuring intake and exhaust.
 
I seem to recall that they are 18" black pipe. I'm going to remove the heat defuser first to see if it fixes my draft problem. It is large, and I can see it really slowing the air flow. If it doesn't fix the problem, I'll be looking at reworking the inlets. I'll probably go to using the elbows on the back only on really windy days. But I think without the defuser and the elbows off the back, it will have sufficient air flow. I'll be practicing with a chicken again this weekend; I'll post the results.
 
I am guessing those are 18" risers like everyone else, including me, uses.

It has been said that the elbows cut the air intake by as much as 50%. I do not have any issues with mine but on windy days, mine is pretty much a no go. I thought about loosing the risers and adding more exhaust to mine.

Mr. Bludawg, I believe it was him, has posted numerous times the math involved in figuring intake and exhaust.
Some people extend the lever of the valve up to where it is more easily reached. See this post.
http://www.bbq-brethren.com/forum/showpost.php?p=524930&postcount=11
Perhaps someone can post a photo.
Found one.
newvds001wt3.jpg
 
Back
Top