• working on DNS.. links may break temporarily.
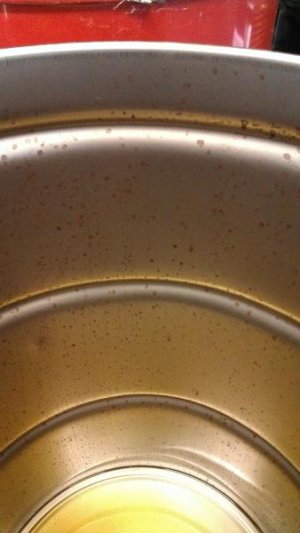
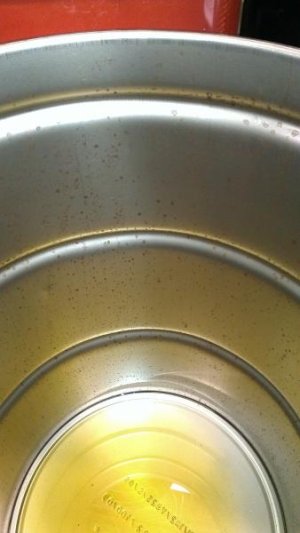
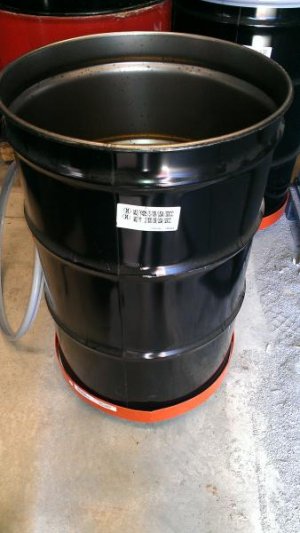
So my boss man decided to let me have three drums from work for compensation for a bad TDY trip. As far as I know, these were bought new and we only used them to drain and store hydraulic fluid for a giant pump we have while we moved it, then put the oil back in the pump. These have been fairly empty since then, which was a few years ago. My question is about the lining. Just from looking at it (and the beginnings of rust spots) I'm assuming that these have no liners? I just want to be sure of what I'm looking at because I have no idea what the different linings might look like. I still plan on doing the burning, just to get the old oil and whatever else cleaned out, but any suggestions would be great. Thanks guys.
 

Attachments

  • IMAG1561.jpg
    IMAG1561.jpg
    25.4 KB · Views: 708
  • IMAG1562.jpg
    IMAG1562.jpg
    24.3 KB · Views: 708
  • IMAG1563.jpg
    IMAG1563.jpg
    31.6 KB · Views: 709
put a few of your base inlet holes, then burn baby burn!

I agree. I burnt one without base holes and another with and the one with seemed like it burnt hotter and faster.

Drink a beer and watch the show!! :mrgreen:
 
What they said.. The drums are clean with no liner so burn em and build em.
 
oil drums that I've seen looking like yours have a thin coat of clear rustproofing or they would be solid rusted, they burn out and wire brush easy
 
Last edited:
I fired mine up again today and the way it ran today verses the way it ran the day I seasoned it was like night and day.

The season run, I ran the UDS for 5 hours and chased temps all day, probably due to over tending. Also in that run, I managed to burn up dang near 6 pounds of coal.

Today I got the UDS out, put about 7 lumps of royal oak coal in the chimney and let it burn until I could visibly see no more black color. I then poured that in my coal basket with about 7 pounds of the royal oak lump. After a 6 (gestimated) hour burn, I managed to only burn MAYBE a pound of coal. I was completely astonished!

When I poured my coals in the basket and set it in the UDS, I let the heat come up to about 180 and put a cap on a intake and walked off. Came back 15 minutes later and looked and it was at 250. Came back 10 minutes later and it was at, you guessed it, 250!

Throwed the fattys, MOINKS, and Echrich sausages on and let them roll!

Anyone who is reading this and tossing around the idea of building one, toss the idea around no more and do it! You will be as amazed as I was.

I really appreciate each person who posted in this thread and on this site. It has helped me a lot!
 
Bet you can't build just one!

I'll be building another that's for sure. The barrel I have left in the garage is now spoken for. The parts will be here in a few days and it will be built for a friend of mine. He checked mine out yesterday in live action mode and he was sold. After his is done, hopefully I will be able to build my self another one.

As it is now though, everyone that has come over so far wants me to build them one. As soon as I head out to my garage, word spreads and here they come. :biggrin1:
 
What did you cover your intakes with? That's pretty nifty!

I copied advice I found on this site.

I used black pipe nipples, .75 inch I think, in holes cut with hole-saw.

The pipe just screws into the hole but I anchored and sealed with conduit washers, after I burned the galvanizing away with torch, which was likely not necessary.

Black pipe nipple caps cover three of them, the valve takes care of the one.

The valve takes care of the one that comes up to waste level with copper pipe, which is just pushed together, anchored to side with strap and couple small SS bolts.

One covered nibble is barely visible in pic.

I might add that I am glad I used smaller drum. I only smoke for two, but if need arises, I use both grates.

The hole for the chimney was a PIA to cut...took 10 minutes, but that top was a lucky stroke of luck...thermometer probe is near perfect position when installed and squatchin' going, as in second pic from last April...

The SS chimney is near exactly the diameter needed to maintain flow with its area matching the sum of the vents...or close enough it does the job, no creosote smoke after it gets going.

Rarely mess with it once it gets to temp, save messing with valve once in awhile. Usually end up with two vents open, bottom opposite and some degree of valve opened.

Better many vents to begin and later shut, to me.

The chimney may be from Char Broil...forgot, some brand of burner...will send if you call.
 

Attachments

  • DoneUDS.jpg
    DoneUDS.jpg
    62.2 KB · Views: 736
  • Squatchin!stSmoke.jpg
    Squatchin!stSmoke.jpg
    89.4 KB · Views: 735
Last edited:
Finished my UDS, and some red liner advice...

Finally got my drum prepared and Big Poppa Smoker kit assembled! Here she is on the seasoning and first run with some nice TBS! I'll apologize now for not having any food pron! :doh: I was too preoccupied making sure everything was working right on the first run and forgot to get any in-process or final product pictures.

IMG_20131011_105644.jpg


I loaded her up with a mix of mostly RO lump and a little bit of Kingsford Comp. Lit about 12 briqs and a few lump chunks in the chimney and threw those in the basket when they were ready. I didn't have the temp alarm set on the maverick and ended up leaving the vents wide open too long and overshot my target of 225-250°. It reached temp much quicker than I planned and was at 300° after only about 10 or 15 minutes. Perhaps I lit more charcoal than necessary for the lower temps also? I struggled to get it to go much below 280° over the next 6 hours that I ran it. Temps were very solid though, so that was encouraging!

After it ran for a few hours, I threw on a couple fatties. I did one naked with just a rub and did one hot sausage stuffed with pepper jack cheese. Both turned out excellent! I brought them into work and they were pretty well finished off between 5 of us in a matter of maybe 10 minutes tops. Can't wait to do the next run...I'm thinking maybe a nice pork butt.


On a slightly separate note, my drum came used with the "dreaded" red liner in it. It wasn't until after the liner was still intact after a long hot burn that I did some searching and realized the red liner was called the "dreaded" red liner. I tried taking a wire wheel to it post burn, but that didn't do much at all. I did a lot of reading and finally decided I was just going to scrub/wash it down and season over the liner. This is where I made a discovery that may help someone else... I took one of those green and yellow Scotch-Brite pads and some dish soap and started rubbing the inside. Almost immediately the pad and my hand were covered in kind of a thick, almost pasty, dark red, just like the liner. A quick rinse and I was shocked to see that a very quick scrub in the one area had gotten me right down to bare metal!! What the wire wheel hardly touched, the SB pad and Dawn powered right through almost effortlessly! I knew those things were crazy abrasive, but dang! Now perhaps my red liner wasn't as bad as some (it was a "food grade" barrel that was previously filled with chicken broth), but it might at least be worth a shot for someone else with the red liner to try the SB pad and dish soap trick and see if they have any luck. Perhaps it will save someone else a lot of time and effort with a grinder like it did me!
 
jlvhawk, that is 55 gal drum?

Don't use the green pads on glasses...or china, will scratch just about anything.
 
jlvhawk3

I had a temp issue as well meaning my first run the temps came up real fast and it was HARD to get them down. The next run, in my chimney I put about 5 or 6 coals and lit them. The temps came up real slow and I was able to hit target temp on the first try and there she said save a minor valve adjustment here and there.

Nice looking barrel by the way!

Ray

This is what I found as well with my Big Poppa UDS.

My first cook, I lit about 12 coals, and the temps came up a little bit too fast. Next time, I just used 5, and it worked out well for a target of 250.

Perhaps the Big Poppa basket is smaller than some of the typical home made ones, so the charcoal distribution might be promoting the higher temps.

Carl


What is the basket size on the "Big Poppa"?
 
Back
Top