• working on DNS.. links may break temporarily.

My first UDS build

G

gwmercer

Guest
Fellow Brethrens,

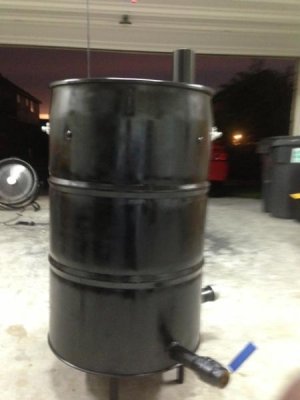
My name is Garrett, and I am glad to be a new member of this site. I am a rookie when it comes to the low and slow art of cooking. After many years of tasting other people's good bbq I decided to go-ahead and start learning myself. So I decided to build my very own UDS Smoker and give it a try. Now I may have done a little over kill on my build but I wanted to see how the smoker would turn out. Well here is what I did...

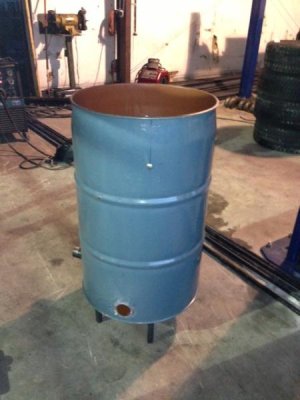
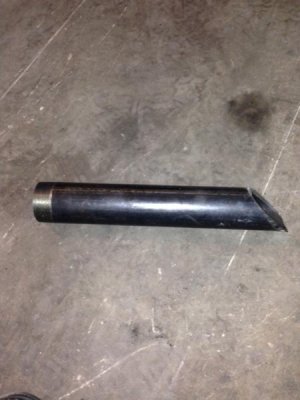
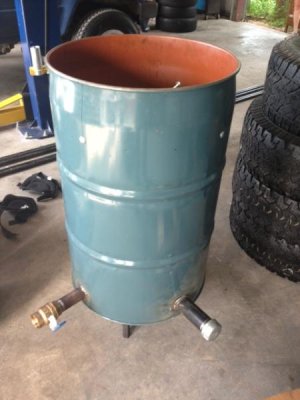
The over kill part I feel was the intake I had a few pieces of 2" sch 40 black pipe that had been threaded. I cut them @ a 45deg angle thinking about air flow lol. Maybe this helped out some or maybe it was a wasted moves...The bad part is it added a weight to it. On my next build I am going to use smaller pipes for intake and turn them up 90deg with a 2 or 3' extension so I will not have to bend over for air adjustment. As of now this pit can build heat up very quickly and it seems to hold a constant temp with little adjustment. This barrel had deiced tomatoes in it and was not concerned about nasty chemicals. I still made 3 very hot burns at or above 500 degrees then seasoned the pit. So this weekend I am going to try a pork butt and see how it turns out. I will post pictures this weekend and see how it turns out.
I look forward to hearing your comments and hope that I can learn from you seasoned vets!
Thanks!!!
 

Attachments

  • uds1.jpg
    uds1.jpg
    31.8 KB · Views: 214
  • uds2.jpg
    uds2.jpg
    33.5 KB · Views: 210
  • uds3.jpg
    uds3.jpg
    32 KB · Views: 210
  • uds4.jpg
    uds4.jpg
    33.1 KB · Views: 211
  • uds5.JPG
    uds5.JPG
    96.1 KB · Views: 209
  • uds6.jpg
    uds6.jpg
    24.4 KB · Views: 213
You should cut the intakes on the inside of the drum, other wise your basket might sit too high.

That also looks like the red liner which needs to be removed. Most people will burn out then sand it until they see metal or get it sand blasted. Good luck on your first cook! And as always post some pics
 
So does the basket sit on top of the extended intakes? If so, they may get clogged up w/ ash unless you have some sort of pan between basket and pipes. If weight is a concern, ditch the pipes (the ones w/o a valve) and replace w/ high heat magnets. They work like a charm and you don't have to worry about weight or the caps rusting onto the pipe (learned this one the hard way!).

Good luck and have fun!
 
Looks like your off to a good start... I too would be concerned about ash cloging those intakes you may wanna consider making them shorter on the inside the drum.. Inless you have a plan for your basket to prevent that
 
You should cut the intakes on the inside of the drum, other wise your basket might sit too high.

That also looks like the red liner which needs to be removed. Most people will burn out then sand it until they see metal or get it sand blasted. Good luck on your first cook! And as always post some pics

The liner was burned out good and sanded. I used my echo blower lol to force air in so I could get the temps up really high. My temp gauge was reading 500 but I am not sure exactly how hot because it was pegged. This was done 3 times at that temp or above.

The basket at first was low but I raised it up to 4" above the pipes. So far no real issue with ash. I have seen other builds where they use a pan on the bottom of thier basket to collct the ash. I might try that next weekend and see what happens.

I have another drum and to build so I am notes taking on your suggestions. Thanks for the replies
 
picture of the basket before the change
 

Attachments

  • photo.jpg
    photo.jpg
    36.7 KB · Views: 147
I'd agree you might want to think twice about the pipes inside the drum......they're really not necessary and I could see them causing ash collection problems, as well as air flow problems when they clog....
 
I just thought of something that might help you with your current intakes. Turn them with the cut angle downward. This should prevent any clogs from ash while keeping you from buying new materials
 
First welcome! Looks like you're off to a good start, but I agree with others the pipes aren't necessary. Not saying they won't work for you either, just may be over complicating a very simple cooker. As for the red liner, seeing that brings back horrible memories for me. Even with multiple burnouts, chemical strippers etc., I still had to spend the better half of a day laying in my drum with a wire wheel on a grinder getting the rest of that chit off. Only reason I mention it is you need to make sure ALL of it is gone, right down to where the sides meet the bottom and everywhere in between. It sucked so bad removing it that if I had to do it over I would source another drum! As for your intake valve you can get some threaded rod and a coupling nut and make an extension to the top of the drum. Just remove the valve handle, get a rod and coupling nut of the same thread and fashion a simple bracket at the top of the drum and bolt the original valve handle at the top end of the rod with two nuts sandwiching the handle in between. Viola, no more bending over. You can do a search for this mod using the search bar at the bottom. It's a great search feature so keep it in mind for any questions you may have.

Stay smokin!
 
I dont know if you guys noticed or not, but they are FULLY welded in. UNless he cuts them, they are pretty much there to stay.
 
I dont know if you guys noticed or not, but they are FULLY welded in. UNless he cuts them, they are pretty much there to stay.

Its all good all the material I already had so no real out of pocket money and I have another drum I'm fixing to build. This next one will be different!
 
I have a pork but on know and will post pics when I get it done. Hope the cook goes well and will not have a ash problem
 
Fwiw, i dont believe it is going to be that much of an issue. and am curious to know how it works, with the o2 being pumped right into the basket.
 
Back
Top