Don't know about the thoughts in the book or how you cooked those last items but I'll hazard a guess that you had a fair amount of wood chunks mixed in with your lump or briquettes. I use lump and will mix in 3 or four 2x3" wood chunks in the entire basket. Plenty smoky for me.Also make sure the drum has gotten up to operating temp, around 250°, and the smoke coming from the stack is of the thin bluish kind as opposed to the thick white variety.

Some kind of a diffuser is also a nice thing to use. It will catch some of the fat resulting in a less smoky taste. Helps even out the temps too!
Smokin' D,

Here's the funny part...I followed Wiviott's directions nearly to a T (yesterday), and that means 6 pieces of wood. Waiting like he says meant a higher initial temp (royal oak lump), but the food was far less smokey and my daughter and her friend scarfed down the fatty while we fought them off.

I am looking into diffusers. I think I'll place something on a new grate I'll mount over the fire basket. Wiviott's Chicken Mojo Criollo was PHENOMENAL!
 
Smokin' D,

Are you the one with all the funky holes drilled in your diffuser plate? Do you have a template for that?
 
Some kind of a diffuser is also a nice thing to use. It will catch some of the fat resulting in a less smoky taste. Helps even out the temps too!

Like Smokin says, I'm becoming a fast favorite of the diffuser! Did two butts last week, and used a 14" pizza pan which fit just right above my basket. (Third time I've used it that way) It seems to take a little longer to cook, but the results are far better for me anyway! :thumb: I do have some holes drilled in it, but definitely not the fancy random ones, or the jet cut ones that are so cool.... I'll get there though!
 

Attachments

  • Smoked Butt.JPG
    Smoked Butt.JPG
    74.1 KB · Views: 943
Smokin' D,

Are you the one with all the funky holes drilled in your diffuser plate? Do you have a template for that?

Yep that is, or those are, my diffuser plates. There is no template, I just drilled random, yet artistically placed holes, smaller and fewer in the middle to larger and more of them toward the outer edge in a cover to a 30 gallon barrel. Used one of those Vari bits in a drill press. Works for me. A friend, CarolinaQue, made up 2 diffusers out of thicker steel for my two barrels. I have yet to see how they do while cooking, but the thicker steel should do a nice job as a thermal mass and they look so wonderfully Medieval I'm sure they will work great. Pics will show up soon.
 
Of Wiviotts and Diffuser plates

OK...I wanted to show the Chicken Mojo Criollo I made on the UDS using Wiviott's Low & Slow directions.

And....I am bringing fatties to a X-mas party tomorrow night. Since we will get 7"-11" of snow tomorrow, I did the fatties tonight. One with pepperjack and the other with 3-blend sharp cheddar and onions.

Any ideas for keeping the fatties string the fatties and warming them tomorrow?
 

Attachments

  • IMGP9869.JPG
    IMGP9869.JPG
    114.9 KB · Views: 899
  • IMGP9868.JPG
    IMGP9868.JPG
    89.7 KB · Views: 891
  • IMGP9867.JPG
    IMGP9867.JPG
    84.9 KB · Views: 888
  • IMGP9853.JPG
    IMGP9853.JPG
    91.5 KB · Views: 891
  • IMGP9852.JPG
    IMGP9852.JPG
    107.9 KB · Views: 902
  • IMGP9851.JPG
    IMGP9851.JPG
    57.3 KB · Views: 887
  • IMGP9850.JPG
    IMGP9850.JPG
    47 KB · Views: 888
  • IMGP9849.JPG
    IMGP9849.JPG
    65.2 KB · Views: 893
I picked up a food grade drum (Apple Juice) last weekend did my first burn on it. It still had some of the red liner left in it so I did a second burn yesterday. Instead of wire brushing it I took it to my step son and he bead blasted the rest of it for me,both inside and out. This morning I took it over to a friend of mine who owns a paint shop. I'm having him powder coat it for me. Only cost me a 12 pack of Red Hook ESB.

100_5076.jpg
[/IMG]
UDSburn2.jpg
 
My Ugly Drum Smoker

Hi all. I have been reading this thread and the one that got me here (http://www.bbqbug.com/forums/general-bbq-grilling/832-our-uds-cooker-how-build-one-part-1-a.html) about building an ugly drum smoker.

I have an offset with firebox (Brinkmann) and once the temps started dipping (New England) getting that cooking chamber to temp was freaking hard. I made several mods, but it just wasn't working out. My buddy bought a big tent-like thing for his and it works well for him to keep him insulated. I was not too eager about doing that, plus, the cheap metal on mine is already deteriorating on the firebox after just 1 solid season of smoking. I could probably punch a hole in it.

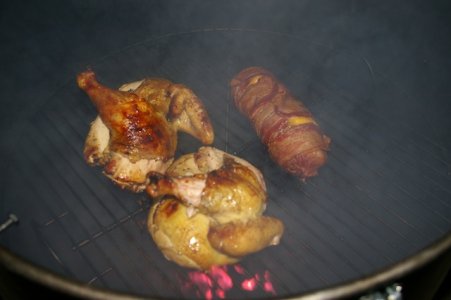
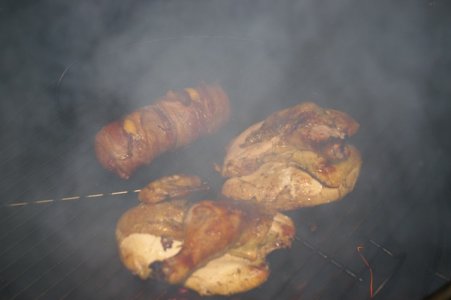
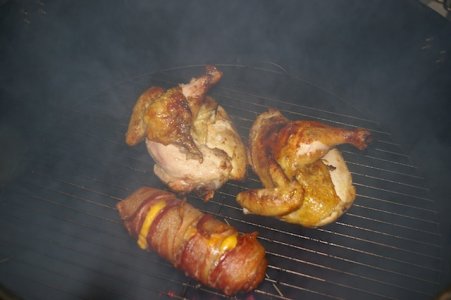
So wanted to try the UDS. So far so good!!!

I followed most of the directions on that site, but made my own theories on changes. I need to study air circulation dynamics, but what I have is pretty good.

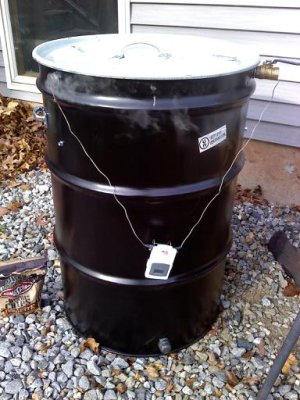
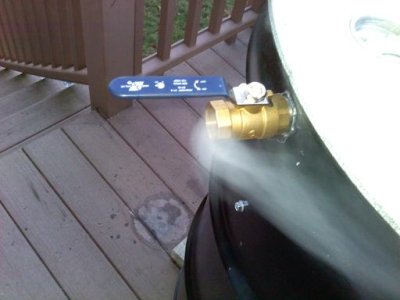
At the bottom, I put in the usual three 3/4 inch holes. I inserted the little nipples :) 
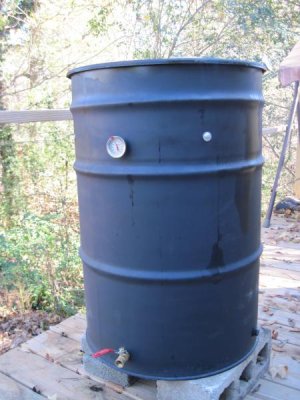
and on one of them put a valve for great accurate intake control. Usually people put some kind of smoke stack on the lid, or drill holes in the lid. I chose to leave the lid intact and do the same thing I did on the bottom but near the top. So I have three 3/4 inch holes with nipples on the side of the barrel just about 1 inch from the top. As you can see in one of the pics below, I also put a vale on one of those.

This has been working.. though I don't know if it's anything related to my specific design. What I was going for is to try to keep the smoke in there longer, keep heat in there, and hopefully keep more moisture.

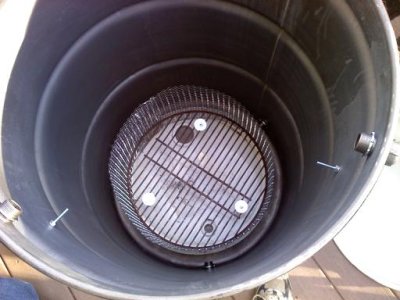
I'm thinking what would happen if I drill more holes right under the grate level... in fact.. maybe even use those nipples for holding the grate instead of separate bolts.... anyway.. curious to see what would happen if I opened the holes at food grate level, and close, or almost close, the holes at the top. I wish I could see how the smoke flows inside.

My attempt at making the air circulate inside was to put the intake port directly on the opposite side of the barrel where the exhaust port is. Point being that if I leave an intake open, I would leave the exhaust on the opposite side open. So.. that would provide a good flow? I don't know.

I read an article about someone making a short mini UDS (http://www.shortypen.com/projects/bbqsmoker/uds/index.htm) and how he explained that he had better flow and temp control by extending the chimney.

I'll post more pics and thoughts as I practice.

I would like to leave with one big question. I read that some people manage to maintain their smoker temps like within 10 degrees for hours! I would like to know how that happens. :) Now, with my UDS temp control is in fact very good.. however there is one catch... it's not exactly where I want it. It's where it wants it. :) I am very happy with the temp control I have, but I don't think I can do better. Maybe it's the fuel? I just use normal grade charcoal (Kingsford, or Stubs brand).
 

Attachments

  • downsized_1210001228.jpg
    downsized_1210001228.jpg
    61.9 KB · Views: 837
  • downsized_1204001607a.jpg
    downsized_1204001607a.jpg
    21.7 KB · Views: 832
  • downsized_1204001437.jpg
    downsized_1204001437.jpg
    31.4 KB · Views: 832
Thought about Powder Coating my next drum... Post a pic when you get it done! Can't be the price you got either!
 
I picked up a food grade drum (Apple Juice) last weekend did my first burn on it. It still had some of the red liner left in it so I did a second burn yesterday. Instead of wire brushing it I took it to my step son and he bead blasted the rest of it for me,both inside and out. This morning I took it over to a friend of mine who owns a paint shop. I'm having him powder coat it for me. Only cost me a 12 pack of Red Hook ESB.

100_5076.jpg
[/IMG]
UDSburn2.jpg

Score!! Great to have family/friends with resources like that! Keep us posted on the progress!
 
help!!
looking 4 local uds for sale or cheep drum food grade
Akron,oh
thanks your brother in bbq
call the summit co, or portage co, recycle centers. They may have a lead on getting a drum. I got mine from a machine shop. It held mineral oil for lubricating the eq. I got mine in Youngstown. If you want to drive the hour.
 
Question-
Who was it that built the UDS upside sown? After cleaning mine this weekend having a removable bottom is a MUST for me! That or find a way to absorb the drippings that miss the coals.

I went on ebay and spotted a 18'' pizza pan but in keeping with the idea of lowest cost I passed on it. Any other ideas?

Used disc blades, co-worker gave me two 18" disc blades for bases in my soon to be UDS. They come in a multitude of sizes, just check with any farmer friends.
 
Question-
Who was it that built the UDS upside sown? After cleaning mine this weekend having a removable bottom is a MUST for me! That or find a way to absorb the drippings that miss the coals.

I went on ebay and spotted a 18'' pizza pan but in keeping with the idea of lowest cost I passed on it. Any other ideas?

Pure clay cat litter sprinkled in the bottom of my uds soaks up all the grease and makes it easy to scoop clean:cool:
 
Pure clay cat litter sprinkled in the bottom of my uds soaks up all the grease and makes it easy to scoop clean:cool:
I built mine upside down, but have never taken the bottom off because all the moisture leaks out, I was thinking I might do it this spring do give the bottom a good cleaning but I probably wont. I think you could just drill a couple 1/4" drain holes and you would be good. I don't think it would affect the way the drum runs.
 
"I would like to leave with one big question. I read that some people manage to maintain their smoker temps like within 10 degrees for hours! I would like to know how that happens. :) Now, with my UDS temp control is in fact very good.. however there is one catch... it's not exactly where I want it. It's where it wants it. :) I am very happy with the temp control I have, but I don't think I can do better. Maybe it's the fuel? I just use normal grade charcoal (Kingsford, or Stubs brand)."

I would say, your air flow is not working the way it should. If you use the KISS method your drum temp would be easier to dial in to what you want it!! Easy way to try it, close your side exhaust vents and open the 2" bung hole for exhaust. Leave it wide open and control your temp with the intake. If you want more smoke flavor add more wood chunks. I don't know what the other sites say to do, this is the best on the net for help with anything Q, hands down, in my opinion. Give the KISS method a try and see if it works for you. People on here have more problems trying to improve what works. Not saying you can't come up with some other design that will work for you.
 
I would say, your air flow is not working the way it should. If you use the KISS method your drum temp would be easier to dial in to what you want it!! Easy way to try it, close your side exhaust vents and open the 2" bung hole for exhaust. Leave it wide open and control your temp with the intake. If you want more smoke flavor add more wood chunks. I don't know what the other sites say to do, this is the best on the net for help with anything Q, hands down, in my opinion. Give the KISS method a try and see if it works for you. People on here have more problems trying to improve what works. Not saying you can't come up with some other design that will work for you.

The thing is actually that I was thinking I was making it SIMPLER than the other designs by drilling 3 of the same type of holes in the side of the barrel. I thought it was harder to remove the bung hole cap (which seems to require a tool I don't have) and then putting a flap on that.

But I will try at least leaving all the top vents open and see if I notice it better. Then maybe I can find something to open this bung hole cap.
 
bung hole and 3 nipples worked pretty good for me. The only issue I had is the lump had to be dry. If it absorbed too much humidity, it was very difficult to get the temp above 220.

bung hole and BBQ Guru is easier (can set it pretty much anywhere from 175 to 400) - but is kind of overkill (but sometimes overkill is a good thing). Not sure if there is a hot spot over the bunghole or not - but can always rotate the lid.
 
Well enough lurking. I've sat thru this entire dog & pony show, and for any other new folks.... any question you could conceive is here, answered, in detail...Likely several times over again.
So, here's my take...
I got my hands on a free drum from work, and after some reading here I got going. KISS... 4 ½" inlets; 2 with valves. Drilled holes in the lid for exhaust, used carriage bolts to hold a single (for now) Weber grate. Made a charcoal basket out of a retired 18" grill grate and expanded steel (also free, sometimes I love my job). After 1 cleaning I made an ash pan out of a cheap grill from the dollar store. After a few cooks I wanted higher capacity, but couldn't source a kettle lid. Refusing to buy one, I came home with another drum from work and partitioned the top 1/3 to extend my drum. Works like a champ, and now I've got room for another grate, or sausage hangers, or.... :becky:
At any rate I wanted to thank the folks here, and share yet another success story.
 

Attachments

  • IMG_1862.jpg
    IMG_1862.jpg
    46.5 KB · Views: 877
  • 02-28-10 013.jpg
    02-28-10 013.jpg
    40.1 KB · Views: 881
Thanks guys. I've only got the seasoning/small cook on the extended version, but it worked just as well as before. Maybe slightly more fuel consumption, but nothing to get worked up about. It ran at 300° for 3 hours, then down to 250° for 5 hours. Still had plenty to burn after I shut it down. Dang I love this thing!
 
Back
Top